Fiskars is a great choice If you need a kindling hatchet for the homestead, cottage, or camping. But Fiskars offers many options, and it’s not always clear what the best choice is.
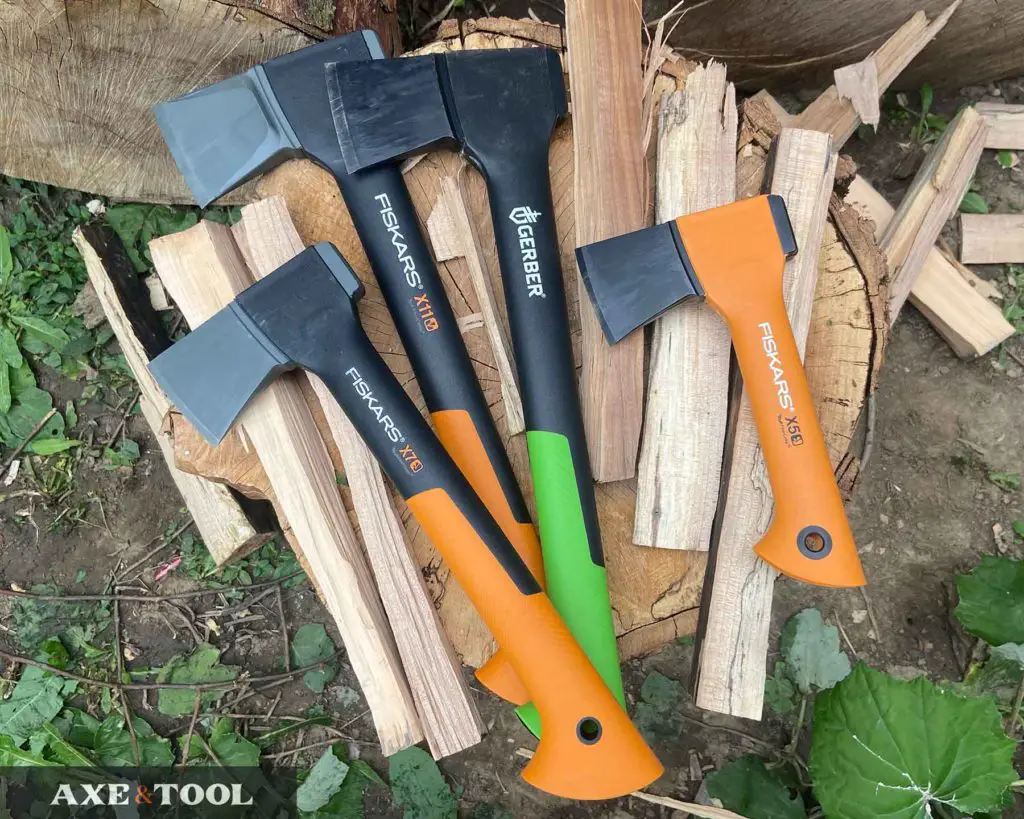
I tested the Fiskars X5, X7, X10, X11 and compared a few alternative versions of these models.
While I think there is a clear winner for a dedicated kindling hatchet, there are some serious alternatives that can do quite a bit more and still be a decent kindling tool.
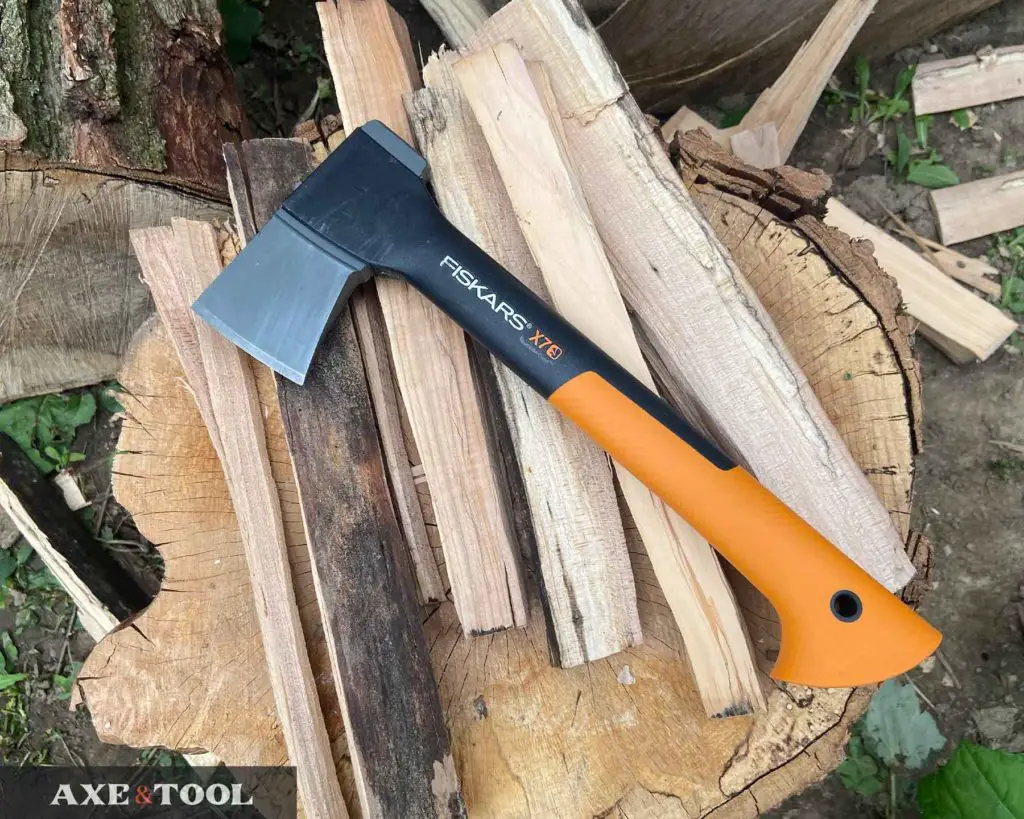
The 14” X7 is the best overall Fiskars hatchet for kindling. The stout wedge pattern head pops wood apart, and the handle is short for close work but long and tough enough to pry twisted grain apart. However, you might consider other models that can handle kindling and also flex into other rolls.
The X7 is small, light, and a great all-around hatchet. It can be handled easily by new and experienced users alike and is surprisingly capable in this role. It can split 4.5-5 inch pieces pretty easily. So you don’t need to worry about which log you start making kindling from.
The X7 head splits well
The wide-angle of the short wedge shape helps pop the grains apart quickly with less penetration than a traditional hatchet. This can mean less power is needed and you can be more accurate.
Longer thinner blades can be better for other tasks but have the potential to stick when splitting vertically.
Fiskars axes also come quite sharp for an inexpensive axe. There is a uniform 30-degree edge that will cut in for smaller tinder, even if the head shape isn’t suited for slicing.
The X7 handle length is perfect for splitting kindling
The tough 14-inch nylon handle is long enough to get leverage and act as a pry bar If you take on a piece of wood that is a little too big or has twisted grain. It won’t be damaged.
The length is also an ideal distance away for kindling, as it’s easy to keep aim and be precise. While its total length is 14” (13.875 to be precise), the last inch gets taken up by the massive hook on the bottom, so it handles like a 13”.
I’m not complaining about the hook – it’s one of the best features of the entire Fiskars line. It keeps your hand locked in the axe.
Making tinder with a Fiskars X7
If you need to get down to the really small stuff (like tinder), you may wish you had a thinner blade. They are sharp enough, but the wide wedge tends to break off strands before you can get them very long. So shaving tinder or making a feather-sticks is a little trickier.
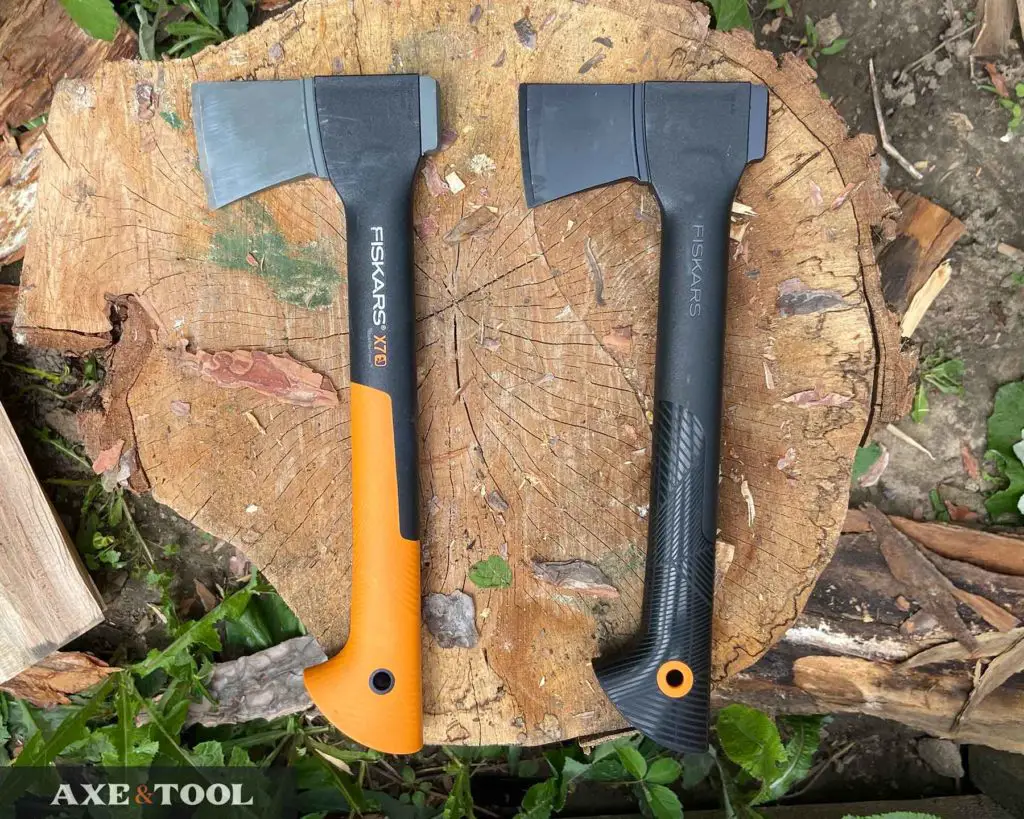
X7 vs 14” Black Chopping Axe
The Fiskars X7 and Black 14” hatchet (A6) are essentially the same hatchets except for the overmold grip on the X7. The head size and performance of these axes are identical but the overmold does improve the grip and perceived vibration.
I would get the X7. I was originally skeptical but the over-mold does make a difference, and the price is almost identical.
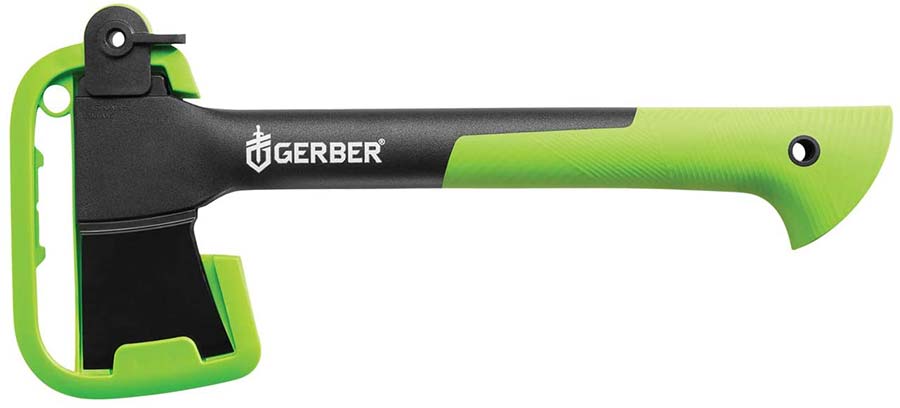
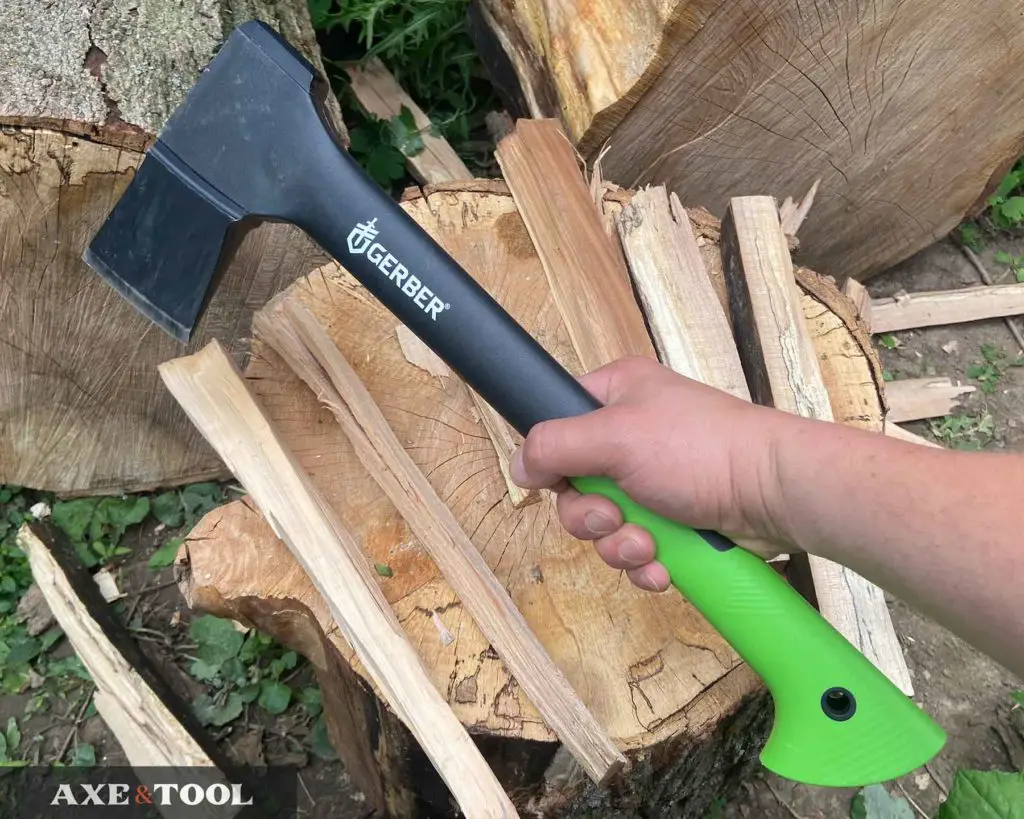
Gerber Freescape 14
Gerber is owned by Fiskars. This is the same axe with a green handle and black blade, BUT the Gerber also comes with a lighter pack-focused sheath for the woods. The X7 can come with the pack sheath, but I’ve found it usually has the older wall hanger sheath.
If you like Green and want to make sure you get the pack sheath I would go Gerber – but be aware it’s often $5-$10 more than the X7. Check the Gerber on amazon.
Fiskars Norden N7 vs X7
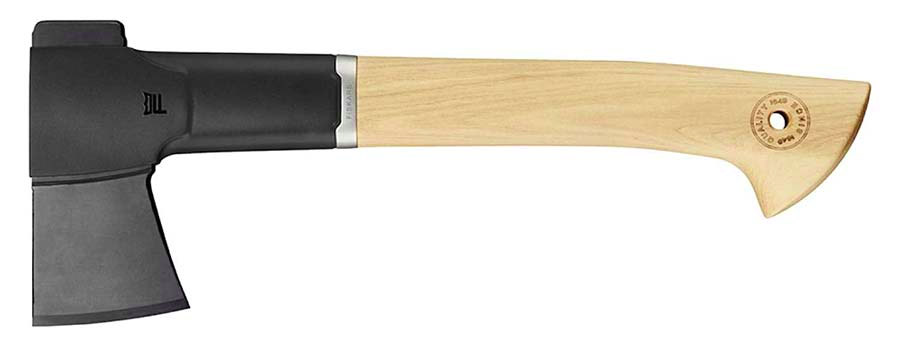
The Fiskars N7 has the same head and overall length as the X7, but it has a hybrid composite/wood handle. The nylon upper handle provides the standard Fiskars durability while the lower handle wood offers a traditional feel in hand.
While I love the feel of a wood handle, the price would make me pick the X7 every time. The X7 is like $40, and the N7 is like $90 (see on amazon). But it offers identical performance and is certainly an option if it speaks to you.
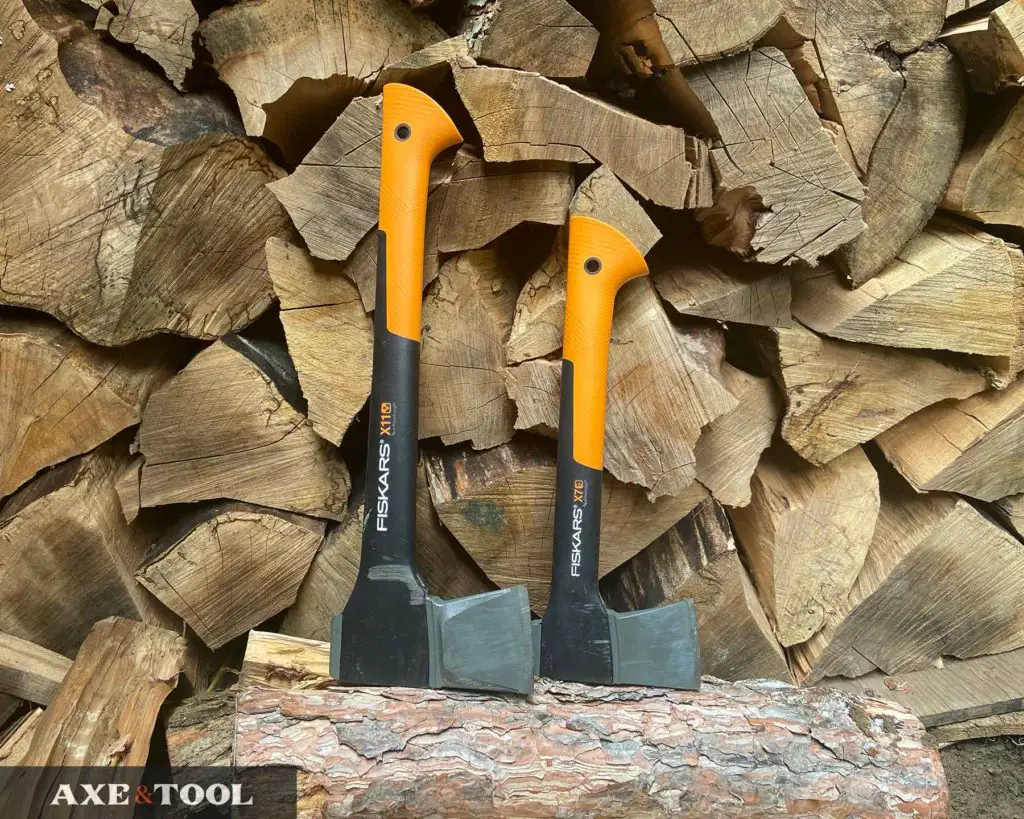
Fiskars X11 is for the woodpile
The X11 should be a serious contender for anyone with a homestead or cottage that keeps and uses a woodpile.
As the smallest Fiskars splitting axe, it’s just shy of 17.5” long with roughly a 2lb flared splitting head. This axe can flex between one-handed use for kindling and two-handed use splitting larger logs. It can go up to about 8″ wide logs.
The extra weight in the head helps split kindling and even tinder. An easy tap will usually get things started. You won’t need big swings to pop small pieces apart.
Why isn’t the X11 my first choice?
Originally, I thought the X11 was going to be a no brainer – but after a summer of testing I found I kept wanting to use the X7.
The X11 is powerful for big swings, but can be awkward working one-handed close up. The larger head can feel clumsy when working with small pieces. Even a light swing is harder to aim than the X7 and the inertia carries much further. It feels a bit like overkill if you are making kindling from typical pieces of pre-cut firewood (at your campsite or fireplace).
It will easily blow through typical kindling size wood and has more potential to be dangerous to less experienced users. The blade could find your other hand or your shins very easily if used incorrectly.
As evidence – I cut my thumb with this axe like a dumbass processing kindling, ONE DAY AFTER I finished this article.
But, if you like the idea of having more power if needed – The X11 worth considering. (See on Amazon).
X10/Gerber Freescape 17.5 for the wilderness
The actual X10 doesn’t seem to be sold in North America, just the Gerber branded Freescape 17.5. These axes are identical (again Gerber is owned by Fiskars).
The X7 is probably the better for basic car camping – where your wood comes pre-cut and you might just need to pop a few pieces apart for kindling. The X10 is more of a forest axe and chopper that can also be a kindling maker.
It’s 17.5” (ish) in length and can be used one or two-handed. The larger head is uniquely longer and thinner than all the other Fiskars axes, making it well suited for the wilderness and bushcraft. It’s a very versatile chopper.
Similar to the X11 it’s a little too big and awkward for a dedicated kindling hatchet. You will often find yourself holding mid-handle and the larger blade feels like overkill for smaller pieces.
So this is a good option if you want a more capable axe for camping, or around the property that can do more serious chopping and kindling. I just wouldn’t pick it for kindling specifically.
This axe can be harder to find in store, since it’s more “Bushcrafty”. I bought mine on Amazon (see here).
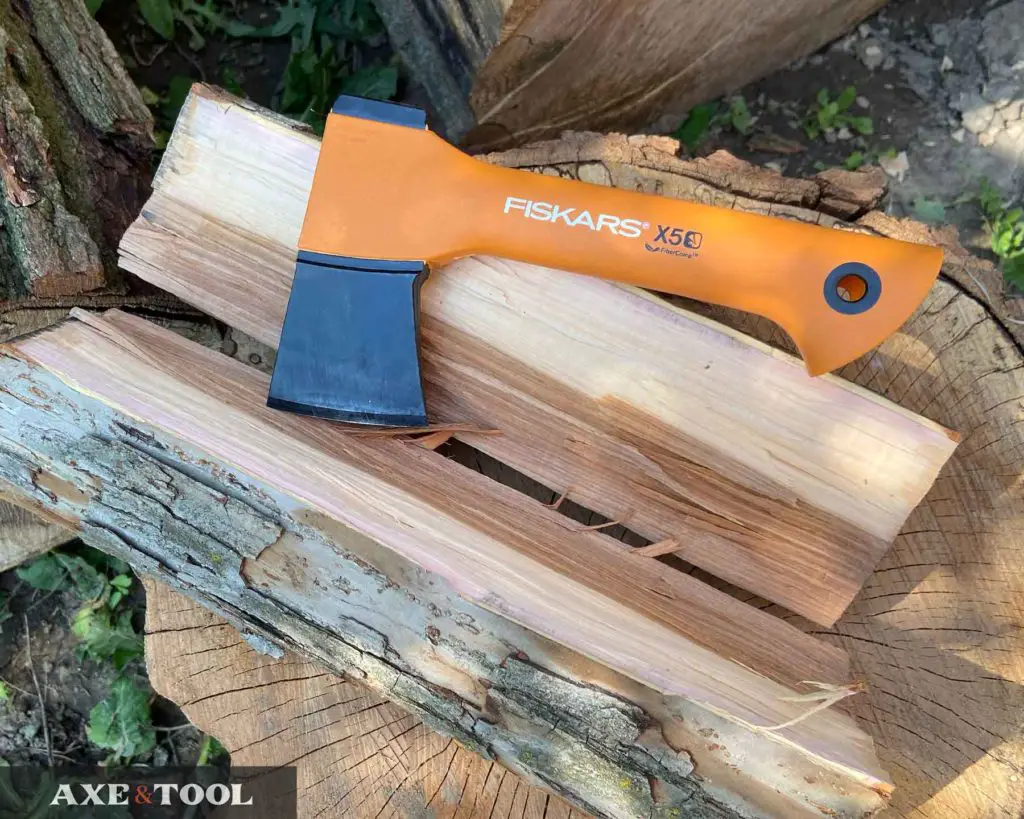
Fiskars X5 pack axe
This little pack hatchet is surprisingly good at splitting too. It uses the same head as the X7, it just has a shorter overall length of 9.5 in. It’s my first choice for backpacking (often even over some of the more expensive options). It only weighs 0.56kg (1.3lbs), which makes it the lightest “real” axe out there. (see my article X5 vs Gerber Pack Axe)
In testing, it was splitting 4-inch pieces of firewood easily, just like the X7. However, there are 2 reasons I would pick an X7 over the X5 if you can take the size:
zzzThe handle is too short to be effective prying wood apart if it doesn’t split fully on the first hit, or if the grain is twisted.
There is always a certain fear for your knuckles when splitting larger pieces. You need to swing hard enough that it would hurt if your aim was off.
The hook at the bottom is smaller than the other models so you can hold that in a half-hand manner and get a little more clearance. But the hollow end of the handle can dig into your palm and isn’t super comfortable for extended use this way.
So if size and weight are the most important factors – then this is a capable little hatchet. But I would go for the X7 if possible.
The X5 can be harder to find, even on amazon (try here). But, there is a black Gerber branded version that is identical to the X5 (it’s made by Fiskars) which can sometimes be easier to find in USA/Canada. Here is the alternate Gerber 9 on amazon.
Avoid the Gerber Gator, which looks like, but is not a Fiskars. Gerber Gator axes are lower quality and made in Thailand).
Future Wyoming grizzly bear hunts — a near certainty if federal authorities approve the state’s petition to again remove the animals’ Endangered Species Act protections — would likely target more than triple the number of bruins than previously proposed hunts, according to a state analysis.
The explosion in anticipated grizzly hunting tags owes to a spike in the bear population — at least on paper.
A handover of jurisdiction from the U.S. Fish and Wildlife Service to Wyoming, Montana and Idaho is not guaranteed, but population data presented in Wyoming’s petition and publicly available federal reports paint a picture of what a grizzly bear hunt could look like.
Using the latest population numbers, from 2021, a hypothetical state-managed grizzly hunt could kill up to 10 females and 29 males in Wyoming’s portion of the tightly managed “demographic monitoring area,” according to Dan Thompson, who leads the large carnivore section of the Wyoming Game and Fish Department.
“That’s an example, based on previous estimates,” Thompson said. “Basically what we’re looking at is an increase in what’s available for harvest and what’s available as far as management flexibility with a more accurate estimate of the population.”
A change in the method of counting grizzlies in the Greater Yellowstone Ecosystem underlies that new population estimate and the resulting change in potential hunting opportunity.
In 2018, during the last era of Wyoming grizzly bear management, the grizzly population was estimated at 714 bears and the state capped its hunt at one female bear and 10 males within the DMA. (Originally Wyoming proposed targeting two female bears, though it was trimmed to one due to an interstate spat about the divvying of grizzly mortality.)
Today, however, managers estimate a population of 1,069 animals, a count biologists say is more accurate, due to an adjustment to how many female grizzlies with cubs are tallied.
Historically, sows and cubs counted aerially within 19 miles of each other were only counted once to avoid double-counting bears. An analysis found this buffer too broad. Since 2021, only sows with cubs detected within 10 miles of each other are excluded to avoid duplication.
Grizzly bears in the Greater Yellowstone Ecosystem could be subject to hunting if the U.S. Fish and Wildlife Service takes action on Wyoming’s petition to delist bears from the Endangered Species Act for the third time. This grizzly would remain protected from hunting where it sits on Yellowstone National Park’s Swan Lake Flats. (National Park Service/Jim Peaco)
The change in how grizzlies are counted, a process known as recalibration, was among the issues U.S. District Court Judge Dana Christensen cited when he rejected the Fish and Wildlife Service’s most recent attempt at grizzly delisting. The worry was that revising the estimate upward without simultaneously adjusting population objectives upward could result in heavy hunting and a smaller number of bears.
Another change in how officials estimate the Yellowstone region’s grizzly population is on horizon. Federal and state biologists are moving toward using an “integrated population model,” which, Thompson said, is “more accurate, basically.” When applied, that new model produces similar numbers to the just-revised population estimate of more than 1,000 grizzlies in the monitoring area, he said.
Thirty nine grizzlies — 29 males and 10 females — is not the upper limit of what Wyoming could hunt, were a hunt to occur. An untold number of additional bruins could be targeted outside the 19,278-square-mile DMA.
In 2018, Wyoming sought to target another dozen grizzly bears on the fringes of the ecosystem where there were no federal restrictions. All told, the state’s planned hunt that year could have knocked down its population by 23 bears, but the selected trophy game hunters never got the chance — Christensen declared an injunction stopping the hunt, then later he directed federal managers to relist the species as threatened under the ESA.
Wyoming hasn’t signaled what grizzly hunting might look like outside the monitoring area at the Yellowstone region’s core if the state reassumes control. Last time, the peripheral hunt was pitched as a tool to drive down the population, mimicking the structure of the state’s two-tiered wolf management regime, which keeps wolf numbers outside of the Greater Yellowstone Ecosystem as low as possible.
“To be responsible, we’d still have limits in place,” Thompson said of hunting the outskirts of grizzly range. “But we could potentially use harvests in a heavier fashion outside the DMA.”
If Wyoming’s coming grizzly hunting seasons mirror 2018’s planned-and-foiled hunt, with a roughly 1-to-1 ratio of bears targeted in each of the two zones, about 80 grizzlies could be taken statewide.
Grizzly range has been stretching outwards at roughly 12,400 square miles per decade since the population lowpoint in the 1970s, though it’s slowed somewhat of late, Interagency Grizzly Bear Study Team leader Frank van Manen said. At last estimate, occupied grizzly range encompassed more than 27,200 square miles — 40% of which fell outside of the monitoring area. Population densities are lower on the outskirts, but there’s really no saying how many grizzlies, which tend to be young males, exist in places like the southern Wyoming Range, eastern Owl Creek Mountains and the plains of the Bighorn Basin.
Mortality math
“I wish we had the resources to do that,” van Manen said of counting peripheral grizzlies. “But we made a decision in 2012 to restrict [the count] to the demographic monitoring area.”
Grizzlies killed outside the monitoring area aren’t counted toward mortality caps included in tri-state pacts that outline cooperative management of the region’s grizzly bears. And so the operative number van Manen sees when looking at the effects of a hypothetical Wyoming hunt is 39 bears.
“This would, I think, represent a fairly conservative approach,” he said. “These numbers of added mortality would not have any huge effect on the population, positive or negative.”
Federally protected grizzly bears have steadily increased their range, in green, over the past four decades. Based on the latest population data and plans, Wyoming could hunt up to 39 grizzlies inside the blue line and an unlimited number of animals outside that area. (Interagency Grizzly Bear Study Team)
If delisting proceeds, Montana and Idaho could hunt grizzly bears, too. The overall number of grizzlies that could be hunted in the DMA throughout the whole ecosystem is 69, Thompson said, breaking down to 51 males and 18 females. Wyoming is allocated more than half of that sum because the majority of grizzly range falls in state bounds.
Hunting down 69 of the 1,069 grizzlies in the Yellowstone region would work toward the three states’ goal of reducing the population to 932 animals — the average from 2002 to 2019. There’d be other thresholds. If the population dipped below 831 bears, hunting within the monitoring area would be “suspended,” according to Wyoming’s petition. If grizzly numbers were to hover between 600 and 831, the states and tribes would retain “full management authority,” though with an absence of hunting. Below 600 grizzlies and all so-called “discretionary mortality” would also cease except to protect human safety.
These parameters were compelling to the Fish and Wildlife Service. In early February the agency announced it found Wyoming’s petition favorable and that it would examine whether to surrender jurisdiction to the states. The next step in the process is a “comprehensive status review” of Greater Yellowstone Ecosystem grizzlies, which is supposed to be completed within a year of a petition being filed but often takes much longer.
There’d be more bureaucratic steps prescribed by the Endangered Species Act after that: a proposed delisting rule and final rule.
Round three
The state of Wyoming would have its own process for setting up a hunt if federal delisting proceeds.
“It’s not up to me,” Game and Fish’s Thompson said. “It’d be up to the commission whether we move forward with a hunting season. I would envision the same process as before.”
Ahead of its planned 2018 grizzly hunt, state biologists traveled Wyoming and held a series of meetings to vet the idea. There were geographic splits in reception. Residents of Jackson Hole, home to several celebrity grizzly bears, were leery of hunting, leading to a no-hunting buffer zone that ran up the east side of Grand Teton National Park. The appetite for grizzly hunting elsewhere in Wyoming was greater.
Grizzly 399 sizes up the Snake River before a crossing in May 2022. The celebrity of bears like Grizzly 399 has exacerbated tensions about the prospect of grizzly hunting. (Mike Koshmrl/WyoFile)
Grizzly hunting in the Lower 48 ceased in the 1970s, when Ursus arctos horribilis became one of the first species protected by the Endangered Species Act. At the population’s nadir a half-century ago, grizzlies were rarely seen outside of Yellowstone National Park and fell to as few as 136 bears. Numbers grew steadily for decades afterward and have long met initial recovery goals for the ecosystem.
Still, a debate rages whether it’s appropriate to use hunting to drive down isolated populations of grizzly bears that have persisted, like those in the Yellowstone region. There are only 2,000 to 3,000 Lower 48 grizzlies on the landscape today, down from an estimate of 50,000 bears believed to exist before the western settlement era.
Advocacy groups are still sorting out their positions on the states’ third go at gaining jurisdiction over their grizzlies. That’s the case for the Greater Yellowstone Coalition, which opposed the first delisting attempt, but didn’t oppose the idea the second time. Craig Benjamin, the group’s conservation director, said it’s “premature” to take a position on the next delisting attempt, though some views of state management are already settled.
“We’ve made it clear that we oppose hunting of grizzly bears,” Benjamin said. “We don’t see a biological or wildlife management reason to do it, given all of the mortality that already occurs.”
Of course, it’s up to federal wildlife officials whether Wyoming and its neighboring Northern Rockies states get a chance to manage and hunt their resident grizzly bears.
The U.S. Fish and Wildlife Service declined an interview for this story.
Decisions, decisions
Rob Wallace, who oversaw the Fish and Wildlife Service for the Trump administration’s Interior Department, said that ideally the decision will be driven by the federal agency’s career professionals who know the species best. But, “whether we like it or not,” he said, there’s undeniably a political dimension to the grizzly delisting decision.
“I’m sure the career people are going to tell this administration, as they told our administration, that the bear has recovered,” said Wallace, a Teton Village resident. “They’re going to also try to understand what the states of Montana and Idaho and Wyoming are going to do if the bear’s delisted. And if they think there’s going to be a shooting arcade on the border of the parks, that’s going to affect their decision.”
… if they think there’s going to be a shooting arcade on the border of the parks, that’s going to affect their decision.”
Rob Wallace
Other variables that could stymie delisting and prevent grizzly bear hunting are out of Wyoming’s control. Endangered Species Act case law precedent is such that a “distinct population segment” of a species, like the grizzlies of the Greater Yellowstone Ecosystem, cannot be delisted along state lines, said David Willms, an attorney and former policy advisor to Gov. Matt Mead who teaches an ESA course at the University of Wyoming. In other words, Wyoming’s delisting petition — if it’s successful — would also give Montana and Idaho the opportunity to manage and hunt their grizzlies. And whether delisting is successful also hinges on plans Idaho and Montana put in place.
“There’s no path to delisting without the Fish and Wildlife Service working with all three states, and with all three states working together,” Willms said.
Idaho’s grizzly bear petition called for delisting throughout the Lower 48 states, but lacked “substantial, credible information,” and was dismissed by the Fish and Wildlife Service.
Hunting grizzly bears in Wyoming. (Frank Leslie’s Illustrated Newspaper 1844)
Montana’s petition, meanwhile, was found favorably, triggering a separate “comprehensive status review” for its Northern Continental Divide population of grizzlies. But recent laws passed by the Montana Legislature could jeopardize Wyoming’s chances of managing and hunting its grizzly bears.
In a February 2024 letter, U.S. Fish and Wildlife Service Director Martha Williams warned Montana Fish, Wildlife and Parks Director Hank Worsech that his legislature flouted the Endangered Species Act by passing a measure that legalized killing grizzlies caught preying on livestock. She also cited several other “concerning” policies, such as allowing wolf snaring and trapping and the use of dogs to pursue black bears in occupied grizzly bear range.
“The current 2024 Montana legislative session presents a good opportunity to address these issues,” Williams wrote.
The Montana Legislature, which meets every other year, will complete its session in mid-May.
Willms sees similarities to what unfolded when wolves came off the ESA in the Northern Rockies more than a decade ago. Wyoming, insistent on classifying wolves as unprotected predators in 85% of the state, slowed down the whole show, he said.
“Depending on what Montana does here,” Willms said, “Montana could be to grizzly bears what Wyoming was to wolves.”
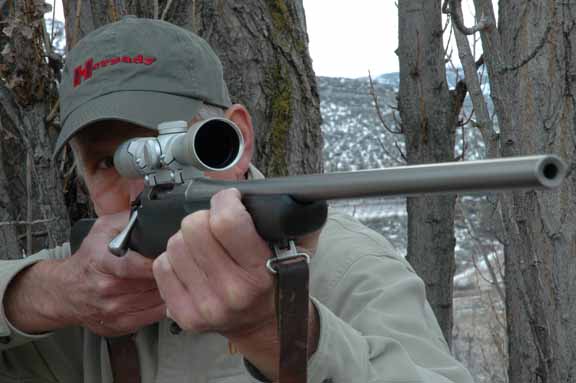
The Tikka T3 Lite is a svelte, accurate rifle perfect for those who cover a lot of ground when they hunt.
One of the most appealing new Tikkas, a T3 Lite, weights in at just 6 ¼ pounds — as lightweight as seems useful to me. Less heft and the rifle bounces like a clothesline in the wind. When you’re puffing after a climb or must curb the effects of pulse to shoot far, rifle mass is your friend. It helps mitigate recoil, too. A sling and scope quickly bring six-pound rifles to seven. A full magazine adds ounces. Occasionally I’ve wished for more. But after long hours on the trail, I’ll take 7.5.
Then T3 has a two-lug bolt with a 70-degree lift and disassembles quickly by hand into four major components. Its recessed face has a plunger ejector and a Sako extractor.
The T3’s receiver is slim but stiff due to a small ejection port. Rails machined into the receiver’s roof accept 17mm clamp rings, but the rifle is also drilled and tapped. The recoil lug is a steel insert in the stock that engages a slot in the action.
While early Tikka bolt rifles came in two action lengths, the T3 is built on one, with two bolt stops for different cartridge lengths. Single-stack three-shot magazines are of lightweight polymer. They can be loaded only when out of the rifle. You can buy deep boxes that hold more cartridges. A flush magazine latch is out of the way in front of the well.
The stock (walnut or synthetic) has a long grip and a comfortable pitch. It comes with spacers to lengthen the butt. Shadow ridges on the fore-end, with raised rubber-like panels there and on the grip, help you grasp the rifle with wet or cold hands. Deep fluting at the comb nose welcomes the heel of your hand. The stock doesn’t contact the hammer-forged barrel. A steel stock insert engaging a slot in the receiver serves as recoil lug.
Trigger pull on Tikka’s T3 adjusts from two to four pounds. The test rifle’s came in at 3.5. The trigger guard is the only alloy component on a T3 action; all others are of steel, save the polymer magazine and bolt shroud. A red cocking indicator protrudes from the striker race. A two-position safety locks bolt and trigger. The bolt shank is the right length for me, just long enough for easy cycling from the shoulder. The hollow, pear-shaped knob is gracefully curved and easy to grasp.
I’ve several Tikka’s, and all but a .270 WSM printed groups inside a minute of angle. The T3 Lite I tested for this article shot 140-grain Winchester AccuBonds into a 0.4-inch group, and with four of five additional loads I got 0.7-inch groups — and all loads shot well inside the 11/2-inch standard I impose on bolt-action hunting rifles. Indeed, the average best-group measure for this T3 was just half that.
Overall, the T3 Lite is technically excellent, it has a gunny feel that can’t be described but as certainly cannot be faked. The bolt glides. The trigger breaks consistently, although at 3.5 pounds it tested my control. Cartridges cycle without bumps. Shut your eyes, cheek a T3 Lite, and when you look through the scope, I suspect you’ll find the crosswire on target. Still, the Lite puts spring in your step after long days afield.
No, it’s not perfect. The safety is hard to feel with a mittened thumb. And I’d like an adjustment for sear engagement. But those changes would add expense to an affordable rifle that’s already accurate, nimble in the hand and easy to shoot well from hunting positions.
Want a lively, lightweight rifle with killer looks and Crisco-smooth cycling? One with dime-tight accuracy and a trigger that brings out the best in you? It’s here, from Finland.
Fast Specs
Type: bolt action centerfire; 2 locking lugs, Sako-style extractor, plunger ejector.Caliber: 7mm Rem. Mag. (tested), .300 Win. Mag., .338 Win. Mag.Feed System: 3-round single-column detachable polymer box magazineBarrel: 24 in. sporter-weight, hammer-forged; 1:9½ twist.Weight: 6 lbs. 6 oz.Stock: black fiberglass-reinforced polymer with rubber buttpad.Metal: brushed stainless (tested), blue chrome-molyFire control: adjustable steel trigger (3.5 pounds as tested); two-position safety locks boltSights: none; receiver grooved and drilledPrice: $659Distributor: Beretta USA
Accuracy Results
Smallest group: 140 gr. Winchester AccuBond — 0.4 in.Largest group: (tie) 140 gr. Remington CoreLokt Ultra, 165 gr. Federal Sierra GameKing — 1.1 in.Due to challenging range conditions, author submitted only the best of three-shot groups at 100 yards.
Caption 1: The Tikka T3 Lite is a svelte, accurate rifle perfect for those who cover a lot of ground when they hunt.
Caption 2: The Tikka T3 feeds from a single-column polymer magazine and operated without a hitch.
Caption 3: The two-lug bolt offers a 70-degree lift and features a Sako-style extractor.
Caption 4: Like most Tikkas, the T3 Lite demonstrated excellent accuracy.
Trying to decide between the .30-06 Springfield and 7mm Remington Magnum cartridges? Here’s what you need to know about them.
I think most hunters would agree that the 7mm Remington Magnum and .30-06 Springfield are both fantastic cartridges for hunting a wide variety of big game. Both offer certain advantages to hunters, but there are some significant differences between the 7mm Rem Mag vs 30-06 cartridges you should be aware of.
Unfortunately, important details about the cartridges sometimes get overlooked or simply lost in the shuffle. With that in mind, it’s easy to see how many people get confused about the strengths and weaknesses of the .30-06 Springfield and 7mm Remington Magnum, particularly when discussing which cartridge is best for hunting particular animals under specific conditions.
In this article, I’m going to do a detailed comparison of the 7mm Rem Mag vs 30-06 Springfield in order to show the differences between those cartridges so you can make an informed decision on which one will work best for you.
Before we get started, I have two administrative notes:
Some of the links below are affiliate links. This means I will earn a small commission (at no extra cost to you) if you make a purchase. This helps support the blog and allows me to continue to create free content that’s useful to hunters like yourself. Thanks for your support.
Additionally, I recorded an entire podcast episode on this exact subject. If you’d rather listen than read, click the appropriate link below to listen to this episode on your preferred podcasting service.
Be sure to hit that “Subscribe” button in your podcast player!
30-06 vs 7mm Rem Mag Podcast
Apple | Google | iHeart | Spotify | Stitcher
History Of The .30-06 Springfield and 7mm Remington Magnum
Still smarting from a sobering lesson regarding the effectiveness of the 7mm Mauser in the hands of Spanish troops in Cuba in 1898, the U.S. Army decided it needed a new cartridge to replace the .30-40 Krag and .45-70 Government cartridges used by American Soldiers in the Spanish American War.
Specifically, they wanted a new service rifle that could compete with the revolutionary new Mauser rifle. Among other things, they were looking for a new bolt-action rifle designed from the start with a stronger action capable of safely firing more powerful smokeless ammunition, that could be quickly loaded with 5-round stripper clips, and with a “claw” extractor for more reliable feeding and extraction.
In the end, the new 1903 Springfield was modeled heavily on (some might say copied) the 1893 Spanish Mauser rifle. They originally chambered the new rifle in the .30-03 Springfield cartridge, which fired a 220gr round nosed bullet at approximately 2,300fps. While the .30-03 did provide a modest improvement in performance over the .30-40 Krag, the Army still wasn’t completely happy with the performance of the cartridge.
For this reason, they made a few tweaks to the design of the .30-03 Springfield. Switching over to a revolutionary new 150gr “spitzer” (pointed) bullet fired at a muzzle velocity of 2,700 fps gave them the results they were looking for.
Named after the year it was formally introduced, the .30-06 Springfield was a significant improvement over previous military cartridges used during that era.
In addition to extensive use with the U.S. military, the .30-06 Springfield cartridge also rapidly caught on with the big game hunting and shooting communities in the United States during the early 20th Century.
The old .30-06 remains one of the most popular centerfire rifle cartridges in the United States (as well as many other parts of the world) to this day. Not surprisingly, the .30-06 has also served as the parent for many other cartridges (like the .25-06 Remington and .35 Whelen).
The .30-06 Springfield has also long been the standard against which new centerfire rifle cartridges are measured against in the United States.
Now let’s fast forward a couple decades from the introduction of the .30-06.
The years following World War II were a true renaissance of civilian firearm and cartridge development in the United States. That time period saw a flood of new centerfire rifle cartridges like the .223 Remington, .280 Remington, and .308 Winchester.
That same general time period also saw the start of “Magnum Era” when Winchester introduced a line of new belted magnum cartridges that utilized a modified .375 H&H case. The .458 Winchester Magnum came along first in 1956 and was quickly followed by the .338 Winchester Magnum and the .264 Winchester Magnum during the next couple of years.
All of those cartridges utilized a .375 H&H Magnum case necked down (or up, in the case of the .458 Win Mag) and shortened from 2.85″ to 2.5″ long. The designers used those shortened cases so all three cartridges would fit in a standard length rifle action (same as the .30-06 Springfield) instead of the longer magnum length action required by the original .375 H&H cartridge.
Remington took a page out of Winchester’s playbook and rolled out their own belted magnum cartridge in 1962: the 7mm Remington Magnum.
Often referred to as the 7mm Rem Mag, 7mm RM, or 7mm Mag, the new Remington cartridge also used a shortened .375 H&H Magnum case. Instead of using .264″, .338″, .458″, and later .308″ bullets like Winchester did with their magnums, Remington loaded their new cartridge with .284″ bullets.
The use of the larger case based on the .375 H&H along with the use of 7mm/.284″ bullets by the 7mm Remington Magnum resulted in a significant ballistic improvement over the .30-06.
Indeed, the 7mm Mag is capable of shooting the same weight bullet faster than the .30-06.
Additionally, the smaller diameter .284″ bullets the 7mm Mag uses have a higher ballistic coefficient and more sectional density than .30 caliber bullets of the same weight used by the .30-06 Springfield (when comparing bullets of similar construction).
For those reasons, typical 7mm Rem Mag loads have a flatter trajectory, more energy remaining downrange, and (all other things equal) will penetrate better than .30-06 Springfield loads using the same weight bullets.
The new 7mm Remington Magnum cartridge also fit in a standard length rifle action. And to top it all off, the 7mm Remington Magnum was rolled out at the same time as the now legendary Remington Model 700 rifle.
So, American hunters and shooters were immediately offered the chance to use a new high performance cartridge that was available in a well built, reasonably priced, and very accurate new rifle.
With all that in mind, it’s not surprising at all that the flat shooting and hard hitting 7mm Rem Mag quickly caught on with hunters and shooters in North America.
30-06 vs 7mm Rem Mag: Cartridge Sizes
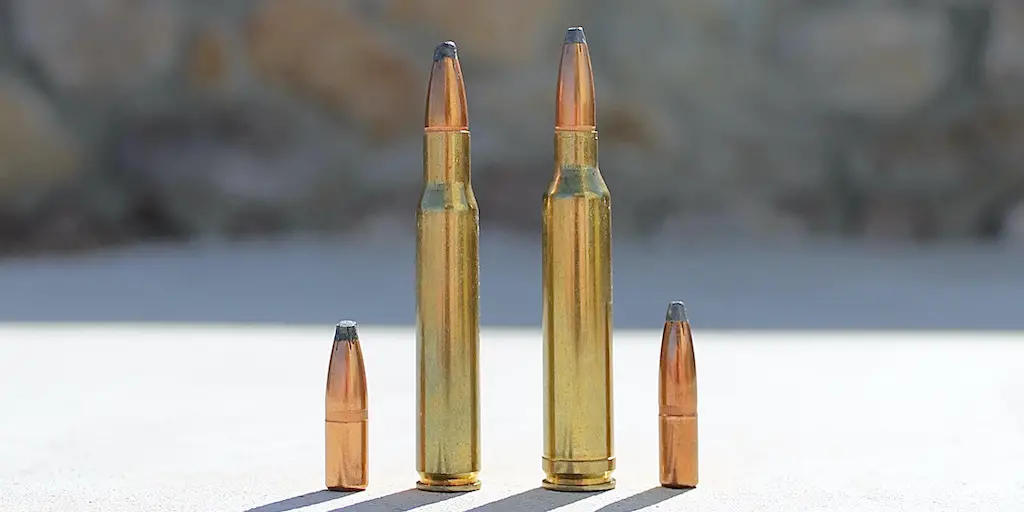
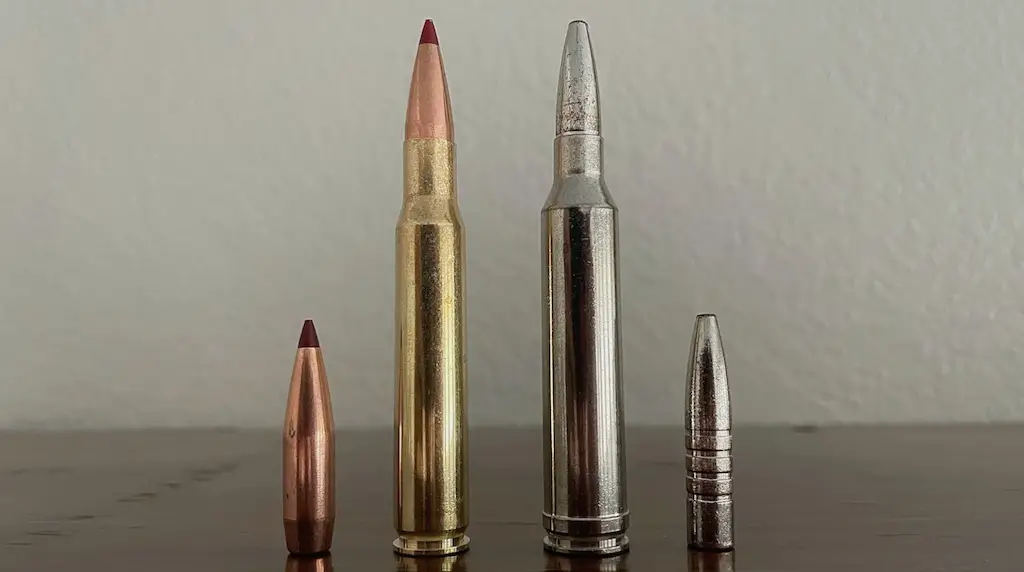
You can see differences between the .30-06 Springfield and the 7mm Remington Magnum in the photos below.
First, the 7mm Rem Mag is physically a little larger than the .30-06.
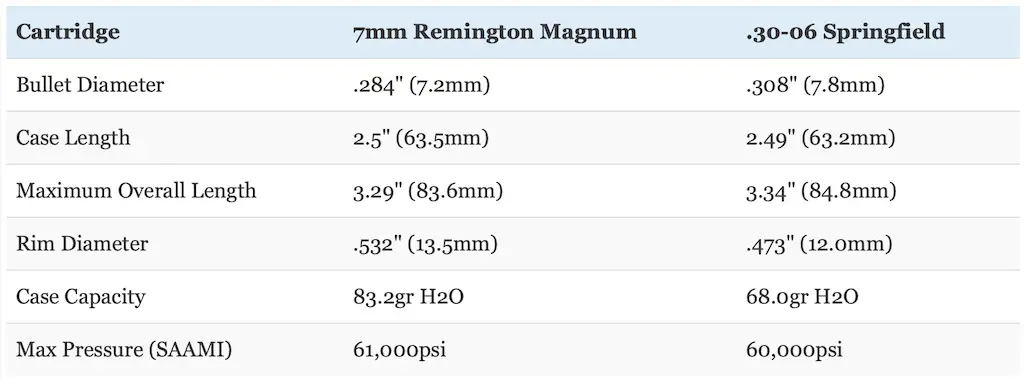
While the .30-06 has a slightly greater maximum authorized overall length (3.34″ vs 3.29″), they are close enough in size that both cartridges are used in standard/long-action rifles. However, the 7mm Remington Magnum has a larger .532″ rim diameter while the .30-06 has a .473″ rim diameter.
At the same time, the 7mm Rem Mag has a steeper 25 degree shoulder (the .30-06 has a 17.5 degree shoulder) that also sits a tiny bit further forward than the shoulder of the .30-06.
The end result is that the 7mm Rem Mag has a much larger case capacity than the .30-06.
Bullet size is another one of the other obvious differences between the 7mm Rem Mag vs 30-06. Each cartridge uses different diameter bullets: .284″ for the Remington cartridge and .308″ for the Springfield.
Everything else being equal, the smaller diameter 7mm bullets have a higher ballistic coefficient and a higher sectional density than the larger diameter bullets of the same weight from the .30-06 Springfield. However, the .30-06 generally uses heavier bullets than the 7mm Remington Magnum.
The vast majority of 7mm Rem Mag factory loads shoot bullets in the 139-175 grain range. Of these, 140 grain, 150 grain, 160 grain, and 175 grain loads are by far the most common.
On the other hand, though it’s possible to find .30-06 ammo shooting bullets weighing as little as 110 grains and as heavy as 220 grains, most .30-06 Springfield factory loads use 150 grain, 165 grain, 180 grain, or 200 grain bullets.
The 7mm Remington Magnum is also loaded to a higher pressure than the .30-06 (61,000psi vs 60,000psi).
Note: while the powder capacity figures listed below do give a good indication of the differences between the two cartridges, exact case capacities vary slightly according to the brand of brass used.
30-06 vs 7mm Rem Mag Ballistics
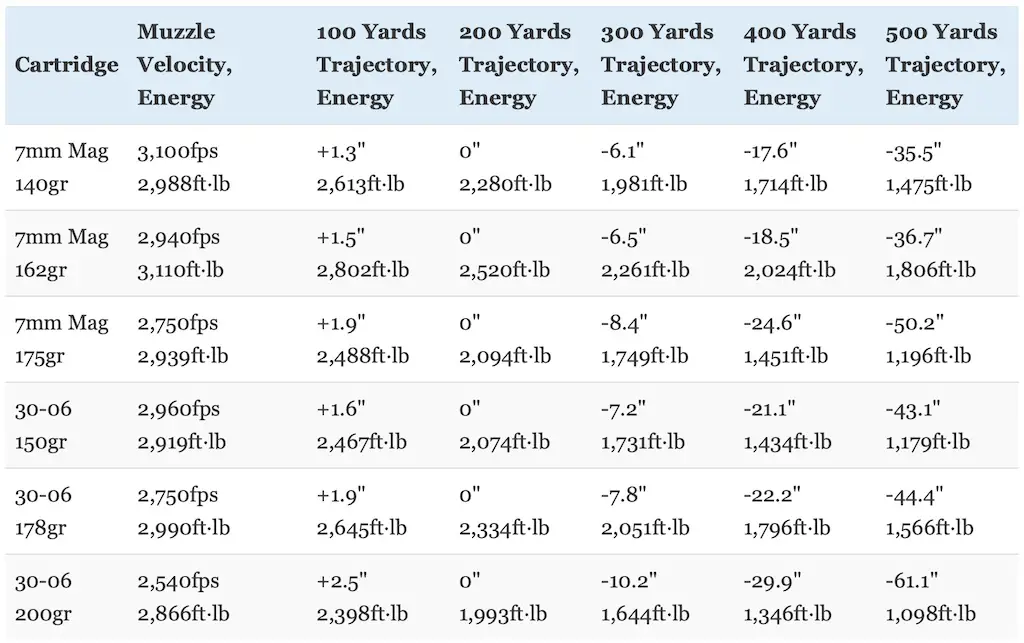
Not surprisingly, the differences in the external dimensions of the 7mm Remington Magnum and the .30-06 Springfield translate into some pretty significant differences in their ballistic performance. This is illustrated in the table below comparing Hornady Precision Hunter, Federal Premium Trophy Bonded Bear Claw, and Winchester Deer Season XP factory ammunition.
I chose those particular factory loads because they provide a good demonstration of the performance of each cartridge when using wide spectrum of different bullets. The Winchester loads use light for caliber bullets, the Federal loads use very heavy for caliber bullets, and the Hornady loads use heavy for caliber, exceptionally aerodynamic bullets for each cartridge.
Specifically, the 7mm Remington Magnum loads use a 140gr Extreme Point (.484 BC), a 162gr ELD-X (.631 BC), and a 175gr Trophy Bonded Bear Claw (.407 BC). The .30-06 loads use a 150gr Extreme Point (.392 BC), a 178gr ELD-X (.552 BC), and a 200gr Trophy Bonded Bear Claw (.395 BC).
Note that the bullets used by 7mm Remington Magnum in each load are more aerodynamic than those used by the .30-06 Springfield for the exact same load. More on this in a minute.
All six loads used a 200 yard zero.
As you can see, the 7mm Remington Magnum has a flatter trajectory and more kinetic energy than comparable .30-06 Springfield loads at all ranges. Additionally, since it uses more aerodynamic bullets with a higher ballistic coefficient, that gap in performance grows in favor of the 7mm Mag as range increases.
Specifically, the 7mm Rem Mag has about 2-4% more muzzle energy than the .30-06 with these three particular loads. That turns into a 9-25% advantage in favor of 7mm Rem Mag at 500 yards.
At 500 yards, the various .30-06 loads have about 7-10″ (~20%) more bullet drop than comparable 7mm Rem Mag loads.
We’ll talk more about those numbers and what they mean in a minute.
The chart below compares how much a 10 mile per hour crosswind impacts those same 7mm Rem Mag and .30-06 loads out to 500 yards.
As you can see, the 7mm Remington Magnum also has a big advantage in this area as well. That makes sense since the cartridge is shooting more aerodynamic bullets at a higher velocity.
The exact details vary by load of course. Once again though, the gap in performance increases with range in favor of the 7mm Remington Magnum.
Update 25 July 2022:
What about the 175gr TBBC vs 178gr ELD-X?
I’ve received a number of questions and comments regarding the fact that the 178gr ELD-X load from the 30-06 has a flatter trajectory and more retained energy than the 175gr 7mm Trophy Bonded Bear Claw.
Those two bullets are closest in weight, so comparing those two loads is the best comparison of those cartridges, right?
Absolutely not.
Take a look at the photo below (178gr .30 cal ELD-X on the left and 175gr 7mm TBBC on the right) and the reasons why should be obvious.
For a detailed discussion on this exact subject (to include why it’s NOT appropriate to compare different bullets of the same or similar weight), check out this post on Patreon.
Moving on, let’s talk about recoil.
The table below compares the recoil produced by the handloads that approximate the performance of the Hornady Precision Hunter factory load above for each cartridge when fired from identical 8 pound rifles.
Felt recoil will vary from shooter to shooter and rifle to rifle, but free recoil energy is still a useful way to compare cartridges.
As you can see, the 7mm Remington Magnum has slightly more recoil than the .30-06. In this case, the 7mm Rem Mag produces 7.5% more free recoil energy than the .30-06.
That should not be surprising at all. After all, the 7mm Rem Mag is a heavy hitting belted magnum that burns a lot more powder and produces higher velocities.
Basically, the 7mm Rem Mag should be expected to hit a little harder on both ends, which is exactly the case.
This can be mitigated to a certain extent with the use of a suppressor, muzzle brake, or a good recoil pad. So the extra recoil of the 7mm Rem Mag isn’t necessarily a deal breaker for many people, especially since it only recoils a little more than the .30-06. All things considered, the 7mm Remington Magnum is one of the more lighter recoiling magnums (particularly when compared to the .300 Win Mag or .338 Win Mag).
Recoil is certainly worth considering though. If we’re being honest, neither cartridge is really suitable for hunters or shooters who are very sensitive to recoil.
Don’t underestimate the impact that recoil has on the ability of a person to shoot accurately either. Some people do handle recoil better than others, but all other things being equal, they will absolutely shoot more accurately with a milder recoiling cartridge.
Additionally, there are a couple of other factors that are also worth discussing though.
First, the .30-06 uses larger diameter bullets than the 7mm Rem Mag.
Specifically, the larger diameter .308″ bullets used by the .30-06 have about 18% more frontal surface area (also known as cross sectional area) than the .284″ bullets used by the 7mm Rem Mag (.0745 vs .0633 square inches). All other things being equal, a bigger bullet will make a bigger hole, cause more tissue damage, and result in more blood loss.
This is a definite, though slight, factor in favor of the .30-06.
On the other hand, as we covered earlier, those longer, heavy for caliber .284″ bullets have a higher ballistic coefficient than the most common bullets used in the .30-06 though.
The .284″/7mm bore diameter is in something of a sweet spot where it’s easier to manufacture very high BC bullets that’s aren’t especially heavy. Those aerodynamic projectiles don’t slow down as fast and are more resistant to wind drift.
The most popular 7mm bullets also have a relatively high sectional density (SD).
Sectional density (SD) is a measure of the ratio of the diameter of a projectile to its mass. All other things equal, a heavier projectile of a given caliber will be longer and therefore have a higher sectional density and consequently penetrate deeper than projectiles with a lower mass and sectional density.
Everything else being equal, the smaller diameter 7mm bullets have a higher ballistic coefficient and a higher sectional density than the larger diameter bullets of the same weight from the .30-06 Springfield. However, the .30-06 generally uses heavier bullets than the 7mm Remington Magnum.
All that being said, the 7mm Rem Mag still has a slight edge with most bullets in common use, even when compared to heavier .30 caliber bullets.
As an example, 140 grain, 150 grain, and 175 grain .284″ bullets have sectional densities of .248, .266, and .310 respectively. This compares favorably to 150 grain, 180 grain, and 200 grain .308″ bullets which have sectional densities of .226, .271, and .301 respectively.
This also applies to ballistic coefficient.
The bullets used in this comparison illustrate those differences well with the 7mm Remington Magnum using 140gr (.484 BC), 162gr (.631 BC), and 175gr (.407 BC) bullets compared to the 150gr (.392 BC), 178gr (.552 BC), and 200gr (.395 BC) bullets used by the .30-06.
What about 7mm Rem Mag vs .30-06 Springfield accuracy?
Gun writers have spilled a lot of ink comparing the accuracy of the 7mm Rem Mag vs 30-06 over the years. While picking the most accurate cartridge of the two is a relatively contentious subject, most people agree that both the 7mm Mag and .30-06 are capable of excellent accuracy.
Not surprisingly, both cartridges have seen extensive use in long range shooting competitions and both have served with distinction with military and police snipers as well as with for precision shooters.
So where do we stand with each cartridge?
7mm Rem Mag vs 30-06
The 7mm Rem Mag fires smaller caliber and lighter, but generally more aerodynamic bullets at a higher velocity than the .30-06 Springfield. The 7mm Rem Mag has a flatter trajectory, more kinetic energy at typical hunting ranges, and is also better for longer range shots, but the .30-06 has less recoil.
With a flatter trajectory, less wind drift, and more retained energy at extended range, the 7mm Rem Mag does have a definite, though not gigantic, advantage over the .30-06 Springfield in external ballistics at typical hunting ranges. This makes the cartridge a little more forgiving of range or wind estimation errors than the .30-06 Springfield.
While that’s certainly something to keep in mind, laser rangefinders and modern scopes with easily adjustable ballistic turrets (like the Leupold VX-5) make adjusting for bullet drop much simpler now than it was a few decades ago.
The most popular bullet weights for the 7mm Rem Mag also tend to be more aerodynamic than the most popular bullet weights used by the .30-06. So, the advantages the 7mm Remington Magnum cartridge has with energy, trajectory, and wind drift grow slightly at extended range.
Those 7mm bullets also tend to have a higher sectional density as well, which assists with penetration to help the cartridge “punch above its weight” in a manner similar to the 7x57mm or 9.3x62mm Mauser cartridges.
As good as the .30-06 is (and I do think it’s an excellent cartridge), the 7mm Remington Magnum just simply hits with a little more authority, especially at longer range.
On the other hand, the .30-06 has an advantage when it comes to frontal surface area (which gives a tiny bit more room for error with shot placement), uses heavier bullets, and has a little less recoil.
It might seem like I’m splitting hairs here when talking about the strengths and weaknesses of the two cartridges. That’s absolutely true to a certain degree.
While they certainly have different advantages, both cartridges are very accurate, relatively flat shooting, and hit hard enough for use on a variety of game out to several hundred yards. The 7mm Rem Mag may be a better choice for use on bigger game and/or on game at longer range, but the .30-06 is still a darn good cartridge.
However, regardless of whether you’re using a 7mm Remington Magnum or a .30-06 Springfield, no deer, elk, black bear, moose or pronghorn will go far if you put a well constructed bullet into the vitals during a real world hunting scenario.
30-06 vs 7mm Rem Mag Barrel Life
Since the two cartridges have a different bore diameter and vastly different case capacities, there can be some significant difference in barrel life with the three cartridges.
Simply put, burning more powder in a similar sized space will result in shorter barrel life.
At the same time, burning more powder is a smaller sized space will result in even shorter barrel life.
Well, the 7mm Remington Magnum has a smaller bore size and uses a much bigger powder charge.
This means that, in general, the 7mm Rem Mag will simply wear out barrels faster than the .30-06 Springfield. Exactly how fast that occurs depends on a number of factors like the quality of the barrel, the exact ammunition used, etc.
For serious target shooters, this can be a concern. However, the good news for hunters is that typical barrel life for all of these cartridges is more than enough to last for many, many years of hunting with no issues at all.
So, there isn’t a tremendous practical difference in 7mm Rem Mag vs 30-06 barrel life as far as most hunters are concerned.
7mm Rem Mag vs 30-06 Ammo
The .30-06 Springfield and the 7mm Remington Magnum are both extremely popular centerfire rifle cartridges. That said, the .30-06 is definitely the most widely used of the two in general, though the 7mm Remington Magnum is by no means rare.
So, they’re both in common use and ammo is usually easy to find for both. Availability also likely varies regionally though. For instance, more people tend to use the 7mm Remington Magnum in many western states where they’re more likely to need the advantages the cartridge provides at longer range.
In general, .30-06 ammo is typically noticeably cheaper than 7mm Rem Mag ammo.
The big ammunition manufacturers like Barnes, Berger, Browning, Federal Premium, Hornady, HSM, Nosler, Remington, Sierra, Sig Sauer, Swift, and Winchester produce an incredible variety of ammo for the .30-06 Springfield and 7mm Remington Magnum.
In each case, there is normally a good selection of bullet types and weights for each cartridge suitable for big game hunting ranging from stuff like Remington Core Lokt and Winchester Super X ammo to Federal Premium Gold Medal and Hornady Precision Hunter factory loads.
During normal times, it’s usually very easy to find ammo for both cartridges and almost any gun or sporting goods store will have a wide variety of .30-06 and 7mm Rem Mag ammo in stock.
Ammo availability is also usually excellent online and the bigger retailers typically have a good selection of quality factory ammo for both cartridges as well.
BUY SOME GREAT 7mm REM MAG AMMO HERE
BUY SOME EXCELLENT 30-06 SPRINGFIELD AMMO HERE
If you’d like to learn more about some of the various hunting ammunition choices for the 7mm Remington Magnum and 30-06 cartridges, read these articles:
Best 7mm Rem Mag Ammo For Hunting Elk, Deer, And Other Big Game
Best 30-06 Ammo For Hunting Elk, Deer, Bear, Hogs, & Other Game
Handloaders will appreciate the fact that reloading components for both cartridges are also readily available and there’s an especially wide variety of bullet choices for each cartridge. So, you should not have any trouble working up a good custom load for either one if you like to handload.
The 7mm Remington Magnum uses the same .284″ bullet size as the 7mm-08 Remington, .280 Remington, .280 Ackley Improved, 7mm WSM, 7mm STW, 7mm Weatherby Magnum, and 7mm Remington Ultra Magnum.
The .30-06 Springfield uses the same .308″ bullet size as the .308 Winchester, .30-30 Winchester, .300 Win Mag, 300 WSM, .300 Ultra Mag, and .300 PRC.
Bullets like the Barnes LRX, TSX, TTSX, and TAC-X, the Berger VLD and Hybrid Hunter, the Hornady A-Max, ELD-X, GMX, InterBond, InterLock, SST, and V-Max, the Nosler AccuBond, Ballistic Tip, E-Tip, and Partition, the Sierra GameChanger and GameKing, the Swift Scirocco and A-Frame, (just to name a few) are options for if you want to reload the 7mm Remington Magnum and the .30-06 Springfield.
7mm Rem Mag vs 30-06 Rifles
In addition to the great selection of ammunition available in 7mm Remington Magnum and .30-06, there are also many quality rifles manufactured in these cartridges.
Both cartridges are extremely common in bolt-action rifles. In fact, just about every really popular bolt-action hunting rifle in current production is available in both cartridges.
For instance, both the 7mm Remington Magnum and .30-06 Springfield are available in several different versions of the Remington Model 700 and Winchester Model 70. The same goes for the Browning X-Bolt, Browning AB3, Christensen Arms Ridgeline, Kimber Hunter, Mossberg Patriot, Ruger Hawkeye, Savage Axis, Savage 110, Tikka T3 and Tikka T3x, Weatherby Vanguard, and Winchester XPR.
That said, the .30-06 is the more popular of the two. So, there’s generally a better selection of rifles in that chambering. It’s also easier to find .30-06 rifles that are less expensive.
On the other hand, while it’s also available in a wide range of rifle models, the 7mm Rem Mag is more common with higher end rifles designed for better performance at longer ranges. That’s not a hard and fast rule though.
It’s also important to realize that gun manufacturers tend to put longer barrels on rifles chambered in 7mm Remington Magnum (and other magnum cartridges in general). This is because those cartridges need a longer barrel to effectively and efficiently burn that larger powder charge.
All things considered, rifles chambered in 7mm Rem Mag tend to be slightly longer, heavier, and more unwieldy than rifles chambered in .30-06.
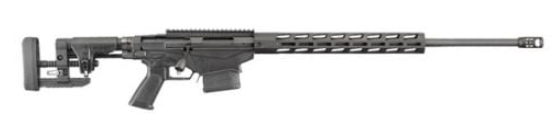
The Ruger Hawkeye Hunter illustrates these differences well.
When chambered in .30-06 Springfield, the rifle has a 22″ barrel, an overall length of 42.75″, and weighs 7.4 pounds. The same rifle chambered in 7mm Remington Magnum has a 24″ barrel, is 44.75″ long, and weighs 8.1 pounds.
The rifle chambered in 7mm Remington Magnum is 2″ longer and weighs nearly a pound more than the exact same model chambered in .30-06.
Barrel lengths do vary depending on the manufacturer and exact model. However, 22″ barrels are very common with the .30-06 while 24″ and even 26″ barrels are pretty standard with the 7mm Remington Magnum.
Having a shorter and lighter rifle is more important on some hunts than on others. So, just keep that in mind.
BUY A GREAT 7mm REM MAG RIFLE HERE
BUY A NICE 30-06 SPRINGFIELD RIFLE HERE
7mm Rem Mag vs 30-06: Which Is Right For You?
Do you primarily hunt medium sized game like whitetail deer, feral hogs, or black bear at ranges within 200 yards? Both are extremely effective deer hunting cartridges and will absolutely get the job done on medium sized game if you do your part. The .30-06 in particular is a great deer hunting cartridge and remains one of the most popular North American hunting cartridges. There’s nothing wrong with using the 7mm Rem Mag on deer inside of 200 yards, but it’s really more gun than you need for that sort of work though (and it’s also a little rougher on both the shoulder and wallet).
If you’re going to be hunting in thick brush or in the tight confines of a deer stand, remember what I just mentioned about the size difference with 30-06 vs 7mm Rem Mag rifles. That extra couple of inches in overall length of a rifle can be a real headache to deal with when trying to quickly and quietly maneuver for a shot.
Are you looking for the cartridge better suited for long range hunting for game like mule deer or pronghorn in open country where you might need to take a shot at several hundred yards? Once again, they’ll both work really well in this role. The .30-06 Springfield is a very good choice for this sort of hunting, but this is where the 7mm Rem Mag really starts to shine because it carries more energy out past 200 yards. The advantages the cartridge has in terms of bullet drop and wind drift start to become much more important at longer range as well. Not surprisingly, the 7mm Rem Mag is very popular with antelope hunters in places like Wyoming where windy conditions are common.
Do you want a hunting cartridge that’s well suited for caribou, moose, elk, eland, kudu, or red stag hunting? The .30-06 Springfield is a fantastic choice for use on bigger game and there’s not a darn thing wrong with using it on one of those hunts. Personally, I lean towards the .30-06 because it uses larger diameter and heavier bullets, but there’s also a good argument to be made for the 7mm Rem Mag as well, especially on hunts were a longer range shot might be necessary. With this in mind, some people prefer the 7mm Rem Mag because it carries more kinetic energy downrange (especially at longer range) and because it uses high SD bullets that tend to penetrate a little better.
Regardless of which cartridge you choose, use a controlled expansion projectile and a heavier bullet weight for your elk or moose hunt.
Are you specifically hunting brown or grizzly bear? What if you hunt in Canada or Alaska and need a heavy hitting cartridge just in case you find yourself on the wrong end of a grizzly/brown bear attack? Neither would be my first choice for use on those hunts. That said, they will definitely work in a pinch. Of the two, I’d go with the .30-06 since it uses larger diameter and heavier bullets. Make sure you use premium, heavy for caliber 200gr or 220gr bullets if you go that route (the 200gr Trophy Bonded Bear Claw I mentioned earlier is a darn good choice).
For what it’s worth, Roy Lindsley used a .30-06 Springfield to take the current Boone & Crockett record Alaska brown bear back in 1952. But then again, that hunt took place before cartridges like the 7mm Remington Magnum, .300 Winchester Magnum, and .338 Winchester Magnum even existed.
Are you sensitive to recoil and in need of a serious low recoil cartridge? Neither is known as being a light recoiling cartridge. That said, the .30-06 does tend to have a little bit less free recoil energy than the 7mm Rem Mag.
Do you want the round that is best suited for target shooting out past 400 yards or so in a precision rifle? Both will work and have excellent reputations for precision shooting, but I lean towards the 7mm Remington Magnum here because of the advantages the cartridge has for longer range shooting.
The 7mm Remington Magnum and .30-06 Springfield are both excellent rifle cartridges. While the 7mm Remington Magnum does offer certain advantages over the .30-06 in some aspects, the old “aught six” is still getting it done well over a century after coming on the scene! All things considered, the difference between them (7mm Rem Mag vs 30-06) isn’t as great as it is sometimes made out to be and the animal will never know the difference if your shot is placed in the right spot.
So, carefully analyze your potential needs before making a decision. If you really need the advantages the 7mm Remington Magnum offers, then by all means purchase one. However, the .30-06 will work really well for most hunters. In the end, a lot of this decision comes down to personal preference. So, choose the one that you feel most comfortable with and it will probably serve you well afield. Good luck!
NEXT: 308 vs 30-06 SPRINGFIELD vs 300 WIN MAG: WHICH SHOULD YOU HUNT WITH?
Enjoy this article comparing the .30-06 Springfield and 7mm Remington Magnum cartridges? Please share it with your friends on Facebook and Twitter.
The Lyman 50th Edition (p214-216 and p246-250) and Hornady 10th Edition (p406-411 and p510-522) reloading manuals were used as references for the history of the cartridges. I obtained the data used to compare the trajectory of the cartridges from Hornady (here and here), Federal Premium (here and here), and Winchester (here and here). Data used to calculate recoil was obtained from the Hornady reloading manual. Case capacities were obtained from Chuck Hawks (here). Maximum pressure obtained from SAAMI (p23 & 29). I used ShootersCalculator.com to compare trajectory and recoil for the cartridges.
Make sure you follow The Big Game Hunting Blog on Facebook, Instagram, Twitter, and YouTube.
As I mentioned in my previous articles on patterning my shotgun, the basics of turkey hunting, and camouflaging my shotgun, I’m in the process of preparing for an upcoming turkey hunt during Memorial Day weekend. For my next article in my series on turkey hunting, I’m writing about the differences between some of the various types of turkey calls commonly used by turkey hunters. Since spring turkey season overlaps with mating season for turkeys in most of the United States, imitating turkey vocalizations is the most popular and most effective technique used by turkey hunters to call in a big gobbler. There are a wide variety of turkey calls available on the market today, and I hope to provide some useful information on the advantages and disadvantages of each in this article.
Before we begin, please note that I’m not necessarily endorsing any particular type or brand of turkey call in this article. Indeed, I haven’t actually used any of them on a turkey hunt yet, so I’m not really in a position to say which type or brand works “best.” Instead, I’m merely presenting some of the pros and cons of each type of call as well as some things to consider when getting ready to purchase one.
The push button call is probably the easiest turkey call to use. Made from wood (primarily walnut) and/or plastic, push button calls can produce realistic sounds imitating turkey hen clucks, purrs, and yelps. Since they are so easy to use, push button calls are very popular among new turkey hunters. Another advantage of the push button call is that a hunter can also easily operate one with only one hand, or even mount it on the stock of a shotgun for quick and easy access.
Unfortunately, push button turkey calls are very sensitive to moisture. While turkeys will still move during a spring rain shower, a little rain can silence a push button call and ruin a hunt for a hunter who relies solely upon push button calls. Additionally, push button calls can present problems for a hunter going after turkeys subject to heavy hunting pressure. Since they are so popular, and since push button calls do not produce quite as wide of a variety of sounds as other turkey calls (particularly diaphragm or pot and striker calls), mature gobblers may quickly wise up and become less responsive to a hunter using a push button call midway through the season.
Like the push button call, the box call is also extremely popular and very easy to use. Box calls are most often made of wood such as walnut, cedar, or mahogany, among others. However, some box calls are now made out of metal. In the hands of a skilled caller, a box call can produce a very wide variety of turkey vocalizations. Additionally, box calls are great for calling over long distances, as they can mimic turkey vocalizations at loud, as well as soft volumes.
Like push button calls, box calls are also sensitive to moisture and don’t work nearly as well when wet. However, this is not as big of a problem as it used to be because some companies now manufacture waterproof box calls (like the call pictured above). Another problem with box calls is that most of them require two hands to operate. This makes it more difficult for a hunter to transition from operating the call to aiming his or her shotgun without being spotted by a sharp eyed gobbler.
Finally, box calls have the same disadvantage as box calls when hunting heavily pressured turkeys. Since they are so popular, turkeys sometimes learn what a box call sounds like and become less responsive to them. Since the goal of a hunter is to sound like a turkey, not a turkey hunter, this can be a problem.
Pot and striker calls consist of a round disc, usually made from glass, slate, or ceramic materials, and a striker usually made of wood, aluminum, or carbon. To use, apply pressure to the pot with the striker at varying pressures, angles, and patterns to create different sounds. Using these calls, a skilled caller can produce a dizzying array of turkey calls. Additionally, most pot and striker calls are much more tolerant of wet conditions than box or push button calls are.
While pot and striker calls are great options for a turkey hunter, they are not without disadvantages. Like a box call, pot and striker calls have the disadvantage that they require two hands to operate. Additionally, they are more difficult to learn to use effectively when compared to push button calls or box calls.
Also known as mouth calls, diaphragm calls are small, horseshoe shaped calls with rubber or latex reeds that vibrate when air is forced across them. Many different manufacturers produce diaphragm calls in a wide variety of variations that can imitate virtually any turkey vocalization. Diaphragm calls are inexpensive, small, lightweight, and weatherproof. They also do not require the hunter to use his or her hands for operation. This significantly cuts down on movement and allows the hunter to use the call right up until the point that they take the shot without spooking the bird.
The biggest disadvantage to the diaphragm call is that they are the most difficult turkey calls for a hunter to learn how to use properly. Indeed, many experienced and successful turkey hunters do not know how to use a diaphragm call to its fullest potential. The other disadvantage to a diaphragm call is that they are not as loud as other turkey calls, especially box calls.
As you can see, each of the different types of turkey calls I described here fits into a particular niche. None is perfect, but they can complement each other very well if used appropriately. As a result, instead of looking for the “best” call, it’s probably a better idea for a turkey hunter to purchase and master the use of 2-3 different turkey calls. This will give the hunter several options if he or she out in turkey hunting and gets caught in a rain shower or the turkeys stop responding to a particular call. By having a different, but complementary, call on hand that he or she can use well, that hunter may be able to change things up and end the hunt with a big gobbler on the ground.
Make sure you follow The Big Game Hunting Blog on Facebook, Instagram, Twitter, and YouTube.
NEXT: BEST 6.5 CREEDMOOR AMMO FOR HUNTING ELK, DEER, AND OTHER BIG GAME
Jeremiah Wood, a biologist for the State of Maine, works through various aspects of fur trapping in this second part of his guest series. (Read part one, Five Reasons to Reconsider Trapping, here.)
For the uninitiated, trapping can seem disconcertingly complex. Trappers target a wide variety of fur-bearing animals all across the landscape, using very specialized tools and equipment on the trapline. Just look into the bed of a trapper’s pickup truck and try figuring out which item does what and where it’s used. The jumble of gear is enough to make your head spin. But once you figure it out, traps and their use are really not that complicated.
Traps can be broken down into three basic types: footholds, body-grips and hunting snares. Each is distinct from the others and has its own unique purpose on the trapline.
Foothold traps have been around almost since trapping began. Though some are complex, all footholds operate on a simple premise: the target animal steps on a pan in the trap’s center, tripping a trigger and causing spring-loaded jaws to close and grip the animal’s foot. Foothold traps are the most traditional, popular and effective trap used today. Every fur-bearing species can be caught with foothold traps and they come in a wide variety of styles, shapes and sizes.
The three main types of foothold traps are categorized by the springs that strengthen them. Long spring traps are the traditional footholds constructed with long, flat steel springs that power the jaws closed. Jump traps are powered by a single, short, flat steel spring situated underneath the jaws. Coil spring traps are a modern version of the jump trap, instead using coiled music wire springs to lift levers that power the jaws shut.
Foothold traps have a wide variety of applications on the trapline, from catching marten in the wilds of Arctic Alaska to beaver trapping in the swamps of Louisiana and most places in between. One significant benefit of foothold traps is that, when used properly, they allow for the unharmed release of any non-target animals. Foothold traps are the most common tool used to trap predators like foxes and coyotes, and are commonly used in wildlife management applications. In fact, footholds have been critical to the success of numerous furbearer studies and relocation efforts by state and federal wildlife biologists throughout the country.
Body-grip Traps
The body-grip trap, often referred to as the ‘Conibear,’ was revolutionized by trapper and inventor Frank Conibear in the 1950’s. It was offered as an alternative to the foothold trap in situations where a quick, humane kill of the captured animal was desired. The basic design of the trap includes two square jaws made of round steel in a box-shaped design, powered by one or two springs of the same material. When the springs are compressed, the jaws form an opening for an animal to enter, tripping a trigger in the opening when it travels through. The jaws then close shut, proving an almost instant kill.
Because of their lethal design body-grip traps aren’t useful in all situations, especially near civilization, where there’s potential to catch the neighbor’s dog or cat. They are most commonly used in water trapping, particularly for beaver, mink and muskrats, in wilderness trapping far from the beaten path and in other situations when precautions are taken to avoid non-targets. The body-grip trap was truly an innovation that filled a need in the trapping world and has greatly enhanced trappers’ ability to address animal welfare issues and capture some furbearers far more effectively.
Snares
While it appears the most simple, the snare may just be the most complex tool in the trapping industry. Type of cable and wire, diameter, orientation, breaking strength, lock types, stops, swivels, breakaways and a number of other components make snares incredibly customizable. If you know what you’re doing, you can create just the right snare for most any trapping situation.
Snares can also be fairly controversial, due to their past reputation for catching non-target animals. But advancements in snare technology have made much of that controversy a thing of the past, and many states are expanding snaring opportunities for trappers who know how to use them right. For instance, snares once would catch the occasional deer. Using a stop that limits loop size closure eliminates deer capture. When a large animal like a mountain lion or elk is captured, a breakaway allows them to power out of the snare, breaking it open and freeing them from capture.
Traditional snares used to kill some non-target animals. Using a relaxing lock instead of a kill-type lock allows a snare to hold an animal gently, effectively rendering the snare something we now call a “cable restraint.” In other situations where a quick kill is desired, springs and poles can be used to make that happen incredibly effectively. What was once a simple wire loop has now transformed into one of the most useful and adaptable tools at a trapper’s disposal.
Between footholds, body-grips and snares, a trapper’s arsenal can seem pretty complex—and perhaps it needs to be. Like everything else, trapping has changed with the times. Advances in technology have continued to make traps more efficient and effective, helping trappers continue to responsibly harvest wild fur. And if you’re looking to get into trapping, these advancements have made for a great set of tools to help start the journey.
Jeremiah is a biologist with the State of Maine and runs Trapping Today, a website dedicated to providing information and entertainment to the modern trapper. Find more from him at www.trappingtoday.com.
Why Do You Mix Pork Fat With Deer Meat When Grinding?
What Kind of Pork Do You Mix With Deer Meat?
How Do You Mix Venison and Pork?
Final Thoughts
Sources
How Much Pork To Mix With Venison
You should mix roughly 30% pork fat with venison when making snack sticks, venison sausage should have up to 50% pork fat, and venison burgers and meatballs need only contain about 20% pork fat. The amount of pork fat you need to mix with venison varies depending on the dish you’re making.
What Do You Mix With Deer When Grinding?
You should mix pork and beef fat with deer when grinding. These act as binding agents and flavor enhancers during the grinding process to compensate for the low moisture content of the lean game meat.
The choice and amount of meat to be added typically varies by personal preference. However, it would be best to read up on established golden ratios and meat-venison mixtures to enjoy your favorite ground venison dishes.
You can opt to mix beef fat with venison to make a patty or meatloaf more cohesive or to enjoy juicy snack sticks that would instead feel dry if you stick with pure venison.
If you are sort of a food connoisseur, you may notice, though, that the overall texture and juiciness of the beef-venison combination lacks refinement, in which case, you may want to try mixing it with pork.
Ground pork fat functions similarly to beef fat when mixed with venison, although you might observe a more savory mix when using pork.
An essential factor to watch out for and consider would be the source of pork fat that you mix with venison.
For instance, fat from pork belly may contain too much flavor and could overpower the deer meat.
You will not want this if you are more inclined to highlight venison’s flavor than the former in the ground meat mix.
Meanwhile, opting for back fat may provide you with just the right chewy texture without compromising the authentic venison taste.
Why Do You Mix Pork Fat With Deer Meat When Grinding?
Mixing pork fat with venison provides moisture, flavor, and cohesion to your venison grounds and a soft texture that outperforms beef fat. Additionally, venison is generally lean meat, so it needs pork fat to bind the venison grounds together.
Otherwise, you may find yourself struggling to cook pure venison patties that easily break apart.
Purists may find this problematic, thinking that precious venison meat deserves to be enjoyed free from other types of red meat that are not as lean or healthy.
The thing about the lean nature of venison is that it makes it challenging to prepare several other meat-based dishes without compromising quality.
However, if only you can toss just the right amount of pork fat into your grinder, you can expect a marbly grind that closely resembles the most common patties – beef patties.
The combination of flavorful pork fat and venison also results in a delectable ground mix. When ground, the combination of juicy pork and deer meat leaves you satisfied while also free from the greasy after-taste that comes with, say, beef.
Sausages with the perfect pork fat to venison ratio coupled with the ideal preparation steps can leave you wanting more. Besides the seasoning added to the pork and venison mix, the pork fat itself already adds flavor to your deer meat.
The moisture extracted from different types of pork cuts, such as bacon and belly, makes the entire meal even more satisfying.
The lean nature of venison makes it quickly dry out during meal prep, so the extra fat accords you with the juiciness necessary to enjoy delicious – but dry – meat.
Imagine indulging in protein-rich, saporous venison snack sticks with a hint of bacon. It seems like it could not get any better.
What Kind of Pork Do You Mix With Deer Meat?
As mentioned earlier, to enhance the juiciness and taste of venison, a certain amount of pork fat is needed. So, it’s best to add pork cuts that contain high-fat content in your grind.
Deciding on the pork cut to use depends on the taste of the end product you want. Do you want to retain the gamey taste without the dryness, or would you prefer one with a hint of pork flavor?
You can mix deer meat with any kind of pork, including pork butts or shoulders or a higher fat pork belly. Butts and shoulders are milder in flavor, while pork belly gives you a more pronounced pork taste. It depends on your preference.
If you want the unadulterated taste of venison, grind it together with pork butts or shoulders. These pork cuts are located at the front end of the pig and contain high-fat contents.
However, if you don’t mind a more domesticated taste, go for the pork belly. This slightly more pricey cut is located in the pig’s underside and is where bacon comes from.
It also has a high-fat content and that distinct pork taste that will undoubtedly influence your venison grind.
Meanwhile, back fat provides your ground venison with a soft and chewy texture, perfect for sausages and meatballs.
How Do You Mix Venison and Pork?
To mix venison and pork, start by ensuring the meats are chilled. This will help with handling and grinding. Next, find a ratio of pork to venison that works for your tastes and then grind them separately before mixing them together into a uniform mound. Finally, add any spices at the end to taste.
The amount of pork you add with venison depends on the kind of meal you plan to prepare. You’ll want to experiment on the correct pork to venison ratio and source of pork fat that you will be using.
Different types of pork fat contain varying moisture and flavor, so consider this when deciding whether to opt for savory belly fat or the more low-key back fat.
For venison sausages, you would want a more fatty venison grind. As such, I suggest mixing at least 20% pork fat with 80% venison. Of course, you can go higher than this, depending on your taste.
Just remember that eating sausages with a fat content higher than 50% can make you feel lethargic.
Venison snack sticks are a versatile outdoor treat typically marketed to hunters that may coincidentally hunt for game. If you want to have that extra money for that cool new hunting gear, you can save on buying snack sticks by making them on your own.
You can make venison snack sticks using 100% venison, but most prefer adding a little bit of pork into it (around 30%) to achieve a certain degree of juiciness. Just make sure you have the time to make them before your next hunt.
Lastly, if you’re into burgers, meatballs, and meatloaves, you may want to try burger patties made of venison. Again, you’ll just have to add a little bit of fat to prevent it from drying out and crumbling during the cooking process.
As with patties made of beef, the fat content is essential to grind the meat. Always remember that venison is leaner than beef, and you may want to add a little more fat than you would wish to on your beef patties.
The safe bet is to go for 20% fat to make the taste of your patties richer.
Pro Tip: I always prefer to grind my venison semi-frozen, after it’s been thawed out. This keeps the meat cold, and prevents your grinds from getting too wet or juicy,
Final Thoughts
One of the most rewarding aspects of hunting is the processing of your own game meat. I highly recommend you give it a try.
You May Also Like: Buck, Buck, Moose: Wild Game Cook Book
If you prefer to use your local game processor or butcher, that’s fine too. Just ask them to add some pork fat to your ground venison, and you’ll have a versatile ingredient that can replace nearly any ground beef recipe.
Thanks for reading!
See Also: Why Eating Does Vension Sometimes Give Me Gas?
Neem Oil Deer Repellent: Does It Really Work?
Is It Okay To Burn Bark In a Wood Stove?
Do Deer Eat Morel Mushrooms?
How To Properly Dispose of Wood Stove Ashes (Safely!)
Is Fatwood Safe for Wood Stoves? Here’s What You Should Know
Is Beaver Good to Eat? You May Be Surprised!
Is Bread Bad For Deer? Here’s What You Should Know
Are Roosters Good to Eat?
3 Easy Ways To Tell If Your Wood Stove Is Leaking
Sources
Fox Valley Foodie: How To Butcher a Deer – Grinding Venison
Legendary Whitetails: The Key to Crafting a Better Venison Burger
Allied Kenco Sales: Wild Game Sausage Making Information Sheet
Nassau Foods: Preparing the Perfect Venison
Home Kitchen Talk: Pork to Venison Ratio for Summer Sausage
Home Kitchen Talk: How Much Pork Fat to Add to Venison Sausage?
North American Whitetail: How to Grind Whitetail Deer Venison
If you learned to fish as a child, your earliest memories, much like ours, were watching a bobber with great anticipation waiting for it to abruptly disappear under the slick calm waters on an early morning fishing trip with a loved one. I’m 51 years old now, and watching a fishing bobber go under still gives me a childlike thrill. Nostalgia not withstanding, a fishing float is a great way to present not only live baits but also small artificials to fish in a natural way.
Fly anglers use small floats and indicators to let them know when a trout has sucked in a nymph in current runs that you won’t see or feel. Crappie anglers will slip float a jig in timber to catch fish that are reluctant to move much. Whatever your preferred method of fishing, knowing the best fishing bobbers and where to use each one will help you present your baits better and catch more fish.
Best Weighted Spring Bobber: Thill Premium Weighted Float
Best Slip Floats: Thill Pro Series Slip Float
Best Rattling Float: Bett’s Mr. Crappie Rattlin Pear
Best Weighted Clip Bobber: Bett’s Mr. Crappie Weighted Bobber
Best Crappie Bobber: Thill Crappie Cork
Best Catfish Float: CJ’s Catfish Float
Best Panfish Quick Floats: Leland’s Lures Trout Magnet E-Z Floats
Best Weighted Spring Bobber: Thill Premium Weighted Float
The Thill name and premium fishing floats are synonymous. Regardless of the species you chase, you’ve likely found yourself looking at one of the many versions of Thill floats to float your offering. Arguably their most popular model because it’s simple, effective and well designed, the Thill Premium Weighted Float features the spring or slip versions but we think the spring bobber is the best no-nonsense float for a variety of species of fish.
Pull the spring down, run the line into the notch and let the spring loose and you’re good to go. We often use this bobber in the spring when casting to crappie in shallow water with jigs we want to work ultra slow around shallow cover that might be spooky (like when they are moving up to spawn). These high quality bobbers come 2 to a pack for $3.99.
Buy at Amazon
Buy at Bass Pro
Best Rattling Float: Bett’s Mr. Crappie Rattlin Pear
We got into using a rattling bobber with tungsten bluegill bugs this spring to chase some of our personal best bluegills and shellcrackers. The Mr. Crappie Rattlin Pear is a small bobber that attaches quickly to help make casting very light jigs a little easier and letting you slow down your retrieve and add pauses you can’t do otherwise.
I took some of my biggest bluegills and panfish on this bobber this year because I felt the rattle called fish in that were curious and then they found the bug. This was especially productive for me in laydown trees in the spring and early summer.
The Rattlin Pear comes in a three sizes from 7/8 inch to 1 1/4 inch for bluegills and crappie alike and would probably work for trout and wallyes as well.
Buy at Bass Pro
Buy at Amazon
Best Slip Floats: Thill Pro Series Slip Float
Another staple in the slip float arena, the Thill Pro Series Slip Float comes in many different sizes and diameters as well as weighted and unweighted. These floats work really well when you want to cast to fish that are in deeper water and you need the rig to be compact on the cast but then sink down to the fish and sit in one place over deeper water. From 1/2 inch diameter up to 1 inch in diameter. These floats work for a ton of species and applications where you want to float fish a little deeper. They are made of premium balsa to ensure a long last bobber that always floats well and is easily pulled under by the right size prey.
Buy at FishUSA
Buy at Amazon
Buy at Tackle Warehouse
Buy at Bass Pro
Best Weighted Clip Bobber: Bett’s Mr. Crappie Snappers Float
There is something to be said for having a bobber that works quick and easy when you suddenly need to change your presentation or need to improve your casting distance because of the wind without having to upsize your lure and speed up your retrieves. A clip on bobber is very handy to have. I keep several in my travel bags and boat because I’ve had lots of times panfishing where I wished I could add a float to a jig to slow my presentation, get a little more distance or make a bait present more naturally in current and wind.
The Bett’s Mr. Crappie Weighted Bobber casts like a rock, attaches quickly and easily and won’t crack or fill up with water. It’s a foam style bobber that comes in a few different sizes for bluegill and crappies alike. I’ve even used the larger ones on other species like catfish. They come two to a pack for $2.29.
Buy at Bass Pro
Buy at Amazon
Best Crappie Bobber: Thill Crappie Cork
The Thill Crappie Cork is the do-it-all bobber for crappie fishermen. It’s made to be the only float you need for crappie. It comes in multiple sizes, offers both spring clip and slip cork design with a bobber stop already built into the stem. It’s the ultimate float for versatility and convenience for serious anglers. Always good to have a couple in your bag. Weight is printed on the float for convenience. These floats start at $2.49.
Buy at FishUSA
Buy at Bass Pro
Buy at Amazon
Best Catfish Float: CJ’s Catfish Float
We’ve talked about these floats before in our Kayak Catfishing feature as these are a dynamite way to present bait to channel catfish and blue catfish alike. Check out our feature to see how these are employed. But these unique floats feature a long 14-inch stem and a rigging mechanism that makes them a slip float but your line runs on the outside. This float is designed to let you know a cat is biting without them feeling any resistance so you have the drop on them everytime. These floats excel for drift fishing and that’s why they have become the staple among serious catfishermen. They come 2 to a pack for $8.99.
Buy at BassPro
Best Quick Float Indicators: Leland’s Lures Trout Magnet E-Z Floats
Sometimes you just want to throw quick small float on an ultralight setup to float your jig or slow your presentation and without having to completely rerig, it’s nice when you can use something like the Trout Magnet E-Z Floats, that use a slit style bobber with a peg to pinch your line in place on the bobber. You can add them quickly to your ultralight offerings to keep your bait up and out of cover and off the bottom as you fish through shallow areas with tiny lures. They are made of a high-float foam, come 4 to a pack in high viz colors for $1.87.
Buy at FishUSA
Buy at Amazon
Buy at BassPro.com
TYPES OF FISHING BOBBERS AND FLOATS
Fishing bobbers and floats vary in size, materials and how you connect them to your line. There are basically three ways to connect a bobber to your line that include the following:
Clip on
Pinch/peg
Slip on with a stopper
As you’ve seen going through this list, bobbers can ether be clipped on with spring loaded clips or external springs or rubber sleeves. Floats can also be pinched on with a peg where you either run the line through the bobber or put it through a slit in the side of the bobber and then use a peg to pinch the bobber onto your line. Or you can use a slip style bobber where your line runs through the bobber after your slide or tie a bobber stop onto your line above it. Each of the three ways to connect have a time and place and often convenience and depth are the determining factors.
BEST BOBBER BRANDS
With bobbers, you can get by with a cheaper bobber in a pinch but their are a few brands that are the best at making specific application floats. Brands like Thill, Betts and Eagle Claw have some of the widest selections of bobbers to fit all types of fish and fishing applications. There are a lot of other good brands that don’t have as diverse a selection but also offer great bobbers like Rod-N-Bob, Raven, Sheffield, Northland, and Lunkerhunt. You can find a very good selection of floats at FishUSA.com
BOBBER FISHING SETUPS
When fishing with bobbers, anglers often like to use lighter lines and either spinning or spin casting setups. I spent a lot of time fishing small bobbers on tungsten jigs for panfish this year on spinning rod and reels with 4-pound line as well as BFS baitcasting gear with the same light lines like 4-pound mono and 8-pound braid. With the bigger bobbers you can go up in size and weighted bobbers also allow you to use larger line sizes without sacrificing castability.
BEST BOBBER AND FLOAT MATERIALS
Balsa and foam are probably the two most common types of fishing bobbers along with plastic. The first two will hold up a lot better than the latter. Plastic tends to eventually crack or wear out and let water in which makes it stop floating. Balsa will still float if it breaks, splinters or loses pieces.
When it comes to the art of long-range shooting, snipers reign supreme.
Operating as a sniper is one of the most challenging and rewarding roles in any field or sport involving firearms.
The primary objective of this profession is to shoot accurately at a distance while maintaining safety and control.
To that end, sniper rifles are built for this purpose — to shoot from a distance with precision and accuracy, making them an ideal weapon for anyone interested in taking down distant targets.
This article will list some of the best models on the market today and what are some of the key features that make them so great.
Below are the 10 best sniper rifles for 2024.
Note: There is STRONG evidence that the Biden administration is steadily working towards the banning of ALL long rifles. These include ALL rifles that they deem an ‘assault weapon‘, many of which are listed below.
It is STRONGLY recommended that, if you’ve been on the fence on buying a long gun, you get off that fence and buy one ASAP.
The Ruger Precision .6.5 Creedmoor 24” M-LOK Bolt Action Rifle offers premium features that will enhance your accuracy and precision down range.
This rifle is chambered in 6.5 Creedmoor making it perfect for taking down any target, including elk, boars, and deer.
It also features several features to provide you with consistent shooting down range, including a 24” cold hammer forged Chrome Moly Steel barrel, a hybrid muzzle break, and a Ruger Marksman Adjustable trigger.
Its hybrid muzzle provides enhanced recoil mitigation and reduced noise.
The Ruger Marksman Adjustable trigger provides you with a customizable trigger pull between 2.25 and 5 pounds for smooth pulls and improved control.
Another prominent feature is the Ruger Precision MSR stock with an assault rifle-style grip, an adjustable length of pull, and an adjustable cheek comb to get a customized fit for any shooter.
It also includes a 15” M-Lok handguard and a Picatinny rail up top for your favorite accessories and optics for the perfect loadout.
If you are looking for a premium sniper rifle that can easily take down your target at any range, the Ruger Precision .6.5 Creedmoor 24” M-LOK Bolt Action Rifle is an excellent choice.
It is available from Palmetto State Armory. Here’s where to buy it: www.PalmettoStateArmory.com
The Springfield Armory 2020 Waypoint .308 WIN Bolt-Action Rifle is the perfect rifle for those who want a lightweight yet rugged rifle that has guaranteed accuracy.
Springfield Armory guarantees a .75 MOA because of its precision craftsmanship.
Weighing just 6.56 pounds, it is perfect for going deep in the backcountry.
Also, the hybrid profile stock and 20” barrel are crafted from durable carbon fiber and can withstand the harshest environments.
It features a Cerakote finish on the barrel and the stainless steel receiver for even more durability and longevity.
To provide over-the-top precision, it also features Springfield’s TriggerTech adjustable trigger.
The Springfield Armory 2020 Waypoint .308 WIN Bolt-Action Rifle is your best bet if you want a lightweight rifle that can handle any environment.
It is available from Palmetto State Armory. Here’s where to buy it: www.PalmettoStateArmory.com
#3. Springfield Armory M1A Loaded National Match
Caliber: .308 Win
Action: Semi-Automatic
Barrel Length: 22”
Overall Length: 44”
Capacity: 10-Round
Weight: 9.3 lbs.
Springfield Armory’s M1A Loaded National Match has the legendary M1A platform with modern features that will give you a competitive edge over your competition.
Winning competitions is all about consistency and reliability, and the Loaded National Match has everything you need to get a tight shot group.
It features a 22” National Match air-gauged premium barrel with a 1:11 twist ratio with a six-groove rifling.
The barrel also features a classic M1A Loaded long-slotted flash suppressor.
You will have precision shooting out of the box by combining the National Match .62” front sight post and a non-hooded aperture rear sight.
It also features a 2 stage Military Trigger that is fine-tuned for a consistent 4.5 to 5-pound trigger pull.
If you are looking for a sniper rifle that is custom designed to provide you with match-grade performance at a reasonable price, the Springfield Armory M1A Loaded National Match is an excellent choice.
It is available from Palmetto State Armory. Here’s where to buy it: www.PalmettoStateArmory.com
#4. Bergara Premier HMR PRO 308 5 Round Bolt Action Rifle, Mini-Chassis With Adjustable Cheekpiece
Caliber: .308 Win
Action: Bolt
Barrel Length: 20”
Overall Length: 40”
Capacity: 5-Round
Weight: 9.3 lbs.
The Bergara Premier HMR PRO 308 5 Round Bolt Action Rifle is an excellent rifle for those who want a premium shooting experience for hunting and matches chambered in .308 Winchester.
It features a Synthetic stock with an adjustable pull length and cheekpiece to get the perfect fit for any shooter.
With a 20” free-floating barrel, you will have consistently accurate shots down range.
With an upgraded bolt and feeding system, it has a premium 2-lug system that separates the floating bolt head for smooth action.
The bolt has a one-piece design and comes with a full nitride finish for enhanced durability.
The rifle also features a premium TriggerTech trigger that offers a consistently smooth pull.
It also comes with a 5-round capacity AICS-style magazine.
If you are looking for a high-performance rifle designed for hunting and matches, the Bergara Premier HMR PRO 308 5-Round Bolt Action Rifle is an excellent choice.
It is available from Palmetto State Armory. Here’s where to buy it: www.PalmettoStateArmory.com
#5. Ruger Predator 6.5 Creedmoor Moss Green 22” Rifle
Caliber: 6.5 Creedmoor
Action: Bolt
Barrel Length: 22”
Overall Length: 42”
Capacity: 3-Round
Weight: 6.6 lbs.
Ruger Predator 6.5 Creedmoor Moss Green 22” Rifle is the perfect rifle for those wanting premium features without a premium price tag.
It features a one-piece three-lug full-diameter bolt with dual cocking arms for smooth cycling.
The rifle also features a soft rubber butt pad, providing better control and recoil mitigation.
For accurate shots down range, it features a trigger with an adjustable pull between 3 and 5 pounds and a 22” threaded cold hammer forged steel barrel.
The Ruger Predator’s synthetic stock and alloy steel hardware can withstand the harshest environments.
Also, it only weighs 6.6 lbs making it perfect for long trips in the backcountry.
The Ruger Predator 6.5 Creedmoor Moss Green 22” Rifle is your best choice for a budget-friendly sniper rifle that can deliver consistent performance.
It is available from Palmetto State Armory. Here’s where to buy it: www.PalmettoStateArmory.com
#6. Sauer 100 Silver XT 6.5 Crd Bolt Action Rifle
Caliber: 6.5 Creedmoor
Action: Bolt
Barrel Length: 22”
Overall Length: 42”
Capacity: 5-Round
Weight: 6.68 lbs.
The Sauer 100 Silver XT 6.5 Crd Bolt Action Rifle is an excellent entry-level rifle that is perfect for taking your targets down at a distance.
It is chambered in 6.5 Creedmoor and has several features to provide an excellent shooting experience.
With a synthetic fixed Ergo Max stock, it will provide enhanced comfort and control.
It also features a 22” cold hammer forged steel barrel with a Cerakote finish for improved longevity and durability.
Other features include a three-position safety, an adjustable single-stage trigger, and steel hardware.
The Sauer 100 Silver XT 6.5 Crd Bolt Action Rifle is a top choice if you are looking for a solid-performing entry-level bolt action sniper rifle.
It is available from Palmetto State Armory. Here’s where to buy it: www.PalmettoStateArmory.com
#7. Savage Arms Axis II Precision 6.5 Crd Bolt Action Rifle, Matte OD Green/Black
Caliber: 6.5 Creedmoor
Action: Bolt
Barrel Length: 22”
Overall Length: 42.5” – 43.5”
Capacity: 8-Round
Weight: 9.88 lbs.
Savage Arms partnered with Modular Driven Technologies to introduce the Savage Arms Axis II Precision 6.5 Crd Bolt Action Rifle.
It includes an exclusive MDT chassis and many other features to provide precision shooting without destroying your bank account.
It features an aluminum stock with a beautiful matte olive drab green/black finish.
The stock features an adjustable comb height and length of pull spacers to get an excellent fit for enhanced control and comfort.
It also comes with a 22” carbon steel barrel that is button rifled for improved durability and accuracy.
An excellent feature is the M-Lok forend that allows you to customize your loadout.
With a 2.5 to 6 lb adjustable AccuTrigger, you will have smooth and consistent trigger pulls that ensure you will take down your target.
With its many features at an excellent price point, the Savage Arms Axis II Precision 6.5 Crd Bolt Action Rifle is a top pick.
It is available from Palmetto State Armory. Here’s where to buy it: www.PalmettoStateArmory.com
#8. Howa M1500 Australian Precision Chassis 6.5 Crd Bolt Action Rifle
Caliber: 6.5 Creedmoor
Action: Bolt
Barrel Length: 24”
Overall Length: 44.5” – 47.5”
Capacity: 10-Round
Weight: 10.8 lbs.
The Howa M1500 Australian Precision Chassis 6.5 Crd Bolt Action Rifle specializes in modularity and accuracy with its fine-tuned components.
It comes with a LUTH-AR MBA-4 fully adjustable stock with a variable length of pull of 12” to 15” for a precise fit.
With a 24” threaded precision barrel, ten-round capacity, and an M-Lok free float handguard, you can have the perfect loadout to keep a target engaged no matter the distance.
Howa backs its product with a lifetime warranty and a sub-MOA guarantee.
If you want guaranteed performance with tons of customization, the Howa M1500 Australian Precision Chassis 6.5 Crd Bolt Action Rifle is a perfect fit for you.
It is available from Palmetto State Armory. Here’s where to buy it: www.PalmettoStateArmory.com
#9. Daniel Defense Delta 5 Pro 6.5 Creedmoor Rifle 24”
Caliber: 6.5 Creedmoor
Action: Bolt
Barrel Length: 24”
Overall Length: 40.25”
Capacity: 10-Round
Weight: 11.4 lbs.
The Daniel Defense Delta 5 Pro 6.5 Creedmoor Rifle 24” has custom enhancements that you will not find in your average long gun.
It features an interchangeable 24” proprietary steel blend barrier with a Cerakote finish and an Area 419 Hellfire Muzzle Brake.
The Area 419 Hellfire Muzzle Brake provides reduced recoil and muzzle rise, allowing you to reengage your target quickly.
It also comes with an adjustable Timney Elite Hunter single-stage trigger, an M-Lok handguard, an AR-15 grip attachment, and an ergonomic thumb rest.
The synthetic stock also has an adjustable length of pull, butt pad height, and cheek riser for a fantastic fit.
Pair all that with an included ten-round PMAG, and you get an excellent package.
A downside to the Delta 5 Pro is its price, but every inch of it is well worth the price tag.
If you want a feature-rich sniper rifle perfect for newcomers or professionals, the Daniel Defense Delta 5 Pro 6.5 Creedmoor Rifle 24” is an excellent choice.
It is available from Palmetto State Armory. Here’s where to buy it: www.PalmettoStateArmory.com
#10. Springfield Armory M1A SOCOM-16 .308
Caliber: .308 Win
Action: Semi-Automatic
Barrel Length: 16.25”
Overall Length: 37.25”
Capacity: 10-Round
Weight: 8.8 lbs
The Springfield Armory M1A SOCOM-16 .308 brings everything shooters love about the standard M1A and makes it compact.
This version has a shorter 16.25” barrel and gas system with an overall length of 37.25”, making it perfect for maneuvering in tight spaces.
Its black composite stock is impervious to harsh weather and is comfortable to fit in the pocket of your shoulder.
The iron sights on the M1A SOCOM-16 are top-notch, with an XS Tritium front sight and a classic M1A rear sight.
One of the best things about this rifle is that it is semi-automatic with a ten-round capacity that enables you to continually engage your target without interruptions.
A unique feature of the M1A SOCOM-16 is that it comes with a forward scout-style Picatinny rail to accommodate close-quarters optics.
It also features a two-stage match-grade tuned trigger for crisp trigger pulls.
If you are looking for a premium rifle that will deliver at short or long distances with a semi-automatic action, the Springfield Armory M1A SOCOM-16 .308 is a clear winner.
It is available from Palmetto State Armory. Here’s where to buy it: www.PalmettoStateArmory.com
Semi-Automatic Vs. Bolt Action
Based on the shooter’s preference, they may desire a bolt action or semi-automatic rifle, but what is the difference?
Fire Rate
The most significant difference is that semi-automatic rifles can fire follow-on shots much faster.
In the long run, you can engage a target more effectively with a Semi-automatic sniper rifle.
Recoil
Bolt action rifles will tend to provide more accurate follow-on shots because of the way gas is expelled differently between the two.
Semi-Automatic rifles use some of the gas for expelled rounds to charge the weapon for another shot.
While doing this, the gas is pushed back towards the rear, and the bolt slams into the buffer spring.
Bolt action rifles only have one stage of recoil, where the recoil is pushed directly into the shooter’s shoulder pocket.
Moving Parts
While a high-quality semi-automatic rifle will have consistent performance, it is still more likely to malfunction due to having more moving parts.
.308 Winchester Vs. 6.5 Creedmoor
.308 Winchester and 6.5 Creedmoor are two of the most common rounds fired by snipers and for a good reason.
They offer plenty of power to take down your target at any range.
What Is The Difference?
Round Variety
The .308 has been around for decades with plenty of different variations in weight and complexity from lightweight 125-grain to heavier 180-grain rounds.
With the 6.5 Creedmoor, the heavier rounds are typically 1437-grain.
The .308 Winchester will generally be easier to get and is cheaper.
Recoil
The 6.5 Creedmoor has slightly less recoil than the .308 Winchester.
Ballistics
Both .308 Winchester and 6.5 Creedmoor do an excellent job at providing the ballistics you need to take down your target.
However, the 6.5 Creedmoor has better ballistics, allowing the round to have a flatter trajectory for long distances.
Final Verdict
For long-range precision shooting, the 6.5 Creedmoor is the way to go.
However, if you are the average hunter who will engage their target at less than 300 yards, the .308 Winchester is a better choice.
References
Bolt Action or Semi-Automatic for Long-Range Competition?
6.5 Creedmoor vs. .308 Winchester
See Also
12 Best Long Range Rifles
9 Best AR-10 Rifles
12 Best 308 Rifles
10 Best .22 Caliber Rifles
9 Best Rifles For Home Defense
Featured Image: GetArchive.net
Affiliate Disclosure: This post may contain affiliate links. If you click and purchase, I may receive a small commission at no extra cost to you. I only recommend products I have personally vetted. Learn more.
If you’re looking for a live bait that will attract fish, mealworms are a great option. These small worms are high in protein and fat, making them irresistible to many fish species. In addition, they’re easy to find and relatively inexpensive. Here’s everything you need to know about using mealworms for fishing.
Benefits of Using Mealworms as Bait
There are several benefits to using mealworms as bait. First, they’re a natural food source for many fish species. This means that fish are more likely to bite on a mealworm than something they don’t typically eat.
Second, mealworms are high in nutrition, making them an ideal food source for fish, as it gives them the energy they need to grow and thrive.
Third, mealworms are relatively easy to find and purchase. You can find them at most bait shops or online. They’re also relatively inexpensive, making them a great option for budget-minded anglers.
How to Use Mealworms as Bait
Using mealworms is simple – thread them onto your hook and cast your line into the water. The mealworms will wiggle and squirm, attracting fish to your line. In addition, their soft bodies make them easy for fish to eat. The size of the hook depends on the size of the fish you are hoping to catch.
Ways to use mealworms for fishing also depend on the fish you’re targeting. For example, if you’re fishing for trout, you can thread the mealworm onto a hook and cast your line into a pool or stream.
The movement of the mealworm will attract the trout, and when they bite, you can reel them in. If you’re fishing for catfish, you can drop a handful of mealworms into the water and wait for the catfish to bite.
What Type of Fish Can You Catch with Mealworms as a Bait? Mealworms are effective for many different fish species, including trout, bass, panfish, and catfish. When fishing for trout, try using a small mealworm. For bass, use a larger worm. And for catfish, use a handful of worms.
How to Buy Mealworms
You can find mealworms at most bait shops or online. If you’re buying them online, make sure to purchase them from a reputable source. Look for a supplier that offers guaranteed live delivery and ships their worms in a breathable container. Also, be sure to choose the correct size worm for the fish you’re hoping to catch.
How to Keep the Mealworms Fresh for Fishing
Mealworms are live bait, so it’s essential to keep them alive and fresh. The best way to do this is to purchase a breathable container, such as a mesh bag, and store them in a cool, dark place. Change the bedding regularly and mist the worms with water to keep them hydrated. You can also purchase a live bait aerator to keep the mealworms alive and fresh for longer periods.
Buy Mealworms for Fishing from Sunshine State Worms
If you’re looking for high-quality mealworms as bait for fishing, look no further than Sunshine State Worms. We offer live delivery and guaranteed live arrival on all our worms.
We also ship our worms in a breathable container to ensure they arrive alive and fresh. Plus, we have a wide variety of sizes to choose from, so you can find the perfect worm for your fishing needs. Visit our website today to learn more and place your order.
"Understanding the Legalities: Felon Ownership of Air Rifles in Tennessee"
can a felon own an air rifle in tennessee?
In the state of Tennessee, the ownership...
")
")
")
")
")