I got the OK from A7X at Ice Shanty to post this “How to Sharpen Auger Blades at Home”. This is awesome in getting old blades cutting like new again without too much effort.
This is a post from A7X “Sharpen your auger blades at home
From AX7:
** Iceshanty and myself assume no liability for personal injury or damage ** This is a rough draft, I will add to it or revise it as I read it a couple times… Just trying to get the basics on here for now… So try not to go crazy with suggestions just yet… If you feel compelled to make suggestions, please make them via private message… This is an article on How To sharpen your auger shaver blades at home the right way with nothing but hand tools… If I get my hand on another chipper blade I will write that up as well… Feel free to ask any questions about other types or shapes of shaver blades but the concept will remain the same… First off, Please keep this article clean… As in please don’t post how YOU would do this and “muddy up” my methods… I am spending a lot of time here writing and uploading pictures showing and sharing my techniques as a professional… Feel free to click “New Topic” and write your techniques up… I have full access to a machine shop but I am showing you how to do this just as good without any expensive equipment… I am going to be using terminology that everyone can understand, please don’t be the smart guy and correct me, I am doing it on purpose for ease of understanding… I will add as I feel needed if I accidently leave important info out… Lastly, This is a technique that is learned through practice, don’t expect to get it right the first time, although if you follow closely you just might!… If you take your time to get it right you will feel rewarded for your efforts and you will be very happy with the outcome… I suggest using an old set of blades for practice… Also read directions thoroughly before attempting…
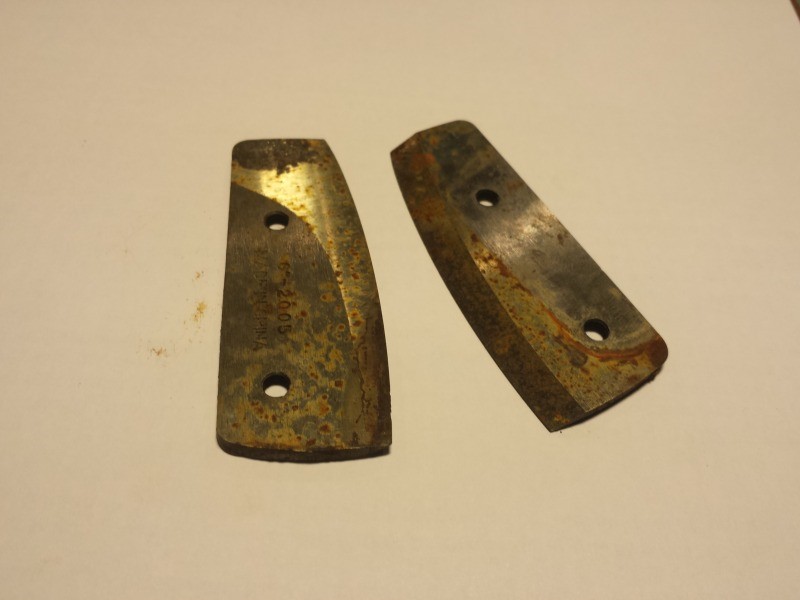
***And as with any blade or tool, PLEASE use caution, You don’t want to end up in the hospital getting stitchesAlso Much care is needed in maintaining the edge when this process is complete… Always apply the blade guard when you are not cutting ice… And Always thoroughly dry and oil blades when stored over night or for long periods of time… This will help maintain your edge and is well worth the extra effort to cut holes efficiently every outing… Let’s get started… First I would like to squash a couple of the myths about sharpening auger blades… Myth#1: When sharpening auger blades, you have to get the angle just like the factory or it will not cut well… Truth: This is far from the truth, I can hear the hooting and hollering now because this is all I hear… But the truth is you can change the angles all you want (within reason of a good cutting edge) and have an auger that cuts amazing for a long, long time… If there was one particular type of edge (angle) that cuts great, all auger blades would look identical… I know where this myth stems from… Read on… Myth#2: When sharpening auger blades if you don’t keep the correct angles the auger will walk… Truth: The reason the auger will walk is because one blade is biting more than the other… This can be due to a bent blade mount, one blade is badly dinged or dull, or one was ground more than the other in the sharpening process leaving it floating just above the other while the other cuts in and thus, the auger spins off to one side… Now that we’ve squashed that stuff, Let’s get your auger cutting ice as if it were warm butter… Here we have a terribly unkempt set of 6” strikemaster blades… We have chips, dings, rust, they’re about as sharp as a turd… Yeah they get through 8” of ice in just over a minute of fighting and applying moderate down pressure only for it to skip and bite and let go again, that’s unacceptable… I was out with these on Thursday… The auger belongs to a friend, it’s 10 years old NEVER sharpened!
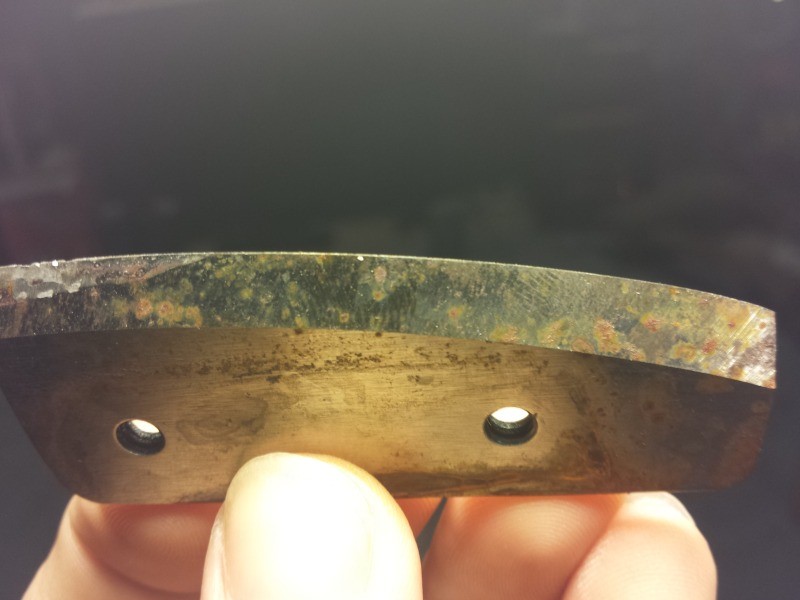
Here is a closer picture notice the large bevel (secondary edge) and then notice the tiny little bevel on the edge? This is the important part, it’s the primary edge but here we are going to remove it completely…
So let’s talk about how these things cut…
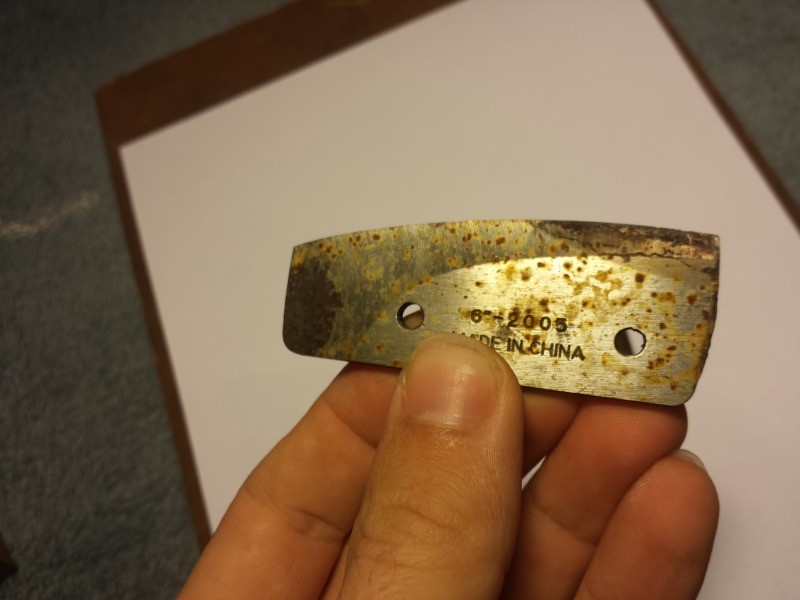
They cut by spinning on the ice and biting in… While biting into the ice, it’s shaved or broken away and pushed up over the blade then it rides up the auger and out of the hole… When the auger blades get dull this doesn’t happen… Why? Because the blades edge has been worn, bent, dinged, rusted, etc… Here we have the bottom side of the blade (the part that faces the ice whilst cutting)…
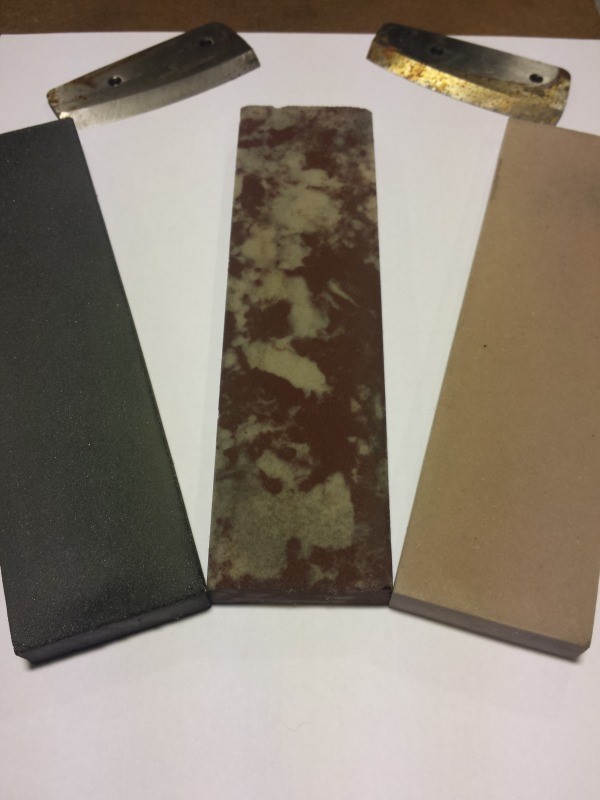
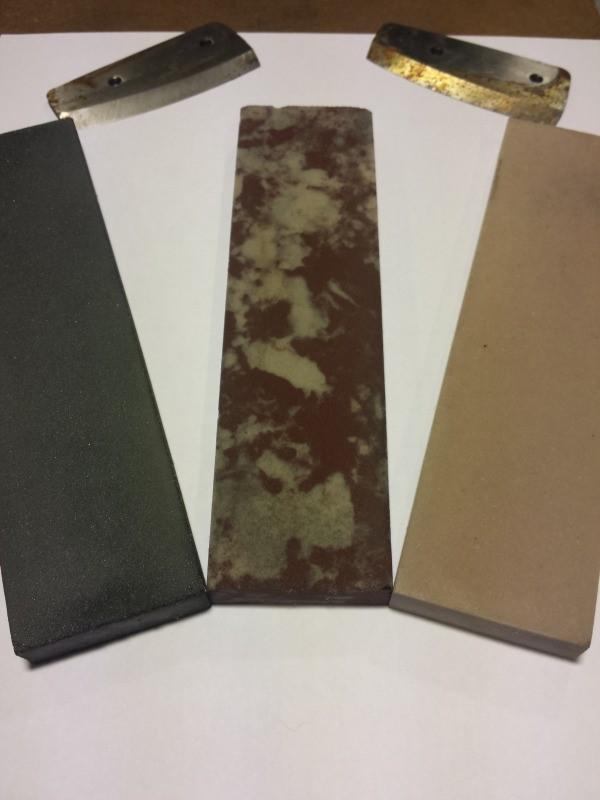
 We DO NOT touch this part of the blade by any means in the sharpening process… I don’t care if there’s rust, a burr or you think there might be a genie inside and you will get three wishes by rubbing it on your honing stone, we don’t touch this! Period! Why? Think of it as a wood chisel, we’re shaving wood with our chisel and you start to angle the handle down toward the lumber, what happens? The chisel rides up and out of the lumber and won’t cut in at that angle… This is changing the “angle of attack” on the material… Removing any material on this bottom side of the blade would do the same thing… So unless you plan on shimming your blades to correct the “angle of attack” DO NOT remove any material from this side of the blade! Period! Some myths can stem from here as well, sharpening the bottom of the blades at the wrong angle will not allow them to cut. .. Enough jibber jabber, let’s get to work here… What you’ll need 3 stones, a coarse, a medium, a fine honing stone and a rag (use your discretion when you need to wipe the blades with a rag)… And a set of Blades of course…
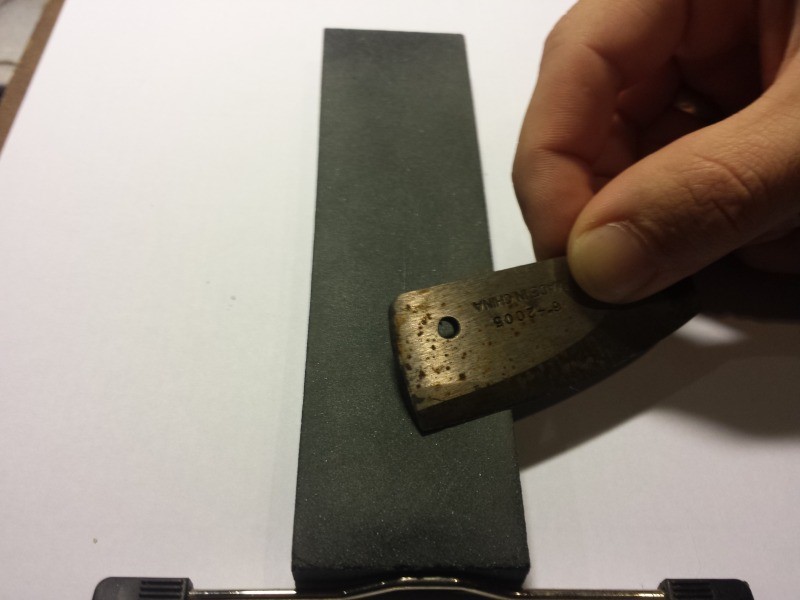
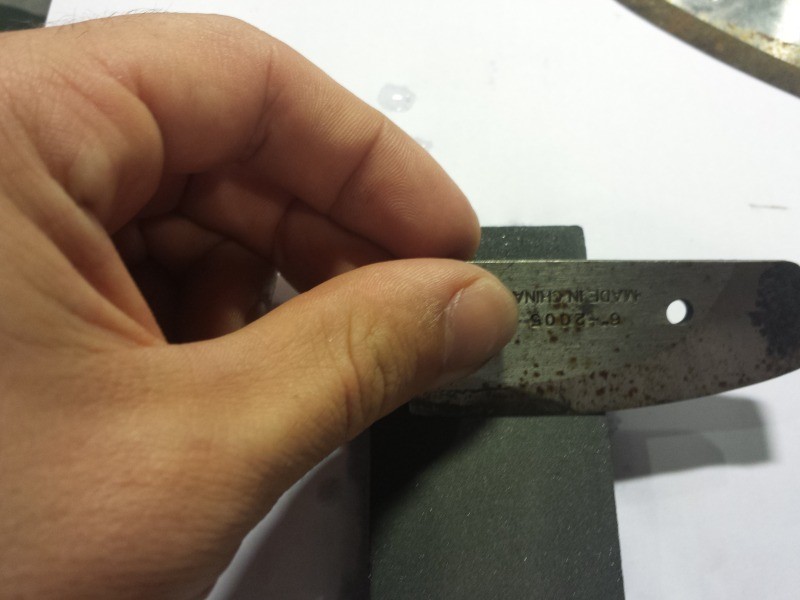
I have a few sets, oil, some I use dry and I also have water stones… But I never oil a course stone, I just don’t like it… Had some spill once, stone went in the trash… But the medium and fine you can oil or use water depending on the type of stones you have, I won’t be using anything in this article (dry stones), and the outcome will still be amazing… ***If you feel your blades only need a quick touch up, proceed to Step 4*** STEP 1 We’re going to start by grinding all the crap, burrs, dings and chips out of the secondary bevel… This wide bevel is only for clearance to hone a cutting edge… It’s only purpose is to make it easy for the cutting edge to be honed on and for material to be cut to pass over… That being said, it can be 20, 25, 30, 21, 27 degrees… So pay no attention to the myths you’ve heard but we’ll go with the factory’s cut so we have to remove as little material as possible and use it to keep our angle consant… WHAT WE DO TO ONE BLADE WE MUST DO TO THE OTHER, see myth #2 Lay the blade flat on your coarse stone so that the side that faces you when you cut is FACE DOWN and the cutting edge is facing you… Then roll it upward until you feel it hit the flat of the bevel… Like this…
 We are going to drag the blade along the coarse stone with the blade toward you… This motion should look like you are trying to shave a sticker off of the stone… The motion should flow like this… USE TWO HANDS, I didn’t have three at the time soooo… 1.
 2.
2.
 3.
3.
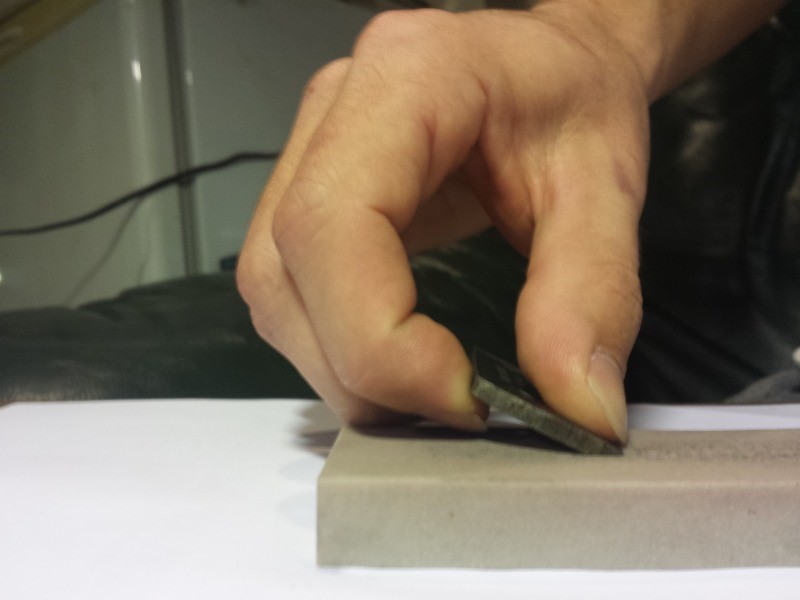
Again with two hands all while keeping perfectly flat on the bevel (this bevel is so wide it’s pretty easy to stay flat at that angle)… Don’t let the edge bite into the stone… DON’T roll the blade up toward you, you will make more work for yourself… Press lightly and once you develop the muscle memory you can start to move heavier and faster but take your time… We draw the stone this way because if you pull AWAY from the edge you will remove or drag microscopic pieces of metal from the edge causing micro serrations and that will hinder the final step… We want all that material there… We are going to run this motion and get any rust off… Be sure through the entire process that you are getting to both corners of the blade, on all steps, getting to the corners without rolling them over, it almost feels like you are picking the blade up to get to them… A good way to check is to flip the blade over and make sure you are removing material there, again, without rolling over the left or right edge… Just enough to get there, don’t over do it and roll the edge… Then I run this motion… 1. Drag the blade straight down the stone on the same bevel again keeping it perfectly flat on the bevel, these grinds are done while holding the blade perpendicular to the stones length… (90 degrees)
 2. Then do the middle
3. Then the other end, working back and forth as such
 You will see that you can rock the blade while staying flat on that bevel as you’re running this motion… Do so when you feel comfortable all while keeping the blade perpendicular to the stone… Do this until you have removed all chips dings and primary edge… You will feel a small burr form on the BOTTOM of the blade (side that faces the ice while cutting) This is good, you need to grind until a burr forms along the entire edge, otherwise you are wasting your time, the burr indicates that you have removed enough material to move on… You will end up with something like this, yes this is the same blade! We can do by hand what a machine can do… No more chips, dings, rust or primary edge…
This is where most people stop and think they have a great edge and most likely where the myths stem from… They get it to this point and it doesn’t work so they blame it on the angles being wrong, well it is not a great edge, it is weak and will probably get through about 2” of ice before going dull… This edge shaves hair off my arm easily (I tested it before moving on) Most people think this means sharp well yeah, its sharp but it’s not going to last long at all… The very edge is too thin and will roll up upon applying any amount of pressure… I said what we do to one we have to do to the other… Here’s a good way to check and now is the time to do it… I bolted the two blades together, This shows us that they are basically the same, (I forgot to take a pic when I checked after I grinded, this is from when I checked the condition beforehand incase any extra grinding on one was needed) but even here from the factory one drops off a bit, not terribly but we’ll fix it…
 Step 2 Much like the first step we are going to grind the blade on the stone the same way as the second motion but we are going to use a medium stone… Same angle until it’s polished
Step 3 And same exact thing on the honing stone, Again till it’s polished…
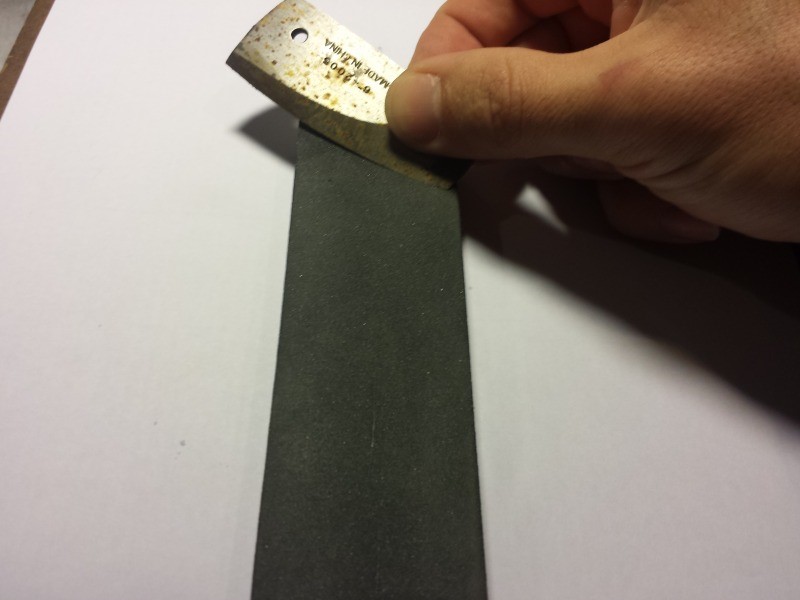 Well even more people will stop here… They will see a nice mirror polish, shave hair very easily but they will get the same outcome as I spoke of before, junk after one hole… Step 4 Now we are going to hone a primary edge on the blade… This is the VERY important angle we are going to grind on… It can be 28 degrees (wont last as long) or 45 degrees (will last much longer but may not bite as well) both can be VERY sharp… This is because there will be more material “backing up” the edge with a thicker more obtuse 45 degree angle than that of a skinny acute 28 degree angle… For ice anything from about 38-40 degrees should be sufficient and last a very long time… But, this angle could be 35 degrees and still last quite some time, 32, 42, 37 degrees, all these angles will cut great, just to back up the truth behind the myth… Ideally though, we are looking for 38-40 degrees for an auger to retain a great edge and not sacrifice longevity… Whatever angle is chosen, MUST remain constant through the honing process or the blade will not cut to its full potential… We are going to take the blade and place it on the stone again on the secondary bevel, but this time we are going to roll it up to about 38-40 degrees From this
To somewhere around here
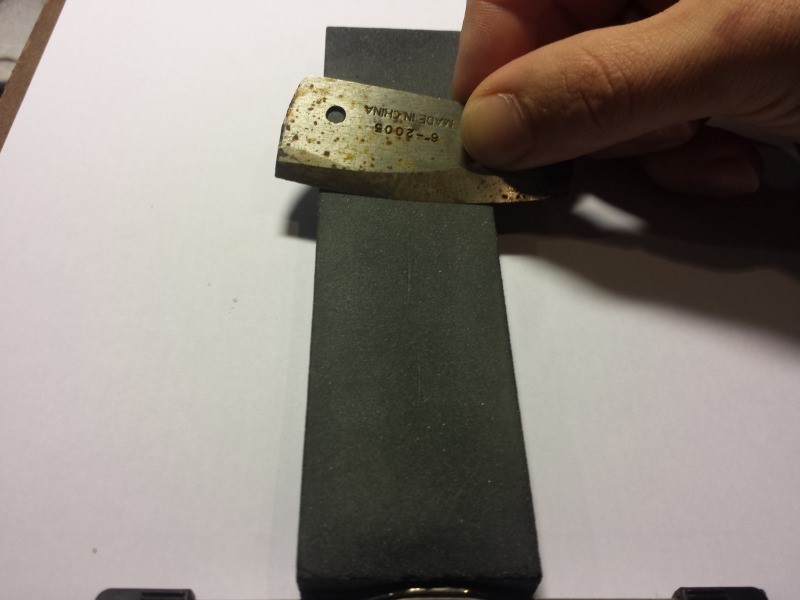 2 From here we are going to hone the primary edge using the first motion (the sweeping draw shave motion from one side to the other, “shaving the sticker off”, you will feel some resistance here on the first pass or two, we are pushing ever so slightly to hone this edge on… Some use oil on the stone here, sometimes I do sometimes I don’t, light hair clipper oil will work great, or any really light oil… It is supposed to aid in floating away metal particles so the blade doesn’t get microscopically dinged or scratched by them… There’s a lot of controversy over this, it’s about 50/50… Sometimes when it just doesn’t seem to get REAL sharp I’ll toss some oil down on a stone I have already oiled… It is VERY important here to MAINTAIN the angle, if you roll up you will be working against what you are trying to achieve… Make yourself some type of jig if needed, I don’t use one but I have been doing this for a really long time… When You’re done you should have something like this…
See that? A nice smoooooth primary edge on an almost mirror like secondary edge… The primary edge only needs to be about as wide as a thick piece of thread at maximum, this will make it easier to remove it on the next sharpening making for much less material to be removed… From here there will still be a slight burr on the bottom, DO NOT TOUCH IT!!! you will have worked way too hard to get this far and go grinding that off… you will feel compelled to use the honing stone thinking eh wont be that bad… Might as well go drill a hole in your driveway… Leave it alone, most people would be like a dog with a scab… Just leave it, it is a thin ribbon of metal that will fall off after the first few holes… If I feel compelled I will add how to strop off the burr, but like I said it will fall off and not affect the auger one bit… We’re cutting ice that shaves, chips and breaks, not plastic or wood… If you feel compelled to remove it, Strop the edge with a leather belt, like the old timers with their straight razors bending the burr back and forth and it will fall off… The outcome? Went from 1 minute + while pushing down on the auger through 8” of ice biting and letting go, to 16 seconds through just over a 14” of ice… This is with absolutely ZERO down pressure other than the weight of the auger, and ZERO centering issues (no walking)… I drilled three holes and just let my “top” arm barely rest… An extreme difference and JUST AS GOOD AS NEW BLADES that will last a damn long time… When reinstalling blades, I ALWAYS like to put a good marine grade grease on all mating surfaces… water will hide in here and corrode the blades and bolts. .. This took me about an hour (While taking pictures obviously) to complete, I have more pictures but didn’t feel the need to post everything, it was very tough grabbing the right light and I hope you can see everything ok… This has taken me FOREVER to type and I had upload issues… I will add more necessary information over the next few days, for now here are the basics… So there we go, a couple myths squashed, Nice freakin sharp blades and… Oh wait, one other myth… Myth: You can’t sharpen auger blades at home they will just never cut like new ones Truth: YOU CAN!!! and they will cut just like new
