A lot of livestock produce manure that can be used in your gardens and on your grass but not all manure is the same. The manure that chickens produce is different from the manure that ducks produce.
This article looks into the differences between chicken manure and duck manure.
You can keep both chickens and ducks on your property to produce eggs, for meat, or even as pets. Both can produce manure that plants can use but the manure isn’t the same, here are the key differences between the two:
The consistency:
If you own chickens and ducks you’ll know that the consistency of these birds’ poop is not the same.
Chickens produce poop that is fairly solid in consistency, it isn’t wet but rather soft. The poop also has a white material on top which is called urates. Chicken poop is also brown or green in color.
Duck poop, on the other hand, is quite runny, this is perfectly normal for ducks. The poop will usually be white in color or will take on the color of whatever the bird is eating.
That being said, the poop of both of these animals can vary in size, shape, and color depending on different situations.
The quantity:
The amount of poop that these birds produce varies slightly.
Chickens poop quite frequently but there are slightly longer breaks between their poops when compared to duck poop. These birds will poop every 20- 30 minutes or so.
Ducks, on the other hand, poop quite a lot, these birds can poop every 15 to 20 minutes on average. These birds will thus produce a lot more poop on a daily basis than chickens will.
Both of these animals have no need to have any control over their bowel movements so both birds will poop wherever they so, please.
Hot or cold:
Whether or not an animal’s poop is hot or cold makes a difference in how you can use it as a fertilizer.
Chicken poop is considered to be “hot’, if poop is classified as hot then this means that the poop contains so much nitrogen that it will burn any plants that you use it directly on.
The poop will cause the plants to wither quickly because it is hot. Hot manure will also cause plants to brown and be stunted.
Duck poop is not considered to be hot, the poop still has high amounts of nitrogen in it but because of its consistency, it will not burn the plants when used in your garden.
When it can be used:
If an animal’s poop is hot then it needs to be processed, by decomposing, before you can apply it to your plants.
Because chicken manure is hot you would have to compost it with carbon-rich materials before you can use it on your plants. Carbon-rich materials include straw and leaves.
Duck manure can be used directly on your plants and will not burn the plants if you choose to not compost the poop first.
That being said, it is recommended that all animal poop for use as fertilizer be composted, mixed, or pelletized before use.
Doing this will increase the nutrient availability of the manure, will change its handling characteristics, and control any pathogens.
How to use it:
You can use chicken poop as fertilizer but you’d need to compost it before you do this.
This involves piling the poop and the carbon-rich materials in layers and letting it sit. This heap needs to be kept moist and aerated throughout the decomposing process.
After a couple of months of this, the poop will be cooler and can be applied to your plants. The heap will become crumbly and black when ready and then it can be applied to your plants or grass.
Duck poop can be used directly on your plants but it may be more difficult to collect because it is runny.
You can shovel the poop and apply it on your plants or you can use the soiled water that your ducks swim in and pour this water on your plants.
If you enjoyed this article then you may also be interested in other duck related articles. Here are some articles that you may be interested in: Duckling Vomiting, Do Geese Get Cold, Why Do Ducks Like Ice Water?, Why Is My Duck Throwing Up Water?, Does Duck Poop Kill Grass?, Duck Eggs Turning Black, How To Keep Ducks Quiet At Night
Carp taste like tilapia, only cleaner and better! They are also much less fishy than whiting. I compare it to these fish because they can be bought in most supermarkets so many Americans have had them.
In fact carp are one of the most commonly eaten freshwater fish around the world. Everywhere except for the US that is…
I’m not entirely sure why we in the US don’t see carp as edible. It may be because we have such an abundance of red meat and chicken, or because we have easy access to salmon (which is pretty dang good).
I have spent a number of years living in Asian countries where I ate carp quite often. Honestly, it tastes really good. It’s comparable to any other white fish I have eaten such as tilapia. In fact I’d say carp taste cleaner than most farmed tilapia.
For one, carp are big fish with a lot of meat on them. Most carp caught in the US will average somewhere around 10 pounds. Some carp can grow to over 40 pounds!
If you have ever caught and eaten a trout, then you know that the ratio of meat to everything else is usually pretty small. An average trout of say 12 inches will only have enough meat for a few bites. But a small carp of 5 pounds can feed two or three people.
Carp eat a variety of things from vegetation to crawfish to mussels. The best tasting carp will be ones that have spent their life in clean water lakes with an abundance of crawfish and insects.
What Might Make Carp Bad Eating
Since common carp eat just about anything, they spend a lot of time sifting through the silted lake and river bottoms. This can effect the taste of the carp to have a slight muddy taste.
The best way to reduce the muddy taste in a carp is to bleed it or fillet it immediately after killing it. If you don’t do this, the blood will stay in the meat, giving it a muddy taste.
Another thing people don’t like about carp is how boney they are. A fillet of carp will still have a number of Y-bones in it. However, these are easy to remove after the fish is cooked.
Tasty Species of Carp
There are many species of carp around the world. However I’m going to give an overview of the most common carp in the US, and how they taste.
Eating Common Carp
The common carp is the one most people think of when they hear the word carp. They have dark olive/brown backs with beautiful golden sides.
Other than their color difference, they look pretty much the same as the Koi you might find in a garden pond.
Their mouth is on the underside of their head and eat mostly off the bottom. Their diet is made up of the widest range of foods as far as carp go.
Common carp may not be the best tasting carp, but they still taste great. Many people in the southern US, love to both catch and eat common carp.
These carp aren’t native to the US. In fact they were brought here as a food source by many early settlers. As the pioneers moved west, so did the common carp. So we originally brought them here for food, but somewhere along the way we stopped eating them and they became forgotten.
Eating Grass Carp
Grass carp (aka white amur) are often stocked on ponds and canals as a means of weed control. As their name suggests, grass carp eat mainly vegetation. They were brought to the US in the 1960s and stocked in ponds to keep down the grass, weeds, and algae.
If you live in an area with a large population of Asian immigrants then you might even be able to find grass carp for sale in the grocery stores.
Like the common carp (or any fish for that matter), the taste will greatly depend on the quality of the water they were harvested from. If they were raised in a muddy fish pond, then they’re probably going to taste a little muddy…
However, if they are caught in clean water, and raised on natural greens, then they will have a very clean taste.
Eating Big Head Carp
Big head carp are a little on the funny looking side if you ask me. They have big mouths on the front of their head like grass carp, but their eyes are located far down the sides of their heads and even below their mouth line.
Big head carp are filter feeders. They swim through the water with their mouths open filtering out plankton and other food.
These carp are actually one of the favorite menu items in Asia. The cheek meat in particular is considered a delicacy.
These carp can also be found for sale in Asian grocers and they taste amazing!
Eating Silver Carp
The silver carp is another Asian carp that was brought to the US in the mid 1900s. Since then, the silver carp have escaped and spread through Midwest rivers like a wild fire. They are probably the biggest nuisance fish in the US.
Silver fish have the terrible trait of jumping 5 to 10 feet out of the water when scared. This means that when a motor boat is driving up the river, silver carp will be jumping all around, sometimes landing in the boat, or smacking people in the face. It may sound funny, but that’s a 20 to 30 pound fish hitting you at 30+ mph!
Since these carp reproduce in such great numbers, they are popular with fish farms in Asia. Being that these carp are also filter feeders, they taste great as long as they weren’t farmed in a muddy fish pond.
How to Prepare Carp For Eating
Since it isn’t popular to eat carp in the US, you probably won’t find it in your grocery store. But if you have any Asian markets near you, you can try those.
For most people, the best way to get a carp for eating is to go fishing. Besides… fishing is the fun part!
If you want to learn how to catch a carp check out this page, How To Catch Carp!
1. Kill The Carp
You can kill carp by hitting them hard on the head with a rock or a fish bonker.
2. Bleed It
If you aren’t going to fillet the fish right away, then it’s important to bleed it out. If you don’t bleed it out, the blood will remain in the meat and give the fish a muddy taste.
To bleed a carp, cut out the gills and put it head down in a bucket of water for around 10 minutes.
3. Scale The Carp
Scaling the carp is optional. It depends on whether you want to eat the skin or not. If you don’t want to eat the skin, then don’t worry about scaling it. Just fillet the meat off the skin.
To scale the fish I like to use the back edge of my knife blade. Just scrape the scales off from the tail towards the head.
With the scales out of the way, it’s a little easier to fillet.
4. Fillet The Meat Off
There are many ways to cut up a carp. But to keep things simple, fillet it just the same as you would a trout.
Cut down right along the edge of the spine from the head towards the tail. Then cut right along the ribs from the back down to the belly, carefully separating the meat from off the rib bones.
I recommend watching a few YouTube videos about it. It’ll be much easier to understand by watching it.
And there is another video showing a more complex way of doing it, but at the same time you keep a lot more meat!
5. Cool The Fillets
Keep the fillets cool until it is time to cook them. You can put them in a cooler of ice, or straight into the fridge or freezer.
6. Cook The Carp
There are many recipes out there for carp. Most of the recipes will be from the Asian continent. So if you like Chinese food, then this is good news for you!
Here is a website I found that has a list of shared carp recipes. The website is CookPad.com
More on Carp
If you would like to learn more about carp and their history, then read on, or check out my other pages about what carp eat, how big carp get, or how to catch carp.
I’ve been bowhunting for 30 years and in the 2016 season, I took my biggest mule deer ever with a bow. I shoot a PSE Omen bow and on this hunt, I was using a Rage Hypodermic broadhead.
I go to Wyoming fishing. I wanted to hunt mule deer in Wyoming, but I had been guiding so much that I hadn’t had a chance to go to Wyoming and hunt for myself. 2016 was the only time in 10 years that I was able to make a mule deer hunt in Wyoming. When I drew my tag, I knew I’d be hunting in a really good unit.
I made six scouting trips before the season. I found a buck in the middle of July, then I didn’t see him again for 1-1/2 months. I found him again five or six days before my hunt started. I had pulled my trailer up to the area that I wanted to hunt five days before the season. When I saw this buck, his antlers had grown from about a 210-inch buck to a 252-inch buck in a little bit more than 1-1/2 months.
I came back home to Utah for a couple of days, and all I could think about was that mule deer buck. I went back to Wyoming two days before bow season started on Thursday. I arrived on Tuesday, and I found that buck again on Wednesday. The buck was holding on a peak at about 10,000 feet – almost above the tree line. I saw a grizzly bear, two wolves and about five or six black bears. I could see the Grand Teton Mountains off to my west.
I was hunting along the Wind River where one of the tallest peaks in Wyoming is and it’s called Gannet Peak. This is a really remote area of Wyoming, and I rarely see any other hunters when I’m up there. The first time I found this buck and every time I found him until I took him, he was on the same peak. I had put some trail cameras out on this mountain, and I got trail camera pictures from when he scored about 210 inches.
I was hiking in to my stand before daylight on the day I took the buck. My Dad and a friend of mine were hunting on the opposite side of the mountain from me. All the way in to where I was going to setup, I thought about the bears I had seen when I was scouting. I had one hand on my bow and the other hand on my bear spray as I moved silently through the dark woods. I hoped that the buck would be feeding at daylight on a south-facing slope where I had seen him before. One of the advantages of bowhunting mule deer in the early season is, because their antlers are still in the velvet, they tend to stay in open places more often than when they’re in hard horn.
The buck I was hunting was with another buck that would score about 180 on the P&Y scale. About 8 a.m., when the sun started warming up, the bucks would usually leave the open areas and move to the north side of the slope. I decided to try and intercept the buck as he went from his feeding area in the early morning to his bedding area. When I spotted the buck, I knew I had to climb the mountain to get above him. I climbed between 1,000 and 2,000 feet up above the buck. I was only about 100 yards from the top of the mountain when I set up. As the two deer moved toward me, the smaller buck was leading my buck up a trail about 50 yards from me.
Once I finally took the shot, the arrow hit the buck hard enough to turn the buck around and cause him to start going back down the trail he had just come up. Then the buck bedded down about 80 yards from me. After about 30 minutes, I saw the buck come rolling out of this patch of trees where he had bedded down. If he hadn’t hit this one tree while he was rolling, he would have fallen off a ledge, landed about 500 feet down the mountain and probably would have broken his rack.
He was a 252-inch buck, and he had a total of 25 points. The buck was also the state record for mule deer taken in the velvet in the state of Wyoming.
Day 1: Mossy Oak Pro Brandon Wicks’s Biggest Bull Elk
Tomorrow: One of Brandon Wicks’s Most Memorable Elk Hunts
“Unleash your shooting potential with the ultimate high-performance air rifle! Discover the highest FPS air rifle on the market that requires no license. Experience unrivaled power and precision in a compact package, perfect for both beginners and seasoned shooters. Elevate your shooting experience without any legal hassles – get ready to dominate the target range like never before!”
highest fps air rifle without a license
When it comes to air rifles, enthusiasts are always on the lookout for the highest FPS (feet per second) models that do not require a license. These powerful air rifles offer an exceptional shooting experience without the need for any additional paperwork or permits. Whether you are a seasoned shooter or a beginner looking to explore the world of air rifle shooting, finding the highest FPS air rifle without a license can provide you with an exhilarating and satisfying shooting experience.
One of the top contenders in this category is the Benjamin Bulldog.357. With its impressive 800 FPS muzzle velocity, this air rifle delivers unparalleled power and accuracy. It is capable of taking down small game with ease and has become a favorite among hunters and target shooters alike. Another noteworthy option is the Gamo Swarm Magnum, which boasts an impressive velocity of up to 1650 FPS. This break barrel air rifle offers incredible precision and speed, making it suitable for both hunting and competitive shooting.
It’s important to note that regulations regarding air rifles vary from country to country, so it is crucial to familiarize yourself with local laws before purchasing or using any high-powered air rifle. While these models may not require a license in certain regions, it is always best to ensure compliance with legal requirements. By selecting the highest FPS air rifle without a license that aligns with your needs and adheres to local regulations, you can enjoy the thrill of shooting while staying within legal boundaries.
In conclusion, owning the highest FPS air rifle without a license comes with its pros and cons. While it offers power and accuracy for recreational purposes, it also raises concerns over safety and legal implications. It is crucial for individuals to adhere to local laws, regulations, and safety precautions when considering such firearms.
“Exploring the dietary habits of deer, this headline delves into the intriguing question of whether these majestic creatures have a penchant for devouring morel mushrooms. With their distinctive taste and nutritional value, discover if deer include these prized fungi in their diet or if they leave them untouched in the wild.”
The Role of Deer in the Consumption of Morel Mushrooms
Deer play a significant role in the consumption of morel mushrooms. These animals are known to have a strong affinity for morels and actively seek them out during the mushroom season. As herbivores, deer rely on plant material as their primary food source, and morels provide them with an additional nutritious option.
When morels begin to “pop,” deer are quick to detect their presence due to their keen sense of smell. They use their acute olfactory abilities to locate patches of morels and graze on them. In some cases, deer may even exhibit selective foraging behavior, targeting areas where morels are abundant.
The consumption of morel mushrooms by deer has important ecological implications. As they feed on these mushrooms, deer inadvertently aid in the dispersal of morel spores through their digestive system. When the spores are excreted in different locations, they have the potential to give rise to new colonies of morels.
Furthermore, the mutualistic symbiosis between morels and trees is indirectly influenced by deer. As mentioned earlier, morels form a beneficial relationship with tree roots through mycorrhizae. By consuming and spreading morel spores, deer contribute to the dispersal and establishment of these fungi near tree roots, enhancing the mutualistic interaction between trees and morels.
In conclusion, deer play a crucial role in the consumption and dispersal of morel mushrooms. Their preference for this edible fungus not only provides them with a nutritious food source but also contributes to the sustainability and expansion of morel populations.
Exploring the Relationship Between Deer and Morel Mushrooms
Deer as Dispersers of Morel Spores
One important aspect of the relationship between deer and morel mushrooms is that deer play a role in dispersing the spores of morels. When deer feed on the fruiting bodies of morels, they unknowingly carry the spores on their fur and hooves to different locations. As they move through the forest, these spores are then released into the environment, allowing for new morel colonies to establish. This mutualistic interaction benefits both the deer, who get to enjoy a tasty meal, and the morels, who get their spores spread to new areas for reproduction.
The Impact of Deer Grazing on Morel Habitat
While deer can help spread morel spores, their grazing habits can also have an impact on morel habitat. Deer are known to selectively browse on certain plants, including some tree species that are associated with morels. If deer populations become too high or if they overgraze in a particular area, it could potentially affect the availability of suitable host trees for morels. This could lead to a decline in morel populations in those areas. However, when managed properly and with balanced deer populations, their grazing can actually enhance morel habitat by creating open spaces and promoting forest regeneration.
Competition for Morels between Deer and Humans
Both humans and deer have a strong affinity for morel mushrooms, which can lead to competition during the mushroom hunting season. As mentioned earlier, deer are among the animals that eagerly seek out and consume morels when they start appearing in forests. Humans also actively search for these prized fungi during this time. The race to find and collect as many morels as possible can create competition between humans and deer for this valuable food resource. However, with responsible harvesting practices and sustainable management of both deer populations and morel habitats, it is possible for both humans and deer to coexist and enjoy the benefits of this delicious mushroom.
Understanding the Feeding Habits of Deer: Do They Eat Morel Mushrooms?
Deer and Morel Mushroom Consumption
Deer are known to have a diverse diet, consisting mainly of plants such as grasses, leaves, and fruits. However, when it comes to morel mushrooms, there is some debate about whether or not deer consume them. While morels are highly sought after by humans and other animals during their season, it is unclear if deer actively seek out and eat these mushrooms. There have been anecdotal reports of deer grazing on morels in certain regions, but scientific studies on their consumption patterns are limited.
Possible Reasons for Deer’s Lack of Interest
There are several reasons why deer may not be inclined to eat morel mushrooms. One possibility is that morels do not provide sufficient nutritional value for deer compared to other available food sources. Deer have specific dietary requirements and may prioritize consuming plants that offer higher energy content or essential nutrients. Additionally, the unique taste and texture of morels might not appeal to deer’s palates, leading them to ignore these mushrooms in favor of other vegetation.
The Role of Symbiotic Relationships
Another factor that could influence the interaction between deer and morel mushrooms is the symbiotic relationship between morels and tree roots. As mentioned earlier, morels form mutualistic associations with tree roots through mycorrhizal connections. This means that the presence of healthy trees in an area could contribute to the abundance of morel mushrooms. If deer primarily rely on browsing vegetation around trees rather than foraging directly for mushrooms, they may indirectly benefit from the increased availability of morels without actively consuming them.
In conclusion, while there is some uncertainty regarding the feeding habits of deer when it comes to morel mushrooms, it is possible that they do not play a significant role in their diet. Deer may prioritize other plant species that offer higher nutritional value or have a more appealing taste. However, the presence of morel mushrooms in forested areas can indirectly benefit deer through the symbiotic relationships they form with trees. Further research is needed to fully understand the extent of deer’s interaction with morels and their overall impact on these mushroom populations.
Deer as Foragers: Examining their Appetite for Morel Mushrooms
Deer are known to be avid foragers, constantly searching for food sources in their natural habitat. One interesting aspect of their diet is their appetite for morel mushrooms. These elusive fungi seem to be a delicacy for deer, as they actively seek them out during the morel season.
When the time comes around for morels to start appearing, deer are among the first animals to detect their presence. They have a keen sense of smell and can pick up on the distinct aroma of these mushrooms. This leads them to areas where morels are known to grow, such as forested regions with dead elm trees or under wood scraps.
Once they locate a patch of morels, deer waste no time in devouring them. They use their sharp teeth to carefully graze on the mushrooms, leaving behind only remnants of what was once a thriving fungus. This behavior is not limited to just one species of deer; both mule deer and elk have been observed feasting on morel mushrooms.
The mutualistic relationship between morels and trees also plays a role in attracting deer to these fungi. As mentioned earlier, morels form a symbiotic relationship with tree roots through mycorrhizae. This means that the trees provide nutrients to the morels, which in turn enhance the nutrient uptake of the trees. The result is healthier and more abundant vegetation in the area, making it an attractive feeding ground for deer.
In conclusion, deer play a significant role in the ecosystem as foragers of morel mushrooms. Their appetite for these fungi helps disperse spores and contributes to the overall sustainability of this species. While humans may compete with deer during morel season, it is important to remember that these mushrooms are an essential part of nature’s food web and should be preserved for future generations to enjoy.
The Impact of Deer on Morel Mushroom Populations
Deer have a significant impact on morel mushroom populations. These animals play a crucial role in the dispersal of morel spores, which helps to promote the growth and reproduction of morels. When deer consume mature morel mushrooms, they unknowingly ingest the spores along with the mushroom. These spores then pass through the digestive system of the deer and are excreted in their droppings.
As deer move through the forest, they deposit these spore-laden droppings in various locations, including areas where morels may not have previously grown. The deposited spores can then germinate and establish new colonies of morel mushrooms. This process contributes to the expansion and distribution of morels within their habitat.
Additionally, deer activity can also indirectly benefit morel mushrooms by creating favorable conditions for their growth. As deer browse on vegetation, they disturb leaf litter and soil, creating small disturbances that can stimulate the growth of morels. Morels thrive in disturbed areas with decaying organic matter, so the foraging behavior of deer can create ideal habitats for these fungi.
However, while deer can have a positive impact on morel populations through spore dispersal and habitat disturbance, they can also pose a threat to these mushrooms. Deer are known to be avid consumers of young or emerging morels, especially during peak mushroom season. Their feeding habits can significantly reduce local populations of morels if not managed sustainably.
In conclusion, deer play a dual role in influencing morel mushroom populations. On one hand, they contribute to the dispersal and establishment of new colonies through spore ingestion and deposition. On the other hand, their consumption of young mushrooms can potentially deplete local populations if not regulated properly. It is important to strike a balance between allowing deer to contribute positively to morel ecosystems while ensuring sustainable harvesting practices to protect these valuable fungi.
Unveiling the Connection Between Deer and Morel Mushroom Consumption
Morel mushrooms have a unique connection with deer, as these animals are known to consume them. When the time comes for morels to start appearing, deer actively seek out these delicious fungi as part of their diet. The scent and taste of morels attract deer, making it a sought-after food source for them.
The mutualistic relationship between morels and trees also plays a role in attracting deer. As mentioned earlier, morels form a symbiotic relationship with the roots of certain trees through mycorrhizae. These trees, such as elm and ash, provide nutrients to the morels through this interaction. In turn, the morels benefit from the nutrients provided by the trees’ roots.
When deer consume morel mushrooms, they not only satisfy their hunger but also contribute to dispersing the spores of these fungi. The spores pass through the digestive system of deer and are then released into new areas when they defecate. This process helps in spreading morel mushrooms to different locations, ensuring their survival and reproduction.
It is important to note that while deer play a role in spreading morel mushrooms, they are not solely responsible for their distribution. Other animals like elk and grey squirrels also consume morels and aid in dispersing their spores.
Overall, the connection between deer and morel mushroom consumption is an intriguing aspect of their ecological interactions. Deer benefit from the nutritious food source provided by morels, while inadvertently assisting in their reproduction and dispersal throughout forested areas.
In conclusion, while deer have been observed consuming a variety of plant material, there is currently no scientific evidence to support the claim that they eat morel mushrooms. Morels are known to have a distinctive taste and odor that may deter deer from consuming them. Therefore, it is unlikely that deer actively seek out or consume morel mushrooms as part of their natural diet.
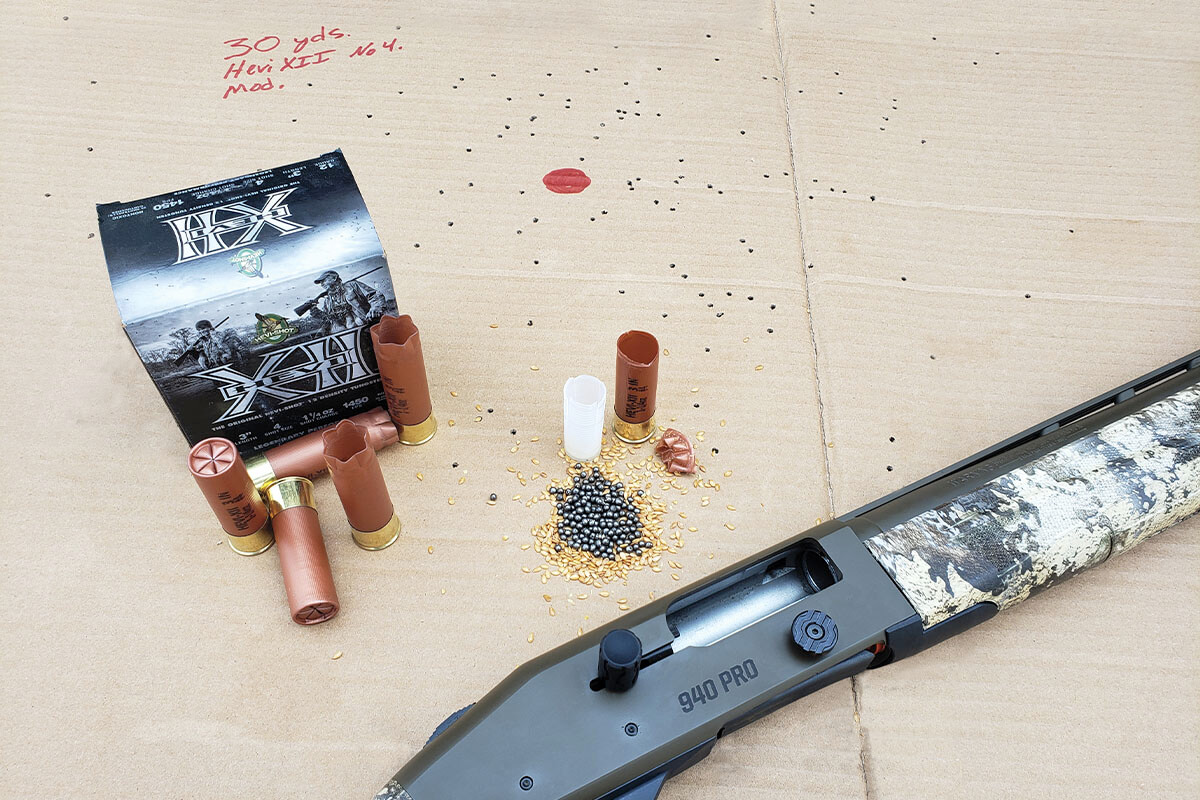
The new tungsten shotgun ammo from Hevi-Shot is a superior, hard-hitting, bird-killing non-toxic load. (Photo By: Jeff Johnston)
If you’re the type of waterfowler who feeds your family by hunting 60 days per year, you probably already know by now that HEVI-Shot tungsten may not be the stuff for you because it’s not cheap. You can get 5 orders of Peking duck down at the local Chinese buffet for less. It’s expensive because there are very few tungsten mines in the world, and this ultra-dense metal is a commodity coveted for making everything from competitive darts to turbine blades and rocket nozzles. But the fact is it’s simply superior to steel, and even a fair margin better than lead bird shot. How?
Imagine a tennis ball and a baseball both thrown 90mph by Pedro Martinez. Which one would you rather get beaned with? The tennis ball, of course, because it’s much less dense and results in much less energy when it hits you. I.e. it won’t hurt as much. The same laws of physics apply to shotgun pellets.
HEVI-Shot’s XII load uses tungsten pellets that measure 12 g/cc (grams per cubic centimeter). Compare that to steel at 7.8 g/cc, then imagine a No. 4 HEVI-Shot pellet and a steel pellet each going 1400 fps. The HEVI-Shot load is like a swarm of our aforementioned baseballs speeding toward that duck, whereas the steel is like the tennis balls. But most of us know this already.
The big advantage of tungsten, however, is that because it’s denser than steel (it’s also denser than lead, Bismuth, and most other materials) the shooter can choose a shot size two to three sizes smaller than comparable steel load and still maintain the same downrange energies. So by choosing a HEVI-Shot No. 4 pellets for geese over No. 1 steel load, for example, shooters are afforded many more pellets per load for denser patterns and more wound channels on the bird. Fact is, denser pellets penetrate deeper and kill quicker.
Tungsten just may pack the most punch on the market; HEVI-Shot’s new HEVI XII is now available for 12-, 20-, and 28-guage shooters.
Tungsten Tested
When I tested HEVI-Shot’s new HEVI-XII shell (3”, 1 1/4-oz. No. 4s) here’s what I found: The load contained an average of 166 pellets that together averaged 583 grains, or 1.33 ounces per payload. (That’s more than advertised.) This payload is touted to travel at 1,450 fps, which equals 2,549 ft.-lbs. energy at the muzzle. Although my actual results were very similar, the inputs differed slightly. From my 28-inch barrel I recorded a mean velocity of 1401, that, when multiplied by a payload mass average of 1.33 ozs, equals 2,541 ft.-lbs. But it’s when the individual pellet energies are compared that the heavier tungsten pellets shine like diamonds in a sea of decoy weights: Consider that the average No. 4 HEVI-XII pellet weighs 3.6 grains; when going 1400 fps it results in 16 ft.-lbs. per pellet! Compare that to a 2.4-grain steel pellet going 1,400 fps for 10 ft.-lbs energy and you can understand where your money’s going.
However, this is where HEVI-Shot also gets a little shaky: I had to use a pellet weight average because, due to the process HEVI-Shot uses to make its tungsten shot, the pellets aren’t uniform. A payload of No. 4 shot contains pellets that individually weigh anywhere from 3.4 grains to 6.6. This leads to my second criticism of HEVI-Shot: It is not known for perfectly uniform patterns, which I suspect is a by-product of the varietal shape and weights of the pellets.
Results from my patterning board bore this out. I achieved best results from a modified choke tube. I must add this observation though: Regardless of how non-uniform the patterns look to my eye, ducks don’t seem to mind. All the HEVI-Shot I’ve used in the past have performed admirably on live game.
As for recoil, it’s academic. A 1¼ ounce payload of steel going 1400 compared to a 1¼-ounce payload of tungsten hurts equally bad by producing around 40 ft.-lbs. free recoil energy from a 7.5-lb. shotgun.
Packed to Perform
HEVI-Shot utilizes a healthy load of flaxseed to serve as buffer from the ultra-hard shot that can ding barrels and choke tubes if the choke is too tight or the load is not properly buffered. While I can’t be sure of flaxseed’s performance as a buffer compared to plastics and silicones used in other loads, frankly I’d rather be shooting natural flax seed in my lakes and fields over plastic. Speaking of plastic, HEVI-XII employs a rather simple, 4-petal, 50-grain plastic wad. The load is available in 12-gauge, 20-gauge and, interestingly, 28-gauge in size 2 (12-gauge only) 4 and 6.
HEVI-Shot’s new XII product differs from past HEVI-Shot tungsten shells mainly in that it is packaged in boxes of 25. At around $50 for a box, certainly they cost more than the 10-round boxes, but packaged as such they cost less per shell. Look, I’ve killed my share of ducks, but I also know that regardless of what shell I’m using, sometimes birds refuse to die. More times than I care to admit I’ll empty my gun at a bird only to wing it before it skims down 60 yards out, where I’ll have to shoot it 5 more times on the water. Perhaps you’re better than me, but boxes of 10 just don’t cut it.
In sum, HEVI-Shot’s new HEVI-XII load is far superior to nearly all duck loads that utilize less dense material. If you choose it, you’ll get the added advantage of choosing smaller shot sizes for denser patterns whose individual pellets hit hard. Trust me, you’ll be able to see that difference in the field. You’ll also feel it in your wallet, but that’s just it. New HEVI-XII is expensive to be sure, but in 25-round boxes it’s not as bad as it used to be. What waterfowler can’t appreciate that?
The deadly tactic of back-trolling earned its stripes in the early 1960s when walleye anglers learned from fishing pioneers like Al and Ron Lindner, Spence Petros, Carl Malz and regular contributors to Fishing Facts. It was an era when anglers were creating and perfecting the techniques of fishing nightcrawlers and leeches with tools like bottom bouncers and the then newly invented Lindy Rig.
The challenge was to troll slow enough to keep those baited rigs in contact with bottom structure or nearly touching weedlines that followed highly irregular shapes—a favorite haunt of walleyes. Trolling forward in a 16-foot V-bottom aluminum boat, even with a 10-hp motor, was too fast for these light rigs. However, if an angler put the motor in reverse and trolled backward, the blunt face of the transom slowed the boat enough for an effective presentation.
Back-trolling seemed a perfect solution until it was necessary to troll into the wind, which caused waves to break over the transom, filling a boat with water. Of course, this was before bailers were popular, as these were low-tech aluminum fishing boats. Anglers found it difficult to hold a rod, steer the motor backward and use a bucket to bail water out of the boat. But walleye anglers, being a creative bunch, soon fashioned transom-mounted splashguards to keep out the water. Soon in those days there were almost as many articles on how to make your own guards as there were on back-trolling. Some were made of aluminum, Plexiglas and thick sheets of rubber. Then some were bolted on while some were clamped to the transom.
“Now, we even put backsplash guards on our bass boats to keep waves from washing over the transom when we must use a launch ramp that faces the wind,” Al Lindner said.
Today, anglers and writers don’t mention the back-trolling tactic as often. But according to Lindner, it is still “the absolute, most precise way to keep a lure on structure and in the strike zone.”
Still wondering about the popularity of back-trolling today, we contacted professional guide Tony Roach. According to him, back-trolling is alive and well, even graduating to big-water boats in the 18- to 20-foot range.
“I have a 20-foot Lund Pro-V with a 200-hp tiller-steering motor,” Roach said. “With the SmartCraft feature, I can run the motor as low as 500 RPMs, which is fine for trolling at 1 to 1.5 mph.”
His engine has a standard shaft length, but he runs a four-blade prop instead of a three-blade model, believing it moves a more appropriate amount of water. Roach has two Minn Kota trolling motors. The bow-mount unit can self-deploy with a remote control while the transom-mounted unit has tiller steering.
Even with today’s battery- and trolling-motor technology, wind and waves can be too much for the strongest 36-volt motors to keep a boat on structure for very long.
So why is back-trolling so effective?
“The bow swings too much for precision trolling forward,” Roach says.
He also says the flat part of the transom allows an angler much more boat control.
“It also allows you to hold yourself better in the current (for river fishing).”
Even salmon anglers who fish rivers have created their version of back-trolling while using the tactic to slip downstream and bounce crankbaits off the bottom. However, they point the boat upstream and row just fast enough to let the boat slowly slide downstream.
Conventional back-trollers are in luck—they no longer have to design and build their own backsplash guards. There are at least two manufacturers who build backsplash units specifically for your chosen boat and model including Wave-Wackers and Whitecap Splashguard. Stock models are available from Ve-Ve Incorporated.
While back-trolling may not be an all-encompassing panacea, it is alive and well. However, it has been kept in the background for a reason.
The Regional Rut Update deer-hunting report for Oct. 26, 2024. (Shutterstock image)
We’re getting closer. Can you feel it? The whitetail rut is getting into gear, and with it comes the best chance of the season for a buck of a lifetime for deer hunters.
This is Week 2 of the 2024 Game & Fish Regional Rut Update, a series of seven exclusive weekly rut reports from the field by whitetail contributors Doug Howlett (East), Darron McDougal (Midwest) and Josh Honeycutt (South). Click here for last week’s report. This week’s report includes:
In the East, Howlett reports food sources are getting most of the attention from bucks right now, but he believes “big things” are about to happen.
In the Midwest, McDougal reports mature bucks have been primarily active at night, but that’s about to change, too, and perhaps by this weekend.
In the South, Honeycutt reports rut activity has been on the rise in some states, though your hunting focus should be on food. Cool weather ahead should lead to increased deer movement.
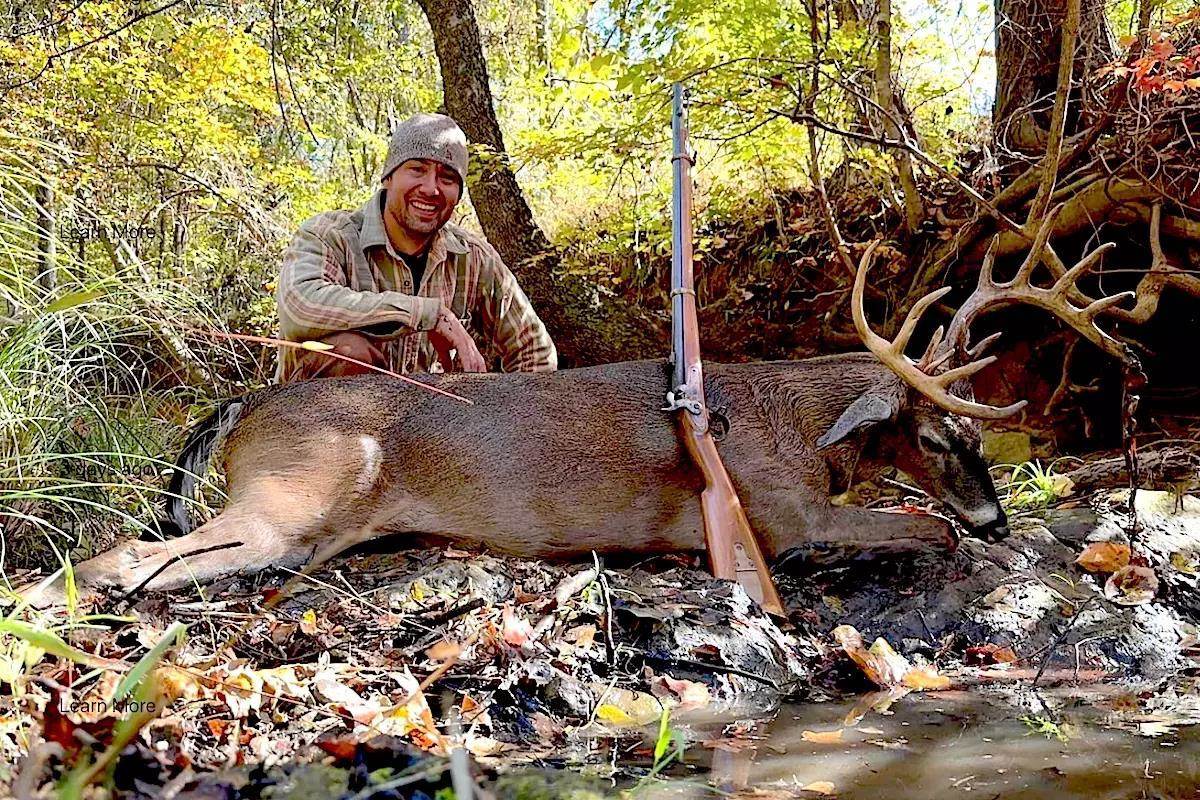
South Carolina hunter Jamie Holler worked a 12-hour shift and managed a short nap before hitting the woods on the morning of Oct. 19. Before noon, he downed this great 14-point buck with his muzzleloader. Read Tagged Out in the South Report below to read more about Holler’s exciting hunt. (Photo courtesy of Jamie Holler)
Rut Activity Spotty; Food Is Still King for Bigger Bucks
Despite a slow week, the East seems to be on the cusp of major rutting activity.
By Doug Howlett
Persistent warm weather continues to plague the region, though a short cold snap last week did kickstart some activity.
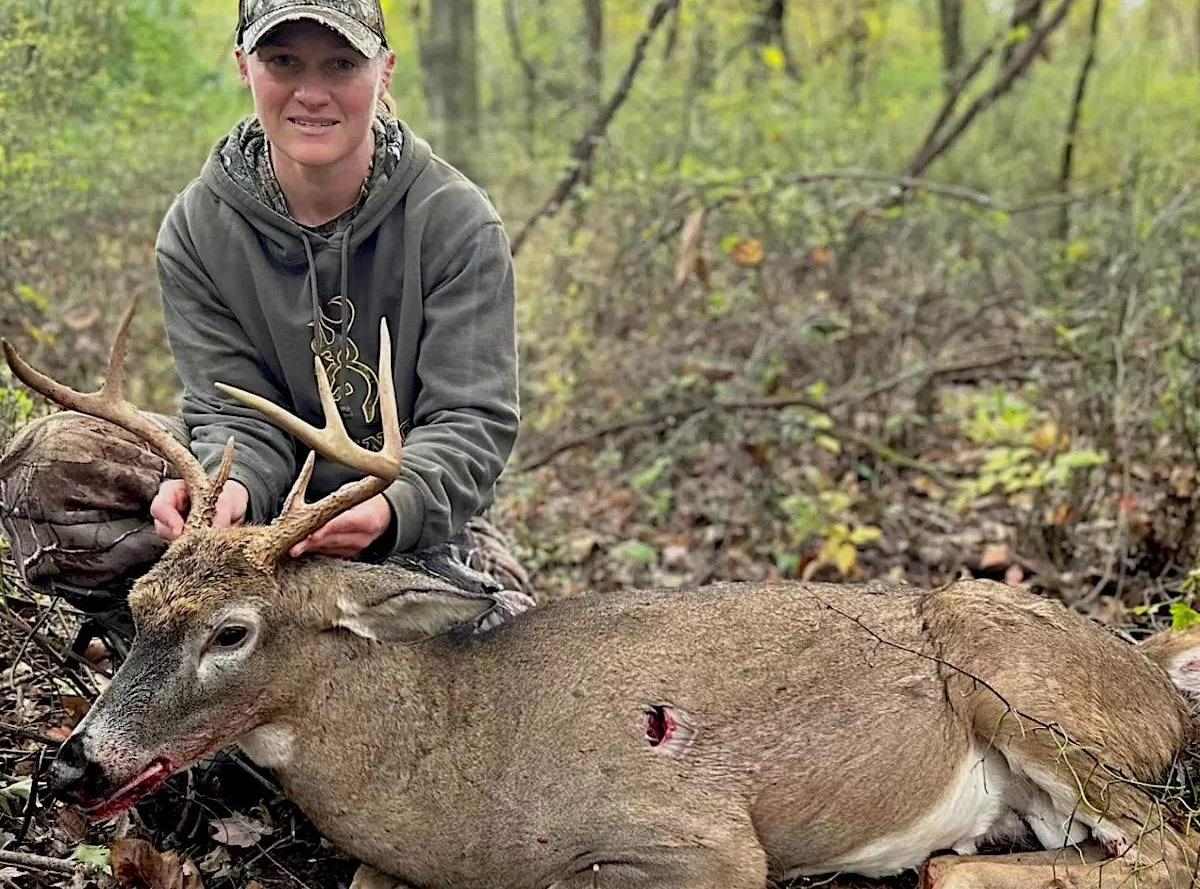
Hunters in New Jersey, according to David Sichik of Triple B Outfitters, began experiencing increased movement with a number of smaller bucks harassing some of the first does. Sichik’s trail cams began picking up bucks chasing early last week, and by the end of the week he had clients steadily scoring on bucks as well as the meat deer they came to fill their freezers with. Tiffany Jade, a New York hunter who made the drive over to the Garden State, scored with a nice 7-pointer (see Tagged Out below). Sichik loves this time of year. The week of Halloween is when his hunters traditionally do very well. So far, things are living up to his expectations.
In Virginia, deer sign is becoming more prominent in the eastern half of the state, as evidenced by the number of rubs and scrapes beginning to pop up. Cut corn and still-standing soybeans are serving as afternoon buffets for legions of deer, making those the places to target wall-hangers, which have not yet been harassed by too many hunters. Meanwhile, in the mountainous half of the Old Dominion, deer movement is still sluggish until after dark and there remains little sign even among the flats and shallow ridge passes.
West Virginia’s Larry Case says there’s been very little rut activity in the southeastern part of his state, stretching down into the southwestern part of Virginia. But that is all about to change. The very first reports of big bucks chasing does started to come in about the middle of last week.
In New England, hunter Michael Wheeler reports, “In the last five days, I’m finally seeing bucks on cameras in the mountains of Vermont, northern New York and New Hampshire. They’re using terrain features like funnels and saddles and beaver dams along swamps. They are cruising at night in locations that normally don’t see bucks cruising except when the rut is close or coming on. I haven’t seen daytime cruising in transition areas yet, but that should start by this week.”
Wheeler is, however, beginning to find more rubs and scrapes opening up on ridges and down low near river bottoms. He notes a number of youth hunters had luck last weekend in farm country down in the valleys, hunting edges of cut corn in the morning and evening. “A few youth hunters I know were successful hunting the edges of clear-cuts and old logging roads in the evening, catching bucks browsing,” he says. There’s been little chasing going on, but by next week sightings should begin picking up rapidly.
Also in New England, Ken Fecteau Jr., says there aren’t a lot of acorns this year, and much of the activity is occurring at night. He notes there still aren’t a lot of rubs and scrapes.
Pennsylvania has seen some dandies fall in the early part of the season, with deer activity just starting to kick in. With the moon at full blast this coming week, look for activity to go into high gear from early afternoon until dark. However, if more heat shows up as predicted, early chasing activity could push back until the sun is about to dip.
We are right on the edge of big things happening, and I fully expect by the next report to hear that chasing is kicking into high gear and more tags are being filled.
TAGGED OUT
Tiffany Bezel of New York tagged this 7-point buck in New Jersey on Oct. 20 on a hunt in New Jersey. (Photo courtesy of Tiffany Jade)
Garden State Success
Hunter: Tiffany Bezel
Date: Oct. 20, 2024
Location: New Jersey
Method: Crossbow
Stats: 7 points
Tiffany Bezel killed this 7-point buck Oct. 20 while hunting in New Jersey with Triple B Outfitters. She was in a treestand using a new TenPoint crossbow her parents had bought her as a gift. She had seen the buck on camera, along with a spike and another decent buck, the night before when the trio appeared after 4 p.m. On the afternoon of her hunt, however, the 7-point buck came in alone along a runway cut in the forest and well ahead of 4 p.m. In fact, Bezel had only been in her stand about a half hour when he appeared. “It was the earliest I’ve ever harvested a buck in the evening,” she says.
VIDEO
MyOutdoorTV: ‘Drury’s Thirteen’ Monsters of the Pre-Lock
The pre-rut can be one of the most thrilling times to hunt whitetails, and thanks to our friends at MyOutdoorTV, we’re excited to bring you big-buck footage that captures the essence of hunting during late October. In this episode of “Drury’s Thirteen,” Mark Drury has his sights set on what could be the largest Missouri buck of his life, while brother Terry is in hot pursuit of an Illinois brute he calls the “Decoy Buck.”
Want more whitetail action? For a limited time, use promo code GAMEFISH30 and get a 30-day free trial of MyOutdoorTV.* MyOutdoorTV gets you motivated with world-class hunting, fishing and shooting content. Choose your favorites from adrenaline-pumping hunts, thrilling fishing escapades, valuable shooting insights and delectable wild-game recipes. MyOutdoorTV is the outdoor enthusiast’s streaming service.
*Offer valid for a limited time. Cannot be combined with other offers.
Get a 30-day free trial of MyOutdoorTV
MIDWEST REPORT
Scrapes, Rubs and Sparring Increase; Hunt Scrapes Downwind of Beds
Although mature bucks are still primarily moving at night, expect daylight activity to begin increasing by this weekend.
By Darron McDougal
Despite numerous recent social-media posts in which hunters say they’re seeing bucks with does, most mature Midwestern bucks are still homebodies and hitting scrapes at night. According to HuntStand Pro Whitetail’s Whitetail Activity Forecast, daylight movement should be on the rise by Saturday and Sunday. For now, here are some observations from the past week.
Kansas has traditionally treated Nate Hosie of HeadHunters TV well during mid-October, but he didn’t kill a buck during his hunt there last week. He says an abundance of food has bucks spread out this year. “I had some close calls,” he says, “but the big fellas were mostly nocturnal.”
Whitetail expert Bill Winke shares that things have also been slow for the past few days in Iowa. “There was a good flurry of daylight activity around the middle of October but not much since,” he says. “Trail cameras are showing that bucks are covering a lot of ground, but it is all at night … at least here anyway.”
Josh Honeycutt, the South correspondent for Regional Rut Update, killed a monster Kentucky buck in September, but he has tags for Ohio and Indiana as well. While he’s been keeping tabs on cameras in those states, he says daylight movement has been minimal. However, he’s starting to see more action during legal light, including evidence that rubbing and scraping are ramping up, too. Still, for the next week or so, he says the action should be centered near white oaks. [Editor’s Note: Be sure to check out Honeycutt’s report on the Southern rut below.]
Michigan’s Nick Vander Schuur took a dandy buck and observed some promising activity on Sunday. “I watched two mature bucks chase a doe,” he says. “Most young bucks are looking. I know of some bigger bucks that aren’t chasing yet, but they’re marking their territory with lots of rubs and scrapes. I’ve heard some sparring in the distance. The rut should be going good by this weekend.”
READ: Best Days to Hunt the Deer Rut in Each Region
TAGGED OUT
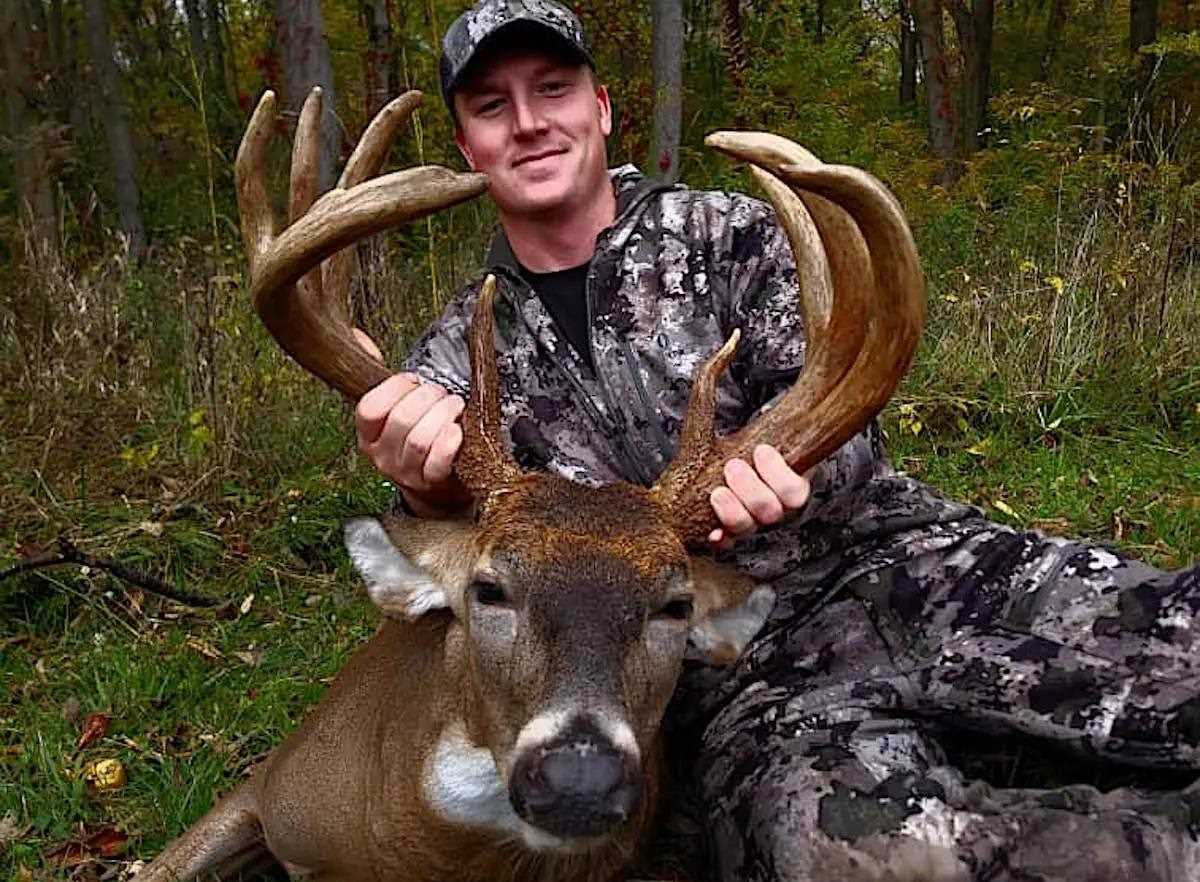
Indiana bowhunter Logan Splater took this massive buck on Oct. 15 as a front moved through his area. (Photo courtesy of Logan Splater)
Hoosier Hunter Bags Brute with Hand-Me-Down Bow
Hunter: Logan Splater
Date: Oct. 15, 2024
Location: Hancock County, Ind.
Method: Compound Bow
Stats: 157 5/8 inches
Logan Splater had been seeing only young deer in the first few weeks of the season. Then, on Oct. 15, he finally had an encounter with a massive, mature buck he’d been chasing for four years. In fact, the deer had only shown up on his trail camera a few days prior.
“I knew where he was bedding,” Splater says, “and on the 15th, the wind was perfect during the peak of a cold front. When I arrived at the property, the landowner told me he had been brush-hogging paths throughout the woods all morning, which crushed my excitement, but I went hunting anyway.
“Around 6 p.m., some does appeared, so I was ready with my bow when the buck silently stepped out,” Splater continues. “He spotted me in the tree, and we had a staredown for about 10 minutes. Finally, he took a few steps. I drew and made a quick 25-yard shot. I was shooting my dad’s hand-me-down bow from the early 2000s, which made the hunt even more memorable.”
RUT GEAR
Great gear for the deer rut (from left): Dryshod Evalusion Hunt Camo/Bark boot, Bushnell 10×42 Engage EDX binocular, Moultrie Mobile Edge Pro cellular trail camera.
Gear Essentials for Hunting the Early Rut
As the rut continues toward its Novemeber peak, old- and new-school gear and tactics can help you score big. Here’s a look at gear trends and strategies for rut hunting, including hot items from Moultrie Mobile, Dryshod and Bushnell.
Click to Read More
SOUTH REPORT
Deer Movement and Buck Sign on the Rise; Still Focus on Food
Cooler weather should lead to more deer activity in the week ahead.
By Josh Honeycutt
As we enter the final weekend of October, some areas in the South are experiencing a sharp increase in deer movement and buck sign. This is mostly limited to the northern stretches of the region and a few areas farther south. Small parts of Arkansas, Florida, Georgia, Louisiana, North Carolina, Oklahoma, South Carolina and Tennessee are seeing the beginnings of pre-rut movement.
Outdoor writer John Radzwilla is in southeastern Oklahoma where he’s starting to see more sparring on camera. Some younger bucks are even pushing does, he says. “My favorite days to hunt are cold and overcast days with rain in the forecast,” he says. “I really don’t pay much attention to the moon as much as I do the cold. You’ll drive yourself crazy trying to line everything up. Just get out there. You have to put in the time.”
BuckVentures Outdoors’ Jeff Danker is in northwestern Oklahoma, and he says the bucks are spread out and unpredictable. This is mostly due to a lot of rainfall earlier in the year. “The crops are thriving and everything is still green,” he says. “Deer are not hitting corn or feeders. Big bucks are starting to hit scrapes somewhat. There’s some movement in the evening but mostly at night. Milo is being cut now and should move deer and have new ones show up. I think it will be a great year for big deer, but so far, with all the rainfall, everything is grown up and deer can hide and eat everywhere.”
In Arkansas, Phillip Vanderpool of Legends of the Outdoors reports a massive mast crop—the best he’s seen in the Ozarks in a very long time. The Huntin Grounds’ Steven Fuller is also in Arkansas. He says it’s about time to start hunting harder. A big front that’s on its way is going to push even the big old bucks to start moving better. “In the last four days, new bucks are starting to show up in new areas,” he says. “The 2 1/2-year-old and younger bucks have been consistent on scrapes, but the older bucks should start hammering scrapes consistently this week. Does are on edge and already have their head on a swivel, so you know they are feeling some pressure.”
That said, continue to focus on food. Interestingly, Fuller is seeing very few acorns on the ground, which goes to show just how localized mast crops can be. “White oak and red oak acorns are few and far between,” he says. “I’m seeing deer even hit on what pin oaks and smaller acorns we have, and that’s not usually the case until much later into fall or early winter. Food plots and good native browse are going to be key. With cold temps and rain coming back to the forest later this week, it’s time to key on scrapes.”
TAGGED OUT
This huge buck taken by South Carolina hunter Jamie Holler with his muzzleloader earlier this month had 14 points and weighed 202 pounds. (Photo by Jamie Holler)
South Carolina Muzzleloader Monster
Hunter: Jamie Holler
Date: Oct. 19, 2024
Location: South Carolina
Method: Muzzleloader
Stats: 14 points
On Oct. 19, after working a 12-hour shift and a short nap, South Carolina’s Jamie Holler gathered his gear and eased into position at his hunting grounds. He located a scrape that piqued his interest and settled in for the morning hunt, setting up camp in a small brush blind. A nice buck cruised through at first light, but it was out of range for Holler’s muzzleloader. Then, two does appeared and walked through. He thought about shooting one of them but didn’t. Seconds later, a spike ran down off the ridge.
About 15 minutes after that, a doe and two fawns ran into view. A nice buck was behind them, and they all worked toward Jamie’s position. Eventually, though, the doe spotted Holler and they all moved off. Around 9:10 a.m., he heard a stick break and looked up to see a huge deer walking down the ridge toward him. Holler slowly raised up into position, readied his muzzleloader and waited for an opportunity. The buck disappeared, reappeared and stopped in an opening 22 yards away.
“I bleated and began working the trigger,” Holler says. “I could feel the sear in that 12-pound trigger. I took the creep out and the hammer fell. My post was centered in the rear sight and positioned right behind his shoulder when the cap and powder ignited.”
The buck turned and ran back up the hill. After an hour, Holler followed blood up the incline about 150 yards before the blood trail got tough to follow. On hands and knees, he pressed on.
“I remembered how much I enjoy hand-tracking deer,” he says. “I love being forced to slow down and pay attention to every little detail, like how every third step he was landing hard, and how the smallest blood splatter gave away his direction of travel.”
After a while, Holler heard a deer crash through a nearby creek on the other side of a hill. He decided to take a peek, but told himself that if his buck wasn’t there, he’d back out. Fortunately, the deer was floating belly-up in the creek below. Holler had centered the lungs with the shot, and the buck went about 250 yards total. The deer weighed 202 pounds and sported 14 points.
“I couldn’t have dreamed it up any better,” Holler says.
WHEN TO HUNT DURING THE RUT
Game & Fish Best Hunt Times
This free interactive Solunar calendar offers the best deer hunting times based on your exact date and location. Click below to access before planning your next trip.
Search for the Best Hunting Times in Your Zip Code
Our Favorite Compound Bow Stabilizers from Mathews, Limbsaver, TRUGLO & More
Look at you, smart feller, searching for the next piece of the archery puzzle. Savvy hunters like you need the skinny on 2024’s best compound bow stabilizers for your hunting rig, and, by George, you’ve come to the right place. With hunting season fast approaching, get your bow dialed in now and not the week before the season starts.
Some sports, like football and golf, are a game of inches. The sport of hunting can be a game of millimeters. One smidge to the left, you hit the shoulder, wound your game, and it’s never to be seen again. Or, if shooter panic sets in and you float your pin too high, you may miss the vitals completely.
Situations like this are heartbreaking, which is why you need a good stabilizer to help steady your shot, increase accuracy, and extend your range. To help you find the best solution, I created this guide with 2024’s top options, from the best vibration dampening front stabs to the world’s elite front, back, and sidebars for increased balance.
The products on this list encompass a wide range from the who’s who of stabilizer brands like BeeStinger, Limbsaver, Mathews, CBE, Dead Center, and more. I’ve also included some friendly, affordable options for those hunting on a budget.
No matter what you’re looking for, you’ll find something tailor-made for you on this list of 2024’s best compound bow stabilizers. Buckle up, and let’s get this show on the road.
Target archers have been using stabilizer bars to fine-tune their shots for a long time; I’m talking about the long and fancy contraptions you see extending as much as 30 inches from their bows. On the other hand, you’ve likely also seen shorter stabilizers on the front of hunting bows.
So, what’s the difference? In short, longer stabilizers are more focused on balancing your compound bow, which creates less pin float, and short stabilizers that come standard on hunting bows are more for vibration reduction than for balance.
You may wonder, why do I need a stabilizer when hunting? Why are some people using longer stabilizers and more complex front, back, and sidebars when hunting? Which type of stabilizer is going to work best for me?
If you’re asking these questions and are a bit newer to the sport, here are some important concepts you need to understand before purchasing a stabilizer:
Standard Front Stabilizers for Compound Bows
Best Overall Bee Stinger MicroHex
Lengths: 6″, 8″, 10″, 12″ Materials: Lightweight counterveil carbon Weights: Three 1 oz weights included
“No games, no gimmicks.” That’s how Bee Stinger promotes their stabs. They’ve tapped into the minds of their customers and learned one valuable lesson that second-rate pretenders never seem to understand: hunters want their archery gear to function as advertised.
The MicroHex line is their most popular stabilizer to date because it has everything a hunter needs to customize their setup to their specific needs and style. The weights stay snug where you want them to and can be adjusted easily to balance your shot.
I like BeeStinger’s MicroHex for two main reasons. First, they make their rods with cutting-edge materials with counter-veil anti-vibration carbon used in fighter jets. Second, their mounting studs have teeth that forcefully clamp down when screwed to your compound bow. A solid fit prevents slop and creates a rigid and seamless energy distribution throughout your shot.
Best High-End Mathews Flatline
Lengths: 6″, 8″, 10″, 12″ Materials: High modulus carbon fiber, stainless steel machined weights Weights: Comes with one 1-oz weight, but you can purchase more here
If you’re shooting a flagship bow, and want maximum performance during the process, grab this top-notch stabilizer from Mathews. Many users claim there’s no better tech on the market.
The Flatline is made from ultralightweight carbon fiber that utilizes the industry’s top anti-vibration and noise-dampening technology. When you combine this feature with Mathews’ patented harmonic dampener — which spools extra energy during your shot and then releases it at the perfect moment of inertia — you’ve got one Steady Eddie on your hands.
Mathews markets this professional tool for any type of shooter, whether experienced, novice, or somewhere in between. It’s compatible with a v-bar bracket and can customize weights for your exact needs. The different ways you can mod this stabilizer to your setup are endless, and if it’s in your budget, you should consider it seriously.
Top-Notch New Product for 2024 Axcel Archery Antler Ridge
Lengths: 6″, 8″, 10″, 12″ Materials: Ultra-high carbon, cutting-edge flax material Weights: Four 1 oz weights included + 1 oz dampener on the end
Stabilizers are only as good as the materials they’re made from. Axcel Archery’s newest line is made from the latest and greatest technology and is designed meticulously to set itself apart in an otherwise flooded marketplace.
The Antler Ridge is the only stab on the market to feature Axcel Archery’s all-new Flax material, which has never been seen in the world of stabilizers. Flax is one of the most anti-vibration-friendly materials in the world and plays perfectly with its rigid and lightweight design.
The cool graphics and personalized color options have nothing to do with performance, but they do let you know one thing: Axcel Archery created a product that stands out in every possible way, from its technology to its aesthetic.
Best for the Money Limbsaver LS Hunter Micro Lite
Lengths: 8″ Materials: Small diameter carbon Weights: 5.6 oz + ability to add more weight as needed
At around 90 bucks, the Limbsaver LS Hunter Micro Lite isn’t the cheapest stab on this list. I do believe it offers the best value you’ll find, however, in that it lands at an approachable price point without sacrificing high-end features.
This streamlined, wind-resistant, small-diameter eight-inch carbon bar is designed specifically for hunters and will handle all the rugged demands of the backcountry while helping you maneuver through the tightest situations. Whether in a treestand, blind, or even a mountain hunter traversing over craggy rocks, you’ll find its compact, forward-thinking design very useful.
Its superb balancing comes from heavier-than-usual front weights that tip the scales at around 5.6 ounces. You can add or subtract weights as needed to create a more dialed-in feel. The Limbsaver LS Hunter Micro Lite will work for anyone who wants a no-fuss solution for their next hunt.
Affordable but High-Tech Option TRUGLO Cadence
Lengths: 8″ Materials: CNC Aluminum Weights: 8.5 oz
From bow releases to bow stabilizers, TRUGLO is an industry leader in high-quality archery equipment. When it comes to stabilizers, they’ve truly outdone themselves by engineering the Cadence stabilizing bar with the average bowhunter in mind. TRUGLO talks the talk and walks the walk.
Since I’m on a budget this year, I will pull the trigger and grab myself one of these bad boys for the upcoming archery season. It has a rigid bar made from CNC aluminum that doesn’t have any give during your shot and is treated with a quiet, soft-touch coating, making it perfect for spot-and-stalk hunters that want to eliminate noise.
Much like the Mathews Flatline, the TRUGLO Cadence has a vibration dampener that reduces noise and play in your shot. As a matter of fact, it has two dampeners, and what’s even more incredible is that it costs one-third of the price of the Flatline.
Too many hunters and “ethical” outdoorsmen clown on people for asking about budget hunting gear. I can’t count the times I’ve heard in forums and Facebook groups, “Why would you buy X when Y is so much better?” I’ll tell you why: not everyone has a Mathews budget.
Regular folks have lives, kids, jobs, and priorities that take precedence over high-priced and top-end gadgets. However, just because they’re trying to save money doesn’t mean they lack the desire to be prepared and have a stable shot.
Luckily, if you’re on a budget, you can still have your cake and eat it too. SAS’s CNC stab is one of the highest-rated and most affordable stabilizers on the market and comes in various sizes and colors. Most importantly, it does precisely what you’ll need it to: stabilize your shot by reducing vibration and balancing the weight of your compound bow.
Made in the USA Viper SX Aluminum
Lengths: 6″, 8″, 10″, 12″ Materials: Aircraft grade aluminum Weights: 4 oz + ability to customize in 1/2 oz increments
Made right here in the good ol’ US of A, the Viper SX sits up near the top in terms of performance and lands at a very attractive price point. It boasts rigid strength thanks to its aluminum end caps and wind-resistant, lightweight rod that keeps the overall weight at a minimum.
Viper SX does utilize some serious balancing weights, however, as it’s equipped with one four-ounce weight at the end of the shaft. The combination of its lightweight bar and well-placed steel weights gives it superior balance by placing the weight where you need it most.
Furthermore, you can remove the end weight and add a variety of configurations that Viper offers. It comes in four lengths and is easy to make into a front and back bar kit using a v-bar bracket. Considering all its versatility comes at a lower cost than its higher-priced counterparts, what’s not to love?
Bow Stabilizer Kits (Front and Back Bars)
Best Overall Kit Dead Center Dead Level Verge V2
Lengths: 6-8″, 8-10″ Materials: Vibration dampening carbon Weights: Some with six 1 oz weights; you can purchase more here
Gone are the days of your stabilizer bars vibrating loose. With this v-bar setup from Dead Center, you can rest assured that your stabilizers will be rock solid when that shot of a lifetime presents itself.
If you want the most steady shot possible, join the ranks of archers who shoot with an added back bar. They’re increasing in popularity, and what was usually more mainstream among target shooters is becoming commonplace in the field. (For what it’s worth, I only rock a front stabilizer, but I don’t shoot with a quiver attached or have issues with pin float.)
If you want to join the bandwagon and aren’t out here taking any chances, look no further than the Dead Center Dead Level Verge 2. It’ll come perfectly tuned with the right amount of weight straight out of the box, and its light bars will hold steady against your bow. With a kit like this, you’ll be able to take long-range shots with a high degree of confidence.
distribution
Best High-End Kit Bee Stinger Sport Hunter
Lengths: 6-8″, 8-10″ Materials: SRX Carbon Rods Weights: Two 2oz weights on each side
Here we go again with Bee Stinger. Some hunters may say I’m a bit of a fanboy, but I have zero shame plugging their stellar products. My job is to pair my readers with products that won’t let them down on their 2022 hunt, after all.
The Bee Stinger Sport Hunter is tailor-made for the craft of chasing game, as its features are cleverly designed to accommodate hunters. It has a low profile to help you get through sticky situations and can be easily adjusted in a variety of scenarios.
The Sport Hunter has everything you could ask for from a stabilizer kit: maneuverability, ease of use, quick disconnect brackets, and an adjustable weight system. Now all you need is for some critters to show up so you can show them how steady your shot is.
Best Mid-Range Kit CBE Torx
Lengths: 7.5 – 11″ Materials: High mod lightweight carbon Weights: Two 2 oz weights on each bar; if you want more customization, grab a few more here
Next time you’re at the range, check out what types of stabs other archers are rocking. I kept a close eye on other shooters my last time out and saw loads of them using the CBE Torx. When I asked one guy why he was using this kit, they responded that it’s simple to use and easily adjustable to his bow.
The rods on CBE Torx are made from lightweight carbon, and their interchangeable weights are placed towards the end of the bar with precision. This customization makes for a great balancing act when shooting from any position.
If you want a set-it-and-forget-it stab that doesn’t rattle loose when climbing in your tree stand or crawling through some thick oak scrub, look closely at the CBE Torx. It has many of the same features and weight distribution as others on this list but will cost you a little bit less dinero for the entire kit.
Editors Choice Stabilizer Kit Trophy Ridge Hitman
Lengths: 6-8″, 8-10″, 10-12″ Materials: Durable target carbon Weights: Two 2 oz weights per bar; you can find more here
Would you get a load of the Hitman stabilizer kit? It’s right up there with the best in terms of research and development but with a much more approachable price tag. Trophy-Ridge really stands out in this class of stabilizers in form, function, and cost. They’re out here playing chess while everyone else is playing checkers.
The Hitman’s standout features include a unique design that allows for effortless energy transfer through its carbon rod and two cleverly placed dampener rings. It’s lightweight, compact, won’t be affected much by the wind, and comes standard with a top-notch v-bar bracket that the user can easily adjust for a custom feel.
Why is this the editor’s choice stabilizing kit, you ask? Well, in my opinion, it leads the pack in quality, performance, and consistency. In a sport where every millimeter matters, the Hitman series of stabilizers won’t let you down. If, at this point, you’re still confused about which stabilizer kit to go with, snatch this one up. You can thank me later.
Best All-in-One Stabilizer Bar Bee Stinger Counterslide MicroHex
Lengths: 10″, 12″, 15″ Materials: Five 1 oz weights; need more? Grab them here Weights:
If you want both a front and back bar stabilizer, go with a v-bar setup like the Bee Stinger Counterslide MicroHex. It’s more of a sidebar than a stabilizer kit, but many hunters prefer it since it keeps their weight down while still allowing them to have reliable balance in their shot.
Here’s my issue with this setup: unlike a v-bar setup in which you can move in centimeter increments at an angle, the Counterslide can’t be adjusted away from your bow. It stays in a straight line. That said, some hunters swear by this style, and if you’re one of them, the Bee Stinger Counterslide is as good as it gets.
This system is useful since it allows you to move your bar forward or back with a dovetail mount, meaning you can make adjustments in the field without adding or subtracting weight. Bee Stinger Counterslide’s single bar is also effective for those that shoot with their quiver attached, as it’s pretty remarkable at counterbalancing the side torque caused by an arrow holder.
Our editors independently select products featured on Wide Open Spaces. However, we may earn a commission when you buy something through our links.
You’ll get an argument from duck hunters everywhere, but when you start talking about the best duck calls, you’ll have to understand that we all have our favorite. The game calls we use for the realistic sounds of waterfowl are arguably the most critical call in the hunting game.
From single reed to double reed and even triple reed duck calls, duck callers can get a little overwhelmed by all the possibilities of different calls. From the high-ball and chuckle to the peeps and whistles of smaller puddle ducks, every call is unique in its ability to fool and even calm wary waterfowl. It’s all about getting them to believe that our spread isn’t the only thing giving them a good reason to land.
There are different reasons to choose between wood, acrylic, and even plastic calls. There are plenty of good reasons to choose or not to select other calls with multiple reeds.
Whether you’re hunting timber or big open water, you may want to be heard loud and clear or give off the swamp’s softer, more melodic tones. Do you want a raspy sound or a clean and clear one?
Whether you want to make a quack, a feed call, or a hail call, you’re not going to do it with your lips. You had better have something readymade on your lanyard. Even better, it should have the versatility to make a wide range of sounds for when it is right to fool some waterfowl.
The Buck Gardner Double Nasty series offers several choices, from the mallard hen to the hen wood duck. Yes, it’s a significant attractor of the venerable woodie. But this call is also a good confidence call for warier ducks who’ve seen and heard it all before. Buck Gardner makes it from durable polycarbonate, which is quite common.
2. Rich-n-Tone RNT Macrohen Double Reed
Rich-n-Tone RNT Macrohen Double Reed – Field Supply, $109.99
The RNT Macrohen is a double reed call that’s acrylic and rocks the high-end sounds needed for reaching those sky-high, determined-to-go-somewhere-else birds. At $119.99, it may not be for everyone’s taste, but that didn’t stop you from buying that much in new duck gear a year ago.
3. Faulk’s Professional Duck Call
Faulk’s Professional Duck Call – Amazon, $29.56
Walnut is the wood of choice for Faulk’s with this tasty-sounding call referred to as the Professional. Wood calls are superior at withstanding subzero temperatures that can freeze up poly calls. Since there’s nothing better than shooting mallards with a bit of snow on their backs, the smooth-sounding tones are what you need for a limit of ducks.
4. Haydel’s Double Reed Mallard
Haydel’s Double Reed Mallard – Amazon, $20.98
The old-school XL from Haydel’s Game Calls was the first duck call that I ever bought. Trying to entice mallards off Lake Ontario in January is hard enough. Still, with a steady northwest wind in your face, you need a call that gets the word out. I always loved its raspy high-ball and the see-through shell. Calling ducks became more manageable once I saw how anyone could apply a tool like this.
5. Duck Commander 6-in-1 Whistle
Duck Commander 6-in-1 Whistle – Amazon, $10.19
On Amazon Prime, this call is a steal. Tweets for pintail and widgeon aside, the simple “dweek” that makes drake mallards stop in their tracks is one of the best confidence calls in duck hunting. This call is great to hand over to the youngster in your life and be patient while they do laps around the house making their favorite call sounds.
6. Duck Commander Triple Threat
Duck Commander Triple Threat – Amazon, $31.56
Arguably the best all-around call out there, the Triple Threat has everything that you want in a call: it’s affordable, easy to learn on, and tough as nails. Veterans and beginners alike will take to this call with pleasure. Don’t let its nondescript look fool you; the best duck calls make duck calling easy, and the Robertsons make one of the best.
There are excellent and outstanding calls from Iowa to Arkansas, where they shoot steel shots at waterfowl. Call makers everywhere would like to think theirs is better than the rest, but you should decide for yourself what a high-quality duck call is.
Looking for a little more? Follow my webpage, or on Facebook and Twitter.
This article was originally published on September 18, 2021.
READ MORE: WHAT SHOTGUN LOAD SHOULD YOU USE FOR EACH HUNT?
")
")
")
")
")


 I was hiking in to my stand before daylight on the day I took the buck. My Dad and a friend of mine were hunting on the opposite side of the mountain from me. All the way in to where I was going to setup, I thought about the bears I had seen when I was scouting. I had one hand on my bow and the other hand on my bear spray as I moved silently through the dark woods. I hoped that the buck would be feeding at daylight on a south-facing slope where I had seen him before. One of the advantages of bowhunting mule deer in the early season is, because their antlers are still in the velvet, they tend to stay in open places more often than when they’re in hard horn.