Ryegrass commonly grows in fields and meadows – and sometimes in our gardens. In fact, you might come across entire fields full of it – likely feeding all manner of local creatures. But do deer eat ryegrass in particular?
Deer will eat ryegrass – but it doesn’t tend to hold much nutritional value for them. Ryegrass is not the same as rye itself – and it’s important to note the distinction before you grow any of your own for deer visitors to your yard.
Ryegrass isn’t necessarily healthy for deer to eat. While they will happily munch away at the crop, anecdotal evidence suggests that it can lead to digestion problems due to the sheer lack of nutrition available.
Ryegrass is often confused with rye grain, which is considered healthy for deer to eat. Therefore, you must choose the right crop for any plots you may be setting up for wild visitors! Rye grain is popular with deer and feeders mainly thanks to its fantastic protein content.
However, ryegrass couldn’t be much further from its namesake. It grows extremely quickly and can be hard to get rid of when it’s sprouting up in your garden. However, it’s not a good idea to let it grow rampant for deer to eat, and if they are consuming it more than any other treats or vegetation in your yard, it’s worth deterring them with healthier options.
Is ryegrass good for deer food plot?
No – ryegrass does not make for good plot food for deer. It’s likely to be an unhealthy distraction for them, meaning that while you may have left various fruits and nuts for your visitors to eat, they may instead fill up on grass beforehand.
It’s best to avoid planting ryegrass or to include it in your deer food plot because it can soon overwhelm other growths. Instead, focus on growing plants deer love – they will happily munch at a variety of common weeds, plots of wheat, and deer adore eating alfalfa, too.
It is more likely to be worth placing nuts such as acorns and beech out for deer plots and a variety of berries, oranges, and even banana chunks. If it tastes either mild or sweet and doesn’t have thorns or fuzzy leaves, deer will likely eat your crops without fuss.
Deer food plots should also be placed towards the edge of your yard – for example, where your perimeter may join with local forest or woodland – and away from bird-feeding zones so that your visitors can feast alone. The further away your plot is from your home, the better – as deer flight responses will activate if they see human activity.
Will ryegrass help to deter deer from my yard?
Ryegrass won’t deter deer from yards because they will happily eat it out of desperation. Deer normally won’t eat grass at all unless there are better things on offer, and if their local habitat is low on their favorites, they could still head into your yard for a taste. What’s more, plot owners’ anecdotes suggest that deer can grow accustomed to feeding on ryegrass – which can be dangerous.
Planting ryegrass to deter deer may be considered cruel – particularly as food with zero nutritional benefits for them could lead to digestive blockages. It could also result in serious health problems for the local herd. Ruminant diets are highly complex and should be satisfied with extreme caution.
If you’d like to deter deer from your yard, you should instead plant crops that they famously avoid. As mentioned, thorny or fuzzy plants are likely to deter their interest. Deer will avoid cucumber plants and won’t eat ferns, either – therefore, the best course of action is to make your yard as boring as possible for them, or at least to set up a tall perimeter.
What animals eat ryegrass?
Ryegrass is commonly enjoyed by a variety of grazing animals such as cattle. However, it can also attract birds hunting for seeds. Ryegrass will also attract a wealth of insect interest, meaning it can easily deplete, leaving livestock with little to feed on.
However, in some cases, landowners may wish to get rid of ryegrass completely thanks to their low nutritional base and their insect attraction. It is another firm reason why avoiding ryegrass is generally a good idea to keep your garden and local wildlife healthy. When attracting deer to your yard, it’s good to cut ryegrass down as soon as you see it emerge!
When I was an up-and-coming hunter, I had a feeling something was missing from my elk-hunting arsenal.
That’s when I realized that I needed a quality hunting suit! And I was fortunate enough to find the HECS hunting suit.
I’ve used this suit several times to stay hidden and defeat an animal’s sixth sense during a hunt! However, many people question its actual performance when hunting.
This article will discuss the suit’s overall mechanism, performance, and results from actual field tests.
I’ll provide you with a thorough explanation and investigation to help you decide if it really works and if it actually is worth your investment.
A HECS hunting suit can be worn as an outlet or undergarment. It’s available in 2 versions – Mossy Oak Country and Realtree Xtra.
There are 10 sizes to choose from:
XX-Small
X-Small
Small
Medium
Large
X-Large
XX-Large
XXX-Large
4X-Large
5X-Large
For the detailed measurement of each size, please visit HECS Stealthscreen’s official website.
The HECS hunting suit includes pants, a shirt, and a head net.
The pants can cover everything from the ankle to the waist. The shirt goes from the neck to the wrists and then overlaps with the pants.
The head net goes under the hat and overlaps the shirt.
I love the inclusion of stretch-fit gloves, socks, and a hat to COMPLETELY conceal me from head to toe!
You can also consider having some good hunting boots that go well with this suit.
How Does The HECS Hunting Suit Work?
Science has found that animals can pick up on minor electrical changes in their environment.
Through heart race and muscle movement, humans create electrical fields that alert the animals.
True enough, I was eyeing a deer once, and my heart started pumping as soon it looked my way. The adrenaline caused it run away and I missed the shot.
When the animals get close, they can sense another living being.
That’s when their other senses are alerted and they run away from you before you can approach them.
The HECS (Human Energy Concealment System) hunting suit comes in as a solution to this.
This video shows this perfectly:
You can read on progressive reloading press to learn more about this.
If you look closely at the inside of the suit, you will see an electrically conductive carbon yarn that is woven in a grid pattern.
The HECS hunting suit applies the Faraday Cage Principle, a concept that centers on controlling electromagnetic fields.
Thus, the HECS hunting suit can be shaped to block the electrical energy that is created by our body.
And by blocking the electrical fields, the suit prevents you from being noticed and recognized by target animals.
Does the HECS Hunting Suit Really Work?
BUYING OPTIONS: » Check Price on Amazon «
The short answer is YES! I’ve gone on several hunts with this suit remained undetected pretty much the whole time!
But you might want to know to what extent? I’ll discuss the pros and cons of its performance below.
Pros
Majority of people who’ve used the HECS hunting suit have reported positive reviews.
I’ve even been able to approach animals closer than ever!
Most people were skeptical about its actual effectiveness. Their doubts were soon gone the moment they wore the suit and saw impressive results.
The HECS hunting suit is most commonly praised for its usefulness with whitetail hunting, making it much easier.
It also offers comfort when worn. It’s lightweight and breathable because it’s made from HECS Stealthscreen fabric.
It’s better and more comfy than any shirt-pants combo I’ve ever tried.
This material consists of more than 85% polyester and is machine-washable, making it easy to pack for hunting trips.
Cons
My main issue with the suit was the price. It averages around $150 which may be quite expensive to some users.
I tend to switch to other camouflage suits that offer more affordability.
There are also some negative reviews on the size and the thickness of the suit. I found the shirt to be paper thin.
I should’ve expected that this suit was the WRONG choice to wear during winter.
I think these negative comments were probably brought about by overly high expectations for the suit.
As mentioned, the HECS hunting suit prevents animals from recognizing a hunter’s presence.
That doesn’t necessarily mean that the HECS hunting suit will blind the target completely.
Because of controversy on its performance, the HECS hunting suit has suffered from a great amount of skepticism.
In fact, even though there are a lot of positive reviews, the handful of negative reviews on the HECS hunting suit have put people off.
As a bonus, here’s a video to help you see the HECS suit in action:
HECS Hunting Suit Field Tests
Many field tests can be seen on YouTube. Most of them are done with bears, deer, turkeys, geese, and even small birds.
What’s common among all of them is that the HECS hunting suit actually makes a big difference when used for hunting mid-sized game animals.
Though there is also controversy over the field test videos, there are many praises for the HECS hunting suit that you can easily find on Amazon or eBay.
I found it to be most effective for hunting the fields for turkeys and geese.
Can You Still Hunt Successfully Without The Suit?
Yes, it’s still possible to hunt successfully even without the suit.
If I’m being completely honest, you’ll still be able to hunt well even if you never try the HECS Hunting Suit!
All that the suit does is enhance your stealth and discretion during a hunt. It won’t really completely shield you from the senses of your prey.
But what the HECS Hunting Suit does offer is added immediate concealment.
Though you might not ever be able to fool the noses and ears of the animals, you can still fool their eyes.
Therefore, I still highly recommend the use of this suit because it will increase your chances of scoring game and also speed up the hunting process.
How Does It Compare to Other Hunting Suits?
I could only think of two other hunting suits that act similarly to the HECS; the ScentBlocker and the New View hunting suits.
Both these options work similarly to the HECS in that they keep you hidden from your prey, which is a necessity.
How the ScentBlocker, as the name suggests, prevents deer and other animals from picking up your scent.
Meanwhile, the New View does what the HECS failed to do, which is keep me warm with its thicker, fleece lining.
These two products are great, but they do not compare to the unique technology of the HECS.
Conclusion
Human’s heartbeats give out much stronger electrical signals to animals than any other organ or biological process does.
The HECS Hunting Suit is designed to make the sound of your heartbeats less noticeable to your prey.
They’ll also help you blend in with the environment better!
I can therefore conclude that yes, the HECS Hunting Suit really does work well for hunting animals. A purchase will definitely be worth it!
FINAL HUNTING TIP: You can check out our Guide on Essential Hunting Gear for First-Timers to make sure you have everything you’ll need for a good hunting session.
Walleye fishing is a popular and enjoyable activity for anglers across the world. One of the most effective techniques for catching walleye is using jigs.
Walleye jigs are specially designed lures that mimic the natural movements of prey fish, which walleye typically feed on. They are available in various shapes, sizes, and colors, and each has its unique features that make it effective in certain fishing conditions.
Whether you are a seasoned angler or a beginner, understanding the different types of jigs, how to choose the right one, and how to use them can significantly increase your chances of a successful catch.
In this article, we will cover everything you need to know about walleye jigs, including the different types, factors to consider when choosing them, tips for using them, and the best ones to use in different water conditions.
Walleye jigs come in various shapes, sizes, and styles, and each has its unique characteristics that make it effective in certain fishing conditions. Here are some of the most popular types of walleye jigs:
Roundhead Walleye Jigs
Roundhead jigs are the most common type of walleye jig. They have a round head and a single hook and are available in various sizes and weights. They are versatile and can be used in a wide range of fishing conditions.
Standup Walleye Jigs
Standup jigs have a flat-bottomed head and a vertical line tie that causes them to stand upright on the bottom. They are effective in rocky areas and can also be used in weeds.
Weedless Walleye Jigs
Weedless jigs are designed to be fished in weedy areas without getting caught up in the vegetation. They have a hook that is recessed in the jig’s body, making it difficult for weeds to snag it.
Swimbait Walleye Jigs
Swimbait jigs are similar to roundhead jigs but have a longer shank and a wider gap hook. They are used with soft plastic swimbaits and are effective when fishing in deeper water.
Bucktail Walleye Jigs
Bucktail jigs are made with a hair or feather skirt and are effective in clear water. They mimic the movements of baitfish and are best used with a slow retrieve.
Factors to Consider When Choosing a Walleye Jig
Choosing the right walleye jig is essential for a successful fishing trip. Here are some factors to consider when selecting a walleye jig:
Water Depth The depth of the water you’re fishing in is an important consideration when choosing a jig. Roundhead jigs are effective in shallow water, while standup jigs work best in deeper water. Swimbait jigs and blade baits are ideal for fishing in depths of 20 feet or more.
Water Clarity The clarity of the water also plays a crucial role in jig selection. In clear water, use jigs with natural colors and avoid using ones with bright colors that might spook the fish. In murky water, use jigs with bright colors that stand out and attract the fish.
Time of Day and Season The time of day and season can also affect the effectiveness of the jig. During early mornings and late afternoons, use jigs with brighter colors to increase visibility. In the winter, when the water is colder, use smaller jigs with slower retrieves.
Structure of the Lake The structure of the lake, such as rocks, weeds, and drop-offs, can influence jig selection. Use weedless jigs when fishing in weedy areas to avoid getting snagged, and use standup jigs when fishing in rocky areas to prevent snagging.
Consider these factors when selecting a walleye jig, and you’ll be well on your way to hooking into some big ones.
Tips for Using Walleye Jigs
Using walleye jigs can be a highly effective way to catch fish, but it’s important to use them correctly. Here are some tips for using walleye jigs:
Cast and Retrieve Technique One of the most common ways to use a jig is with the cast and retrieve technique. Cast the jig out and let it sink to the bottom, then retrieve it with short, quick jerks to make the jig bounce off the bottom. Vary the speed and depth of your retrieve until you find what works best.
Jigging Technique Jigging is a popular technique for catching walleye with jigs. Let the jig sink to the bottom and then use a sharp upward motion of the rod tip to lift the jig off the bottom, then let it sink back down. Repeat this motion, varying the speed and intensity of the jigging until you get a bite.
Drift Technique Drifting is an excellent technique for covering a large area of water quickly. Simply drift with the wind or current, casting the jig out periodically and allowing it to sink to the bottom.
Vertical Jigging Technique Vertical jigging is an effective technique for fishing in deep water. Position your boat over the desired spot and drop the jig straight down, letting it fall to the bottom. Then, use an upward motion of the rod tip to lift the jig off the bottom and repeat the motion until you get a bite.
By using these techniques, you’ll be able to catch walleye with jigs more effectively. Don’t be afraid to experiment with different techniques until you find what works best for you.
Best Walleye Jigs to Use
Selecting the right jig can make all the difference in your walleye fishing success. Here are some recommendations for the best walleye jigs to use:
Northland Fishing Tackle Fire-Ball Jig: The Fire-Ball Jig is a versatile and effective jig that is designed to imitate the movements of baitfish. It has a short-shank hook that allows you to thread on a live minnow or soft plastic bait. It’s available in various colors and sizes and is ideal for fishing in shallow to mid-depth water.
Rapala Jigging Rap: The Jigging Rap is a popular jigging lure that features a balanced design and a center treble hook. It mimics the movement of a dying baitfish and is effective in both shallow and deep water. It’s available in various sizes and colors.
VMC Neon Moon Eye Jig: The Neon Moon Eye Jig is a versatile jig that features a unique 3D holographic eye and a super sharp hook. It’s available in various sizes and colors and is ideal for fishing in clear water.
B-Fish-N Tackle H2O Precision Jigs: The H2O Precision Jig is a high-quality jig that features a custom-designed head and a super sharp hook. It’s ideal for fishing in weeds and can be used with live bait or soft plastics. It’s available in various sizes and colors.
Keitech Tungsten Super Round Jig Head: The Super Round Jig Head is a weedless jig that features a tungsten head and a screw-lock bait keeper. It’s available in various sizes and is ideal for fishing in weedy areas.
These are just a few of the best walleye jigs to use. When selecting a jig, consider the water conditions and factors outlined in section III, and choose a jig that best fits your needs. Remember to experiment with different jigs and techniques until you find what works best for you.
Conclusion
Fishing for walleye with jigs can be a thriling and rewarding experience, but it takes knowledge and skill to be successful. By understanding the different types of walleye jigs, the factors to consider when choosing them, and the tips for using them effectively, you’ll significantly increase your chances of catching more fish.
Remember to select a jig that best fits your needs based on the water conditions and factors outlined in this article. Finally, don’t be afraid to experiment with different jigs and techniques until you find what works best for you. With the right knowledge, skills, and equipment, you’ll be well on your way to reeling in the big ones and enjoying epic fishing adventures.
For 25 years Green Bay Trophy Fishing has guided and provided helpful information to anglers in and around Door County. We are some of the most experienced fishing guides in Green Bay and pride ourselves on being experts on everything related to fishing in the area.
If you are interested in booking a walleye fishing charter, you can view our rates or contact us here.
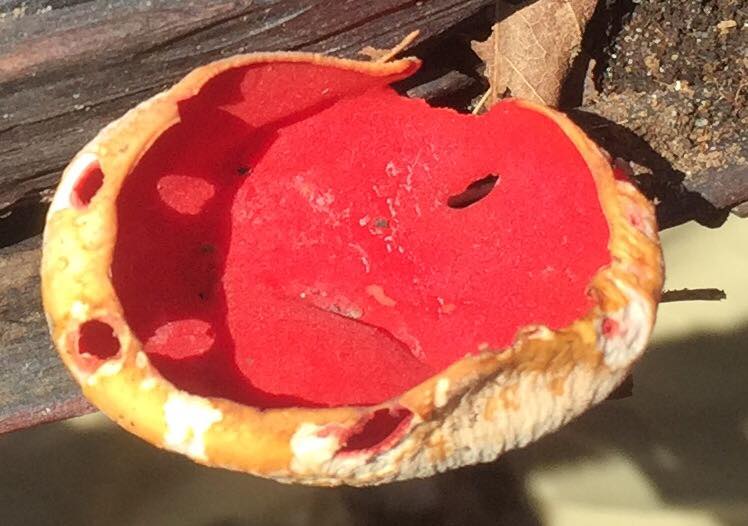
There are over 100 fairly common spring mushrooms in our area (NYC metro area) – that is, occurring between March 21 and June 21. Some of these occur in great numbers. Some are choice edibles. A few are poisonous. One is deadly. Most are just not edible or palatable 0r chewable. Learn them one at a time and you’ll see how quickly you can become familiar with much of our spring mushroom flora…………..
——————————————————-
CENTRAL PARK MUSHROOM HUNT – JUNE 14th
GILLED MUSHROOMS included AMANITA flavorubescens PLUTEUS cervinus, PSATHYRELLA candolleana, RUSSULA sp., SCHIZOPHYLLUM commune, STROPHARIA rugosoannulata, and a few still to be identified
DUNCE CAP – Conocybe lactea – not edible – common in grass in late May/early June
———————————————————-
LAWN MOWER’S MUSHROOM – Panaeolina foenisecii – not edible – common in grass in late May/early June
———————————————-
Baby INKY CAPS – Coprinus macaques complex – Edible, good in soup, as duxelles, etc. – on wood, base of stumps, wood chips
————————————————————-
DEADLY GALERINA – Galerina (autumnalis) marginata – a very common Little Brown Mushroom – on decayed logs – DEADLY POISONOUS
—————————————————————
FAWN MUSHROOM – Pluteus cervinus complex – edible when young – on wood or buried wood
————————————————————-
WINE CAP – Stropharia rugosoannulata – Good edible when young – always in wood chips
————————————————————
BOLETES
CRACKED CAP BOLETE – Xerocomellus chrysenteron – first bolete to appear (late May-early June) – edible – on the ground under oaks (mycorrhizal)
—————————————————————
JELLY FUNGI
WOOD-EAR – Auricularia auricula complex – edible, best in soup – one wood – common in late winter and spring
—————————————————————-
WITCHES’ BUTTER – Tremella mesenteric complex – edible but not incredible – on wood
———————————————————————-
SPRING MUSHROOMS 2017………………SPRING MUSHROOMS 2017…………………SPRING MUSHROOMS 2017
A MULTIPLE CHOICE TEST –
1, Name 3 gilled mushrooms that grow on wood: a) Agaricus bitorquis, b) Pleurotus ostreatus, c) Coprinus micaceus, d) Morchella esculenta, e) Flammulina velutipes, f) Ganoderma applanatum
2. Name 3 gilled mushrooms that grow on the ground: a) Agaricus bitorquis, b) Pleurotus ostreatus, c) Conocybe lactea, d) Panaeolina foenisecii, e) Pluteus cervinus, f) Stropharia rugoso-annulata
3. What color is the spore print of Pluteus cervinus: a) white, b) yellowish, c) pinkish brown or brownish pink, d) ochre brown, e) purple brown, f) black
4. Name one deadly Little Brown Mushroom: a) Agaricus bitorquis, b) Pleurotus ostreatus, c) Gallerina autumnalis (marginata) , d) Morchella esculenta, e) Pluteus cervinus, f) Flammulina velutipes
5. Name one spring lawn mushroom: a) Pluteus cervinus, b) Flammulina velutipes, c) Stropharia rugoso-annulata, d) Marasmius oreades, e) Morchella esculenta, f) Pleurotus ostreatus
6. Name one inky cap mushroom that is not safe to eat: a) Coprinus comatus, b) Coprinus micaceus, c) Coprinus atramentarius, d) Coprinus plicatilis, e) Coprinus disseminatus
7. What’s the name of the common cultivated mushrooms?: a) Agaricus campestris, b) Agaricus bitorquis, c) Agaricus bisporus, d) Agaricus arvensis, e) Agaricus placomyces
8. Name one spring species of Agaricus: a) Agaricus arvensis, b) Agaricus bitorquis, c) Agaricus crocodilians, d), Agaricus placomyces, e) Agaricus bernaradii
9. Where would I look to find Wine Cap mushrooms?: a) in lawns, b) on trees, c) in wood chip mulch, d) in manure, e) in deep conifer woods
10. Where would I look to find oyster mushrooms: a) in a lawn, b) in swampy ground, c) on trees and logs, d) in manure, e) on other mushrooms
11. Name one common spring polypore: a) Polyporus squamnosus, b) Grifola frondosa, c) Meripilus sumstinei
12. Where should I look to find morels? a) on elm trees, b) under elm trees, c) in manure piles, d) in swamps, e) only at Whole Foods
13. How can I tell a morel from a false morel?: a) only one is brown, b) only one comes up in the spring, c) only one has a hollow stem, d) only one smells like cherry vanilla, e) only one is an Ascomycete
14. Have you ever eaten wood-ear mushrooms? a) yes or b) no ????
15. What kind of mushroom is a Turkey-tail?: a) a jelly fungus, b) a gilled mushroom, c) a polypore, d) an Ascomycete, e) a puffball
16. What kind of mushroom is a Reishi mushroom?: a) a gilled mushroom, b) a polypore, c) a jelly fungus, d) an Ascomycete, e) a puffball
17. Where would I look to find Chaga?: a) on an elm, b) on an oak, c) on a birch, d) on a pine, e) on a tulip-poplar
18. What is a Caterpillar Fungus, and is it edible?: Cordyceps is the traditional genus for these mushrooms that parasitize overwintering caterpillars, and it is edible but primarily used as a medicine
19. Where would I look to find Black Knot fungus?: a) on an elm tree, b) on an oak tree, c) on a cherry tree, d) on a poplar tree, e) on a ginkgo tree
20. Are mushrooms edible raw, and if not, why not?: NO (if very few exceptions, mushrooms are highly indigestible raw)
21. Give one example of one ectomycorrhizal mushroom?: a) Coprinus commatus, b) Agaricus bitorquis, c) Pleurotus osteratus, d) Pluteus cervinus, e) Boletus chrysenteron
Hi there! Welcome to my review of the best saltwater fishing rods.
Saltwater fishing calls for only the best rods. You’ll find all sorts of fish, from the tiniest panfish near shore to the largest monster fish far out in the waters. This means your fishing rod has to be sensitive enough for those minuscule fish, as well as strong enough for the prize fish you’ll meet. Since saltwater is more corrosive than freshwater, a saltwater spinning rod has to be corrosion-resistant too. It’s also crucial that the fishing rod is affordable because a perfect fishing rod is pointless if you can’t have it.
The best fishing rod at satisfying all these criteria is the St Croix Legend Tournament Inshore. This corrosion-resistant fishing rod has the backbone to take on the monster fish and the sensitivity to detect timid bites. It may cost lot of pennies, but it’s worth every penny.
Everyone has different preferences though. Some of you may be looking for budget rods and others might be looking for surf fishing rods.
Before we get started, we wanted to let you choose for yourself whether to get a spinning or baitcasting rod, where possible. As such, by default, the links are to the spinning options, but we’ve also included links to the baitcasting rods of the same model where applicable.
With that out of the way, let’s begin.
Best Overall
1. St Croix Legend Tournament Inshore
Blank Material: Carbon Fiber
Guides: Aluminum Oxide
Handle Material: Cork
Power: Ranges from Light to Heavy
I’ll start the ball rolling with a saltwater rod that’s handcrafted in the USA. Designed to be unmatched in strength and durability and to have incredible sensitivity and lightness, this is the best saltwater fishing rod that money can get.
St Croix is famous among anglers for making the best premium rods. They’re always researching and developing new technologies for their rods. To date, their R&D has yielded 3 groundbreaking technologies.
The first two technologies are the Fortified Resin System (FRS) and the Advanced Reinforcing Technology (ART). Rods built with FRS are 33% stronger than rods built with the usual methods. ART is an exceptional carbon fiber that makes a rod 10 times stronger with no increase in diameter or weight. These state-of-the-art technologies combine to produce a saltwater rod that’s stronger and more durable than any other rod on the market. You’ll have no trouble even when up against the largest offshore fishes. And needless to say, this rod will last you a lifetime.
The final technology is the Integrated Poly Curve (IPC) tooling technology. IPC further enhances the rod’s strength and boosts its sensitivity by eliminating transitional points in the rod blank. Plus, carbon fiber is the most sensitive material available for rod blanks. The carbon fiber, coupled with IPC, creates an unbelievably sensitive fishing rod.
Another nice benefit of having those technologies is lightness. With these technologies, less material is needed to get the same amount of strength. As such, the rod is also extremely light.
To sum it up, the St Croix Legend Tournament Inshore excels in every aspect. But be warned, its price is not for the faint of heart. Only serious anglers who are looking to invest in the best saltwater fishing gear available should get this fishing rod.
Of course, for the premium price tag, you’ll be well-protected by the 15-year warranty. If you won’t settle for anything less than the best saltwater fishing gear and have the money to spare, this is it.
Also, as promised, here’s the link to the baitcasting version.
Best Legend Tournament Alternative
2. Penn Battalion II Inshore
Blank Material: Carbon Fiber
Guides: Fuji Alconite
Handle Material: Rubber Shrink Tubing/Cork
Power: Ranges from Medium Light to Heavy
On to our next saltwater rod, the Penn Battalion II Inshore manages to be strong and durable while still remaining a sensitive and lightweight rod. It’s no Legend Tournament, but it’s a damn good substitute.
The Penn Battalion II Inshore boasts a heavy power blank. It’s not common to see such a power rating on a carbon rod since carbon fiber is weaker than fiberglass. However, Penn achieved this with their SLC2 construction that has spiral carbon wraps for the first layer and longitudinal carbon fibers for the second layer. The result is a powerful fishing rod you can use for both inshore and offshore fishing.
Next, it’s equipped with Fuji alconite guides for a long lifespan. Fuji alconite guides are the gold standard in fishing guides. These guides are not just smooth, but also super corrosion-resistant. With the hardy SLC2 construction and these long-lasting guides, this rod will last for years to come.
Another benefit of the carbon blank is the sensitivity. As the most sensitive material, carbon fiber allows this rod to be responsive and feel the subtle bites of small fishes. In fact, it even has an extra fast action option which proves how sensitive this rod is.
As for its weight, it weighs a mere 5.3 ounces for its medium power 7 ft option. This is once again thanks to its carbon blank, as carbon fiber is the lightest material for blanks. This rod is light enough that you won’t feel tired even after a long day of fishing.
I also really like the rubber shrink tube handle. As compared to EVA and cork grips, rubber shrink tube handles provide the most secure grip and maintain this grip even when they get wet.
All in all, this top-of-the-line fishing rod delivers on all fronts, and it’s no wonder. Penn is a brand that is renowned for their quality components and tournament-tested products and rods. They hold about 1,400 IGFA world rankings for their superb performances in various saltwater game fishing tournaments.
And fret not, just because it’s a first-rate rod doesn’t mean it’ll make a hole in your wallet. It’s a fair bit less durable and a tad less strong and sensitive than the Legend Tournament. But it’s also $200 cheaper while still having all the strength and toughness needed for both offshore and inshore fishing. That’s what makes this the perfect alternative to the rather pricey Legend Tournament.
Once again, here’s the link to the baitcasting version.
Best For Surf Fishing
3. Penn Carnage III Surf Conventional
Blank Material: Composite
Guides: Titanium
Handle Material: Rubber Shrink Tubing
Power: Ranges from Medium to Medium Heavy
If you’re looking for a saltwater surf rod, the Penn Carnage III is your best bet.
For surf fishing, your rod has to be no shorter than 8 ft or you won’t be able to cast past the breaking waves. The Penn Carnage III comes in 10 ft and 11 ft to reach the monsters far out.
Of course, length isn’t the only reason to get this rod. Strength-wise, it doesn’t disappoint with its medium heavy power. You won’t be taking home any giants, but sharks and such will be no issue.
Sensitivity-wise, the moderate fast action enables you to feel the soft bites of small fish. It isn’t responsive enough for tiny fish though, so you’ll miss out on those. Still, this isn’t a huge boon since no one goes surf fishing for tiny fish anyway.
Durability-wise, the titanium guides are the sturdiest on the market. There’s also the rubber shrink tubing that’s relatively tough, very secure, and comfortable to grip.
In short, this is a well-rounded saltwater fishing rod, and the best at its length. You won’t find a better saltwater surf rod than this.
Best Carnage III Alternative
4. St Croix Triumph Surf Spinning
Blank Material: Carbon Fiber
Guides: Aluminum Oxide
Handle Material: Cork
Power: Ranges from Ultra Light to Medium Heavy
Just like the Carnage III, the St Croix Triumph Surf was designed for saltwater surf fishing.
First off, it features a SCII carbon blank that has a higher strain rate than normal carbon fibers. This means it’s stronger than other carbon fibers. Naturally, this makes the St Croix Triumph able to wrestle down any inshore fish. Unfortunately, the highest power rating for this rod is medium heavy, which isn’t enough for the bigger offshore fishes. Nevertheless, it will more than suffice for medium sized fish and even some of the larger sized species like sharks.
Other than that though, it doesn’t have any flaws.
The aluminum oxide guides are almost as corrosion-resistant as the Fuji alconite guides, and will still give you a long-lasting fishing rod.
And as mentioned earlier, carbon blanks are sensitive and light. You’ll have no trouble fishing for hours with this rod because of its lightness.
It’s also worth noting that this is a one-of-a-kind rod that uses eco-friendly parts.
Overall, this rod will perform fantastically for surf fishing. It comes in lengths from 8-10 ft, perfectly. Since surf fishing calls for 8-12 ft rods and the Penn Carnage III only runs from 10-12 ft, you can get this rod if you want something from 8-10 ft. It’s able to match the Penn Carnage III in strength and sensitivity, but loses out in hardiness, this the lower price.
That said, it’s lower price but still top-notch performance makes it a great alternative to the Carnage III. Whether you found the Carnage III out of your budget or are just looking for shorter surf rods, this is the rod for you.
Best Budget
5. Ugly Stik Bigwater
Blank Material: Composite
Guides: Stainless Steel
Handle Material: EVA Foam
Power: Ranges from Medium to Heavy
This next rod is the cheapest way to get started saltwater fishing. The Ugly Stik Bigwater Spinning Rod offers rugged strength without compromising on sensitivity.
Right off the bat, you’ll notice that this saltwater fishing rod has a graphite composite blank. This allows you to have the sensitivity of graphite and the strength of fiberglass. The graphite composite rod is further strengthened by Ugly Tech Construction. Ugly Tech is known to make unbreakable rods. This is made possible by their unique way of constructing rods. With it, you’ll be able to pick up on soft bites and handle gigantic fishes.
On top of that, this rod comes with stainless steel guides and an EVA grip. Stainless steel holds up well in saltwater and EVA foam is the most comfortable material for rod handles.
The catch is that this rod is much heavier than all the previous saltwater fishing rods. While fiberglass is stronger than carbon fiber, it’s also heavier. And while Ugly Tech Construction is strong, it uses more material.
At this price point though, those downsides are only to be expected. If you’re looking for a quality saltwater fishing rod on a tight budget, look no further.
Here’s the link to the baitcasting version.
Best Inshore
6. St Croix Teramar Southeast
Blank Material: Composite
Guides: Fuji O-Ring
Handle Material: Cork
Power: Medium Heavy
Last on the list, the St Croix Teramar Southeast lacks the strength for offshore fish, but excels for fishing inshore.
As a glance at the features would tell you, this rod sports a cork handle and Fuji O-Ring guides. O-Ring guides are made with aluminum oxide. This, together with the long-lasting cork grip, guarantees many years of service for this rod.
However, its strength is capped at medium heavy, which isn’t enough for the bigger offshore fishes. That’s why it’s only the best inshore fishing rod.
Moving on to responsiveness, the fast action guarantees you won’t miss the tugs of even tiny fish.
You’ll also be glad to hear that this rod is quite affordable, coming in at a little under 150 bucks. For those who only plan on inshore saltwater fishing, this could just be the rod you’re looking for.
Here’s the link to the baitcasting version.
What To Consider Before Buying A Saltwater Fishing Rod
By now, you should know which rod you’re going to get.
However, each rod has multiple options and each represents a different rod length, power, action, etc.
For the best saltwater fishing experience, make sure to read this buying guide so you pick the right one.
Blank Material
Rod blanks are typically made of either carbon fiber, fiberglass, or composite which is a mixture of both.
You may also have seen some graphite rods, but graphite is just another name for carbon fiber.
Carbon fiber is more expensive, more sensitive and lighter than fiberglass. On the other hand, fiberglass is stronger and more sturdy.
Composite is a material that contains the good qualities of both materials.
Composite rods have the sensitivity of carbon and the strength of fiberglass.
Of course, a pure carbon fiber rod would still be lighter and more sensitive and a pure fiberglass rod would still be stronger. But composite offers the best of both worlds.
I prefer carbon saltwater fishing rods for fishing inshore and fiberglass or composite saltwater fishing rods when I fish offshore. However, this ultimately comes down to what you value in a fishing rod.
Rod Power
Rod power refers to how much force is required to bend a rod, aka stiffness.
It’s quite commonsensical. You’ll need a stiffer rod for bigger fish.
It isn’t just the fact that a flimsy rod won’t hold up against big fish. Rods with heavier power also work better with bigger and heavier lures, which you need for big fish.
As such, you’ll need to consider where you’ll be fishing and what fish you’ll be targeting.
You’ll find smaller fish inshore than offshore, so you can go with lighter power saltwater fishing rods.
I recommend using a medium light to medium power rod for fishing inshore. You can deviate from this if you plan on only targeting panfish, in which case a light power rod will be fine.
Offshore fishes are larger, so go with at least medium heavy rods.
If you’re going after prize fish though, make sure to get at least heavy rods and get extra heavy power if possible.
Rod Action
Rod action is a measure of how high up your rod bends when you apply pressure on the rod tip.
The higher up it bends, the faster the action and the more sensitive your rod will be.
For fishing inshore where the fishes are smaller, you’ll need faster action saltwater fishing rods to feel the softer tugs.
I recommend getting at least a moderate fast action rod, although a fast action rod would be more ideal.
For offshore fishing, the fishes will be larger, meaning they’ll have stronger bites.
As such, you can afford to get a moderate or even a slow action fishing rod. Of course, more sensitivity is always good, so if you see a fast action rod available, go for it.
Rod Length
It’s critical that you get the right length because it’ll determine how far you can cast, how stiff your rod is, and your rod weight.
A longer rod gives you more leverage to cast further and is the biggest deciding factor in how far you can cast.
A longer rod also tends to mean more strength, although it will only affect your rod stiffness to a small degree.
And lastly, more length means more material and thus more weight.
As such, whether you’re fishing offshore or inshore, stick with 6-8 ft.
Unless you’re surf fishing, you won’t ever need more casting distance than an 8 ft rod will provide. A longer rod will only add on unnecessary weight. At the same time, a shorter rod than 6 ft may not cast far enough, especially if you’re fishing inshore.
If you’re going surf fishing, follow this guide to find the right rod length.
Line Guides
It is particularly important that your line guides are corrosion-resistant since you’ll be fishing in saltwater for long periods of time.
The good news is that most metals are corrosion-resistant, and ceramic is completely rust-proof.
Some of the better metals to look out for are titanium and alconite. Both of these are the best materials for guides, being strong, smooth, and highly corrosion-resistant.
Reel Seat
Lastly, though not of huge importance, reel seats will affect sensitivity to some extent. Inferior reel seats won’t hold up against larger fish and your reel can end up being ripped off.
The best reel seats will be made of metal or graphite, so look out for those materials. Minimal reel seats that expose the rod blank also provide an extra sensitivity boost, although it won’t really matter as long as you have the rod action that you want.
How To Take Care Of A Saltwater Fishing Rod
After fishing, always clean your rod with a cloth, using either freshwater or lukewarm water and vinegar or a mild detergent.
If there’s any remaining dirt, clean it off with a toothbrush, or a brush with soft bristles. You can then wipe it dry with a cloth or just let it dry by itself. However, there will always be some moisture on the rod even after wiping, so make sure to let it dry for a while more even if you’ve cleaned it with a dry cloth.
Once a month, remove the spinning reel (or your baitcasting reel, depending on which you have) and lubricate the reel seat and other moving parts, like roller guides.
Next, wipe off excess lubricant
After putting back the reel and tightening all the respective screws, apply a final layer of silicone lubricant. This will not only lubricate, but also resist water and protect the surface from wear and tear.
This next step is optional, but recommended if you want a sleek-looking rod. After you’ve completed all the previous steps, you can lightly coat your rod with bowling alley wax. This will keep your rod looking sleek and shiny. Just note that this only works on modern rods that have that polished finish.
Finally, when aboard boats, make sure to store your rods safely so that they won’t collide against hard surfaces or other rods. Rod racks are very useful for this purpose, but you can also wrap up your rods with towels to protect them.
My Verdict
Saltwater conditions are harsh, and lesser saltwater spinning rods just won’t cut it.
While all the saltwater fishing rods on this list will get the job done, the absolute cream of the crop is the St Croix Legend Tournament Inshore. It stands out even among the best saltwater rods because it excels in literally every aspect.
With that, all the best in your saltwater ventures!
Trail cameras are great tools for wildlife observers, photographers, and hunters. It allows you to view animals in their natural habitat and from a safe distance. Unfortunately, trail cameras are often an easy target for thieves. How to keep your trail camera from being stolen?
To prevent theft of your trail camera: Place it in a high and obscure location, around foilage, and out of direct sunlight. You should also consider a trail camera cable lock so a thief won’t be able to steal it. Also, avoid visible flashes and use a decoy camera to prevent theft.
There is a possibility that someone will steal your trail camera.
Here are 9 ways to keep your trail camera from being stolen. Learn how to prevent trail camera theft.
Here are a set of tips and tricks to prevent theft of your wildlife camera.
While each tip is good, consider using many of them together for the best results.
Let’s get started!
1. Hiding Your Trail Camera
Disguising your trail camera can go a long way. It isn’t a waste of time or money. And you’ll retain your footage.
There are multiple ways you can do this action, including camouflaging it within the foliage of its surroundings. The use of branches and leaves makes your camera harder to see. You might also buy fake foliage since real leaves will die over time.
You could hide your trail camera in a tree stump or a nesting box to make it seem natural. Get creative so you can discover multiple ways of hiding your trail camera. You can also hide your device with the following methods.
Keep Camera Out of Direct Sunlight: This goes a long way in keeping your camera hidden. Compare the following photo with the feature photo of this article.
The first one glows and can’t be missed. And the following photo keeps the camera in the shade and much less visible.
2. Place in Low-Traffic Areas
Placing your trail camera in low-traffic areas is another useful tip when hiding the device.
Putting it in a remote area, choosing sections of woods where people do not typically go.
Easily accessible trails are the last place you want to place your camera, so find a spot difficult to access. The trail less traveled will be suitable in this instance.
3. Mount Your Camera Out of Reach
Mounting your trail camera in a place that is hard to reach is a great way to prevent theft.
Most thefts are crimes of convenience. Mounting it out of reach (especially with a ladder) means it will be hard for a thief to grab and go with your camera.
And a high vantage point means thieves could potentially harm themselves when climbing up a sketchy tree. It is also less likely to be seen by walkers.
Spotting a camera in a high place would take some effort, making this step one of the most ideal methods. It might be a hassle to mount your wildlife cam out of reach, but might be worth the effort.
4. Do Not Use Cameras That Flash
We recommend that you use cameras that do not flash during the nighttime. Cameras flash at night to get a better picture, but the light is a dead giveaway for a thief.
Even if you hid your camera nicely, the flash will reveal its placement and entice a thief to do what thieves do.
Your camera might be safe throughout the day, but once the night comes it’ll be like a lighthouse – visible from all around. The passerby could either steal your camera or break it, which is why a camera that does not flash is great.
Look for trail cameras with night vision and passive infrared (PIR).
5. Set Up a Decoy Camera
Another method of preventing your trail camera from being stolen or broken is by setting up a decoy camera. Place a camera that does not work in a spot that someone can easily notice.
The fake device can draw would-be thieves from noticing the real camera hidden away.
You can even place the decoy in the view of the real camera to catch the thief. This clever action will kill two birds with one stone, revealing the thief’s identity and spotting animals in their natural habitat.
6. Use Cellular Cameras as Surveillance
A cellular camera is perfect for surveillance. Linking it to your mobile will constantly send trail camera images to your phone. So, you wildlife observers can enjoy the beauty of nature in all its gloriousness in real time.
You could also catch the thief in the act if you decide to use a cellular camera.
Keep in mind that these cameras cost more to purchase. And because your phone is steadily receiving images, you will have data costs.
7. Label Your Trail Camera
Adding identification is an obvious thing to do, but labeling your camera can be helpful when on the look for it. Simply marking your name and contact information on your trail camera will prove helpful if it gets lost or stolen.
After stealing a camera, the thief’s first stop might be a pawnshop. But with your name etched into the trail camera, the buyer could realize the seller stole it. They will then contact you and return it, saving you from purchasing another trail camera.
8. Use Social Media for Help
If your trail camera has been stolen, you can use social media. Social media can be helpful when tracking things down. Labeling your trail camera, as previously stated, would make it easier to track down.
The hunter community can help you with this process. You might post images of the thief (taken with steps 5 and 6) and see if it might be tracked down. You could also make a deal for the thief to return your trail camera. And you can share these photos and video clips with police to report the theft.
9. Cable Locks
Trail camera cable locks are a great way to keep your camera secured. You should still use the other steps in this guide – especially hiding your trail camera. But trail camera cable locks can help ensure that it doesn’t get stolen if spotted.
Cable locks have a locking mechanism that will secure positions that are up to six feet.
Your camera will remain secure, even if someone spots it along their walk. The only way to unlock the cable lock is with a key, so the security should leave you relieved when you set it up.
Check out the lock systems below to see where to start.
Here’s how to use a trail camera for security.
More reading: Do trail cameras scare deer?
3 Trail Camera Cable Lock
The following systems will ensure your trail camera remains secure from thieves.
1. Master Lock Python
The Master Lock Python is available in up to twenty-four packs, and each is keyed the same. A thief will not be able to easily cut the camouflaged cable since it is cut-resistant.
The cable lock will survive harsh weather with its strong aluminum alloy lock, cylinder shutter, and vinyl-coated cable.
These features, along with the remaining cable locks, are excellent solutions to keep your valuables safe.
2. Browning Trail Camera Security Box
The Trail Camera Security Box is the next best thing to having a secure trail camera. The 16 gauge steel will protect your camera from damage and theft.
With its powder coating, you will not have to worry about it rotting.
The Browning has two locking channels for python cables and will accommodate a padlock up to 3/8″ in diameter.
3. Cam Guardian Tree Mount Holder
This trail camera attachment is another option for solving your problem. The Cam Guardian will not only mount your trail camera in a high spot but will also keep it locked, in case it becomes discovered.
You will no longer have to worry about damaged or frozen keys. Cam Guardian is also the most useful lock mechanism out of the bunch.
Looking for the best options? Here are the 13 Best Trail Cameras for Wildlife Photography.
Game cameras are popular among game photographers and hunters. They allow you to see what the animals are doing without having to be there in person.
The motion detection shoots only when there is wildlife. PIR delay on game cameras is an important feature.
More reading: How to Hide a Trail Camera from Humans
Your Turn
What tips are you going to use to keep your trail camera from being stolen? Let me know below!
Choosing the right air compressor hose for your compressed air system can be a difficult task. With so many options, and each offering their own benefits, DIYers often turn to advice to help them come to a decision.
This article will provide you with the pros and cons of PVC, rubber, polyurethane, and hybrid air hoses, along with their suited applications and other hose selection considerations to make your decision a lot easier!
PVC air hoses are probably the most affordable air compressor hose available on today’s market. PVC hoses consist of a PVC-compound inner tube and a polyester spiral outer, which allows them to hold their shape. Consequently, making it difficult and possibly impossible to lie them flat.
PVC air hoses are typically stiffer than rubber hoses, making them more difficult to coil and uncoil. They tend to kink which is not desirable, and they easily become inflexible in cold weather conditions.
PVC air hoses are often distributed for free with air compressors, but because of these points, they may be difficult to work with, which is why many DIYers will upgrade their air hose to one of the following materials.
Here’s an example of a PVC air hose readily available on Amazon!
PVC Air Hose Advantages
Affordable
PVC Air Hose Disadvantages
Stiff
Struggle to retain flexibility in cold weather
Tend to kink
Rubber Air Hose
Rubber air hoses are typically the most common and readily available air hoses on the market. They consist of synthetic rubber which is reinforced with either braided or spiraled yarn. These types of hoses are very durable, rarely leak, and if they do, it’s generally easy to fix.
Rubber hoses do not kink and coil so easily, which makes them very easy to work with, even when the ambient temperature is cold. Rubber hoses are typically more expensive than other types of air hoses and tend to collect a lot of direct when being dragged across the floor due to their tackiness.
Here’s an example of a rubber air hose readily available on Amazon!
Rubber Air Hose Advantages
Do not kink or coil easily
Durable
Rarely leak
Rubber Air Hose Disadvantages
Heavy
More expensive than other types of hose
Tacky materials – therefore, collect dirt
Polyurethane Air Hose
Polyurethane air hoses are often confused with PVC air hoses due to their similar appearance. The key difference between the two is that Polyurethane performs far better than PVC.
Polyurethane air hoses are lighter and more flexible than PVC, and they have a very smooth outer layer that allows them to glide across surfaces with ease. Polyurethane hoses are not as flexible as rubber hoses, which makes them susceptible to kinking. Along with this, they also have a relatively high cost among air compressor hoses.
Their qualities make them an ideal choice for working with pneumatic framing or roofing nailers, to allow both freedom of movement and weight distribution.
Here’s an example of a polyurethane air hose readily available on Amazon!
Polyurethane Air Hose Advantages
Flexible
Lightweight
Smooth outer layer – ease of transportation across surfaces
Polyurethane Air Hose Disadvantages
Not as durable as rubber
High cost
Likely to kink
Hybrid Air Hose
Hybrid hoses are a combination of rubber, polyurethane, and PVC. This powerful blend gives them qualities that are similar to rubber but at a lighter weight, essentially making hybrid hoses a lot easier to work with.
Hybrid hoses are very durable, lightweight, and flexible, making them perfect for all types of tasks, from being used with ladders to being used in your garage. Though hybrid hoses aren’t as tacky as rubber, and so, they don’t collect as much dirt, they are more likely to kink after extended periods of use.
Here’s an example of a hybrid air hose readily available on Amazon!
Hybrid Air Hose Advantages
Flexible
Lightweight
Not tacky
Perfect for all types of tasks
Hybrid Air Hose Disadvantages
Likely to kink after extended periods of usage
Hose Selection Considerations
Now you have an idea of the different materials available for air hoses, I want to switch attention to the other considerations you must factor in when selecting the right air hose for you. These include:
Coiling Capabilities
Connections
Hose Dimensions
Kink Resistance
Pressure Rating
Temperature Compatibility
Coiling Capabilities
Air compressor hoses either coil in a standard or recoil method. Standard hoses lie flat with no coils or bends, which makes them easy to unroll and stretch flat for maximum length or for storage.
Recoil hoses are ideal for working around a garage or workshop as they have small twists in their hoses, which cause them to recoil backward when the user lets go. Standard hoses can cause tripping hazards but are the ideal choice when operating a nailer because they have a longer maximum length.
Connections
Air compressor hoses typically have threaded ends to allow users to attach quick-release connectors to them, allowing you to switch between different power tools with ease.
You must take consideration into the right-sized quick-release connector for your tools. They are generally available in 1/8″ 1/4″ and 1/2″ sizes and as aluminum or brass. Brass connectors offer better resistance to corrosion and generally are known for more air-tight connections.
Hose Dimensions
First of all, the diameter of the hoses is important to decide how much air the hose is capable of delivering. Hoses range from around 1/4″ to 1/2″ and the right one will typically depend on the size of the air compressor. The most common size air hose is a 3/8″ hose.
Air compressors with high CFM outputs (cubic feet per minute) should use a larger diameter hose while air compressors with low CFM outputs should use a smaller diameter hose. For more information on CFM, visit our guide here!
The hose length is also important in determining which applications the hose can be used for, and how much pressure it will be capable of handling. Most air hoses range from around 5 feet to 60 feet.
If you require a hose for framing, roofing, painting, or other projects that require you to be a distance from your air compressor, then you will need a lengthier air hose. But, you must be aware that the longer the hose, the greater the pressure drop.
Shorter hoses are better suited to applications like filling truck tires or any other applications that demand higher pressures with sustained use.
Kink Resistance
Air compressor hoses, just like garden hoses, are liable to twisting and kinking when pulled or uncoiled. This can cause a delay in the airflow going through the hose, and may even lead to a burst at the kink if not dealt with.
Rubber hoses resist kinking better than any other type of hose. PVC has the worst of the hoses presented in this article, while hybrid and polyurethane offer good resistance to kinking.
Pressure Rating
Each and every air compressor hose will have a maximum pressure rating, indicating the amount of pressure, PSI (pounds per square inch), the air hose can withstand before breaking.
Typically, manufacturers will recommend an operating pressure for the hose as well as the burst pressure which is the maximum pressure the hose can withstand before bursting. Keep in mind, hoses with higher pressure ratings can handle tougher jobs like inflating truck tires.
Temperature Compatibility
An air compressor’s ability to resist changes in its flexibility typically depends on the different temperatures it’s exposed to. PVC struggle in colder temperatures and become less flexible, making them harder to work with.
In contrast, rubber hoses maintain their flexibility in temperatures that reach well below freezing. Polyurethane and hybrid hoses also are able to retain their flexibility in colder temperatures.
Frequently Asked Questions
If you’re wondering how to plumb an air compressor setup, visit our guide!
If you have any questions about PVC, rubber, polyurethane, or hybrid hoses, please leave a comment below, with a photo if applicable, so that someone can help you!
Trolling fishing is a popular technique used by anglers to catch this prized freshwater game fish. The method involves dragging one or more baited lines or lures behind a moving boat at varying speeds and depths until a walleye takes the bait.
Trolling for walleye can be done on freshwater lakes or rivers, and requires specialized equipment and techniques to be successful. Walleye trolling can be a fun and challenging way to target these elusive fish and is a favorite among many anglers.
Walleye trolling has been practiced for many years, with the first recorded use of this technique dating back to the early 1900s.
At the time, anglers used hand-cranked reels to drag baited lines behind their boats.
As technology improved, the method became more efficient with the development of electric trolling motors and other specialized equipment.
Today, walleye trolling is a popular sport enjoyed by anglers all over the world, and has even led to the development of specialized boats and equipment designed specifically for this type of fishing.
Despite the advancements in technology, the basic principles of trolling fishing for walleye remain the same – drag a baited line or lure behind a moving boat to attract and catch walleye.
Essential Gear for Successful Walleye Trolling Fishing
To be successful at trolling fishing for walleye, you’ll need a few key pieces of equipment.
The first is a trolling rod and reel setup, which should be strong enough to handle the weight of your lures and the fight of a walleye.
Look for a trolling rod that is at least 7 feet in length and has a medium-heavy power rating. Using a sensitive fishing rod can aid in detecting bites and setting the hook properly
Opting for a reel with a smooth drag system can assist in wearing down a walleye and reducing the risk of line breakage. A drag system that is rated for at least 10-12 pounds can help you handle a larger walleye.
The Penn Fathom Lever Drag 2 is an excellent option to consider.
With its user-friendly design and lever drag system, this reel provides a smooth and intuitive experience.
A level wind reel is ideal for trolling, as it distributes line evenly across the spool and can help prevent tangles.
A downrigger or planer board can help you get your lures to the right depth and keep them there.
Investing in a quality trolling rod and reel setup can make a big difference in your success when trolling for walleye.
You’ll also need a trolling motor or an outboard motor that is powerful enough to move your boat at a slow and steady pace.
Boats Suitable For Trolling Fishing
Having the right boat can make a big difference in your success.
Ideally, you’ll want a boat that is stable, maneuverable, and has plenty of space for you and your gear.
A flat-bottomed boat, such as a jon boat or a bass boat, can be a good choice for trolling, as they offer good stability and maneuverability in calm waters.
Alternatively, a larger boat with a deep-V hull can be a good choice if you plan to fish in rougher waters or if you need more space and storage for your gear.
Equipping your boat with a trolling motor and depth finder can assist you in navigating the water and identifying the prime locations for trolling fishing.|
To ensure a successful fishing trip, it’s crucial to have a high-quality net and cooler on hand.
Trolling Motors For Walleye Trolling
There are many great trolling motors available in the market, but one of the best options for trolling for walleye is the Minn Kota Endura C2 55. This motor is known for its reliability, durability, and quiet operation. It has a 55-pound thrust, making it powerful enough to handle rough water conditions and strong currents. Additionally, it features a telescoping handle, allowing for easy control and maneuverability. Overall, the Minn Kota Endura C2 55 is an excellent choice for any angler looking for a quality trolling motor for walleye fishing.
Best Lures and Baits for Walleye Trolling
Walleye are often attracted to lures that mimic the movements of their natural prey, such as minnows or leeches.
The best walleye lure baits can vary depending on factors such as water temperature, time of day, and the specific body of water you’re fishing
Recommended baits are crankbaits, spinnerbaits, and spoons. Designed to attract walleye.
A depth finder or fish finder is also useful for locating schools of walleye.
It also helps determining the depth at which they are feeding.
Recommendations For Lures Based On Water Depth
Less than 15 feet a floating crankbait or spinner rig can be effective.
These lures can be trolled at a slow speed near the surface, which can attract walleye that are feeding on smaller baitfish.
15-30 feet. A deep diving crankbait or a jig and plastic tail can work well in medium depth water.
These lures can be trolled at a moderate speed to get them down to the right depth and keep them there.
Use a downrigger for depths over 30 feet.
A deep diving crankbait or a spoon can work well in deep water, as they can replicate the movements of larger baitfish that walleye may be feeding on.
Speed And Depth For Walleye Trolling
Speed and depth are critical factors to consider when trolling for walleye.
Generally, a speed of 1.5 to 2.5 miles per hour is a good starting point for trolling.
You may need to adjust your speed based on the behavior of the fish and the conditions of the water.
If you’re not getting bites, try slowing down or speeding up your trolling speed to see if that makes a difference.
As a general rule, walleye tend to be found at deeper depths during the day and shallower depths in the early morning or evening.
Using a depth finder can be helpful in determining the ideal depth for your lure.
Once you’ve found the right depth, be sure to maintain a consistent speed and depth as you troll to maximize your chances of getting a bite.
Tips for Avoiding Snags and Tangles
Snags and tangles are a common problem when trolling for walleye, and can quickly become frustrating if you’re constantly having to untangle your lines or retrieve snagged lures.
One of the best ways to avoid snags is to keep your lure at the right depth for the conditions of the water you’re fishing in.
Using a line counter reel can be helpful in keeping track of the depth of your lure and reducing the risk of snags.
Locations for Trolling Fishing for Walleye
Wisconsin is home to some of the best walleye trolling locations in the United States.
One of the most popular destinations for walleye fishing in the state are Green Bay & Lake Winnebago.
Green Bay is located in northeastern Wisconsin.
The bay covers an area of over 1,600 square miles and has an average depth of only 20 feet.
Ideal habitat for walleye. Some of the most productive areas for walleye trolling in Green Bay include the waters around the Fox River, the Pensaukee River, and the Oconto River.
Known for producing some of the largest walleye catches in the country.
Other notable lakes for walleye trolling in Wisconsin include Lake Michigan, and Lake Superior.
When choosing a location to troll for walleye, it’s important to consider factors such as water temperature, depth, and structure.
Walleye tend to be most active in water temperatures between 55-68°F and are often found near structures such as drop-offs, weed beds, and submerged rock piles.
It’s also important to pay attention to weather conditions, as changes in wind and cloud cover can affect the feeding patterns of walleye.
Enjoy Your Trip Walleye Trolling Fishing
Don’t forget to take in the scenery and appreciate the beauty of the great outdoors while you’re out on the water.
Anglers are required to obtain a fishing license and follow specific size and bag limits for different fish species.
It is important to avoid damaging habitats and follow proper waste disposal methods to avoid polluting waterways. Grab your gear, head out to your favorite fishing spot, and enjoy the thrill of trolling for walleye.
Guided Walleye Fishing With Captain Lonney
For 25 years Green Bay Trophy Fishing has guided and provided helpful information to anglers in and around Door County. We are some of the most experienced fishing guides in Green Bay and pride ourselves on being experts on everything related to fishing in the area.
If you are interested in booking a walleye fishing charter, you can view our rates or contact us here.
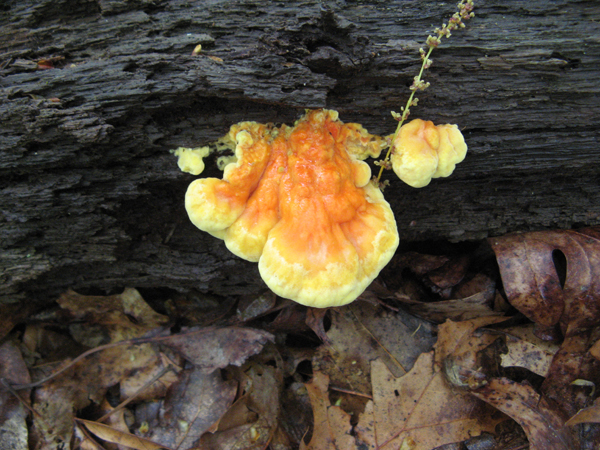
These bright fungi are rather unusual looking, and if you’re trying them for the first time, you may be a little skeptical about their edibility.
But they’re extremely popular with foragers, very versatile in the kitchen and many people consider them the best mushroom to substitute for chicken.
So, if you’re looking for a healthy vegetarian alternative to chicken and live in an area where they thrive, these may be the perfect mushrooms for you.
Read on to learn more about chicken of the woods mushrooms, including where they grow, how to correctly identify them, what they taste like and how to harvest, store, clean and cook them.
Chicken of the woods mushrooms are striking, brightly-colored edible mushrooms that grow on old, dying or dead trees.
They’re the fruiting bodies of polypore, bracket fungi and appear in large tiered clusters of bright yellow to orange mushrooms with fan-shaped caps.
They’re occasionally parasitic on elderly trees where they cause brown rot, but usually saprotrophic, feeding on dead and decaying hardwood trees.
There are several species of chicken of the woods mushrooms that vary slightly in color and taste. Three of the most common are Laetiporus sulphureus, Laetiporus cincinnatus and Laetiporus gilbertsonii.
All three produce delicious edible mushrooms that look similar but grow on different trees.
Like other mushrooms, chicken of the woods has several names, including sulfur shelf or chicken mushrooms, sulfur shelf fungus or chicken fungus.
Can You Eat Chicken of the Woods Mushroom?
Yes, you can eat chicken of the woods, and it gets its name from the fact that its dense fibrous flesh has a texture very similar to cooked chicken.
Where Does Chicken of the Woods Grow?
Chicken of the woods grow in deciduous woodlands, and you’ll find them in a range of woodland habitats, including the edges of natural forests and urban parks and gardens.
They’re widespread in the United Kingdom, North America, and Europe and are most often found growing on trunks or stumps of deciduous hardwood trees like oaks, maples and beeches.
But you’ll sometimes find them growing on willow, wild cherry, sweet chestnut, eucalyptus and yew.
Laetiporus sulphureus and Laetiporus cincinnatus enjoy oak and beech trees, while Laetiporus gilbertsonii is usually found on oak or eucalyptus trees.
Some mycologists advise against harvesting chicken of the woods mushrooms that grow on yew trees as they could absorb the toxic alkaloids found in the yew tree. But others report having eaten these mushrooms without incident.
Is Chicken of the Woods Hard to Find?
Chicken of the woods are not hard to find, but although they’re brightly colored, easy to identify and relatively common, it’s not always as easy to find them at the right stage for eating, and you have to know where to look.
They grow best on dead and dying oak trees and enjoy humid, low-lying locations and cool temperatures. But can be unpredictable and will fruit throughout the year when conditions are favorable.
Usually, the best time to find them is fall, but foragers report coming across them anywhere from late spring through to fall, especially after heavy rains.
You’ll often find chicken of the woods growing on the same tree or log year after year until the fungus has fully decomposed the wood.
So once you have found a flush of chicken of the woods mushrooms, you can return to the same spot the following year when conditions are right and will hopefully discover more.
Where to Buy Chicken of the Woods Mushrooms
If the thought of finding and identifying chicken of the woods mushrooms in the wild is intimidating, don’t worry.
Chicken of the woods mushrooms are sought after, and in many places, you’ll find fresh chicken of the woods at local farmer’s markets or specialty food stores.
Some CSA projects also offer foraged or homegrown mushrooms as part of their weekly food parcel and may include chicken of the woods.
How to Identify Chicken of the Woods Mushrooms
Chicken of the woods are very striking and have few look-alikes making them an ideal species for beginner mushroom foragers.
They grow in overlapping layers, resemble small wavy shelves and vary in appearance from smooth to finely wrinkled.
Their broad fan-shaped caps can get very big and range from 2 to 12 inches (5 to 30 cm) across, with a velvet or suede-like feel when young that becomes leathery as they mature.
Chicken of the woods are polypores, meaning they do not have gills. Instead, the underside of their caps have lots of tiny tubes that look like pores, and these produce their spores.
Chicken of the woods mushrooms don’t have stems, the brackets emerge directly from the tree, but they sometimes have short pseudo or “false stems” that are actually part of the cap.
Their color varies from species to species, and as they mature, their bright colors fade and change, becoming tan or light brown.
The upper surface of Laetiporus sulphureus, often called the sulfur shelf mushroom, is orange-red to orange-yellow, usually with bright yellow wavy edges. The underside is bright sulfurous yellow with tiny pores.
Laetiporus cincinnatus, also known as the white-pored chicken of the woods, has a pale pinkish to peachy colored upper surface, and the underside is white with tiny pores.
The upper surface of Laetiporus gilbertsonii is pale pinkish orange or orangish-yellow, and the pore surface varies from lemon-yellow to pale lemon-yellow.
Chicken of the Woods vs. Hen of the Woods
Chicken of the woods and Hen of the woods are very different mushrooms. And although they’re not look-alikes, their similar names often cause confusion.
Hen of the woods or maitake is a delicious edible polypore mushroom that grows in clusters at the base of hardwood trees. And like some chicken of the woods prefers oaks.
But this is where the similarity ends.
Hen of the woods mushrooms have flattened brown caps with white edges and get their name from the fact that the dense cluster of mushrooms resembles the ruffled feathers of a sitting hen.
Chicken of the woods is brightly colored, looks nothing like a hen and gets its name because, when cooked, its taste and texture are similar to chicken meat.
Hen of the woods mushrooms taste nothing like chicken and have a rich earthy aroma and taste and unique texture.
How to Harvest Chicken of the Woods Mushrooms
It’s easiest to harvest chicken of the woods with a sharp knife, but some foragers pull the entire cluster off the tree.
Pulling often results in more wood particles and dirt that you’ll have to clean off the mushrooms later. It also damages the decomposing wood, which may result in fewer mushrooms the following year.
With a sharp knife you can harvest the entire cluster by cutting it off at the base or trim tender bits off the edges of mature caps.
Harvesting chicken of the woods mushrooms at the right stage is important if you want to eat them fresh.
When is the Best Time to Harvest Chicken of the Woods?
The best time to harvest chicken of the woods mushrooms is when they are still young, with vibrant colors and a firm, slightly spongy texture.
They grow fast and can get past their prime in as little as 2 to 3 days, so if you find young chicken of the woods, it’s best to harvest them the same day or come back the following day.
Immature chicken of the woods mushrooms appear from dead trees as bumpy cyst-like knobs and a few days later start forming brackets.
They’re most tender before the brackets form. If you find them at this stage, it’s the perfect time to harvest them.
Prime edible chicken of the woods usually have brackets less than 8 inches (20cm) across with moist flesh, bright colors and a pleasant mushroomy smell. When crushed, they exude a watery, yellowish liquid.
As they mature and their brackets expand, the center part becomes tougher, but the outer edges remain tender. They also often become hosts to bugs and worms that enjoy their flesh.
At this stage, some foragers feel it’s best to cut off any soft sections on the edges and leave the rest for the bugs. But others harvest the entire cluster and use any tough sections to make a deciduous, savory chicken of the woods mushroom powder.
When a chicken of the woods reaches full maturity, the entire mushroom becomes tough and woody, and the colors fade.
At this stage it’s way past its prime and probably best left in the woods, although some people still use mature chicken of the woods for mushroom powder.
Chicken of the Woods Mushroom Look-Alikes
Chicken of the woods is one of the easiest mushroom species to identify, and there are no false chicken of the woods mushrooms.
Although some bright mushrooms may look similar from a distance, it’s easy to tell them apart when you get closer.
Bright yellow to orange mushrooms that grow in similar conditions are delicious edible chanterelles, parasitic honey mushrooms and toxic jack-o-lanterns.
But none of these mushrooms are bracket fungi, and they all have gills, so a quick look at the underside of their caps will quickly remove any confusion.
There is one polypore fungus, Phaeolus schweinitzii, that people sometimes confuse with chicken of the woods. It’s called the velvet-top fungus or dyer’s polypore.
It grows in similar conditions to chicken of the woods and, when young, is often bright yellow or orange, but the upper surface of the fan-shaped cap is velvety brown in the center.
The velvet-top fungus is not poisonous. But it’s also not edible as it has a very tough texture. People use these mushrooms to make natural green, yellow, gold, or brown fabric dyes, hence their second name.
Can You Grow Chicken of the Woods Mushrooms at Home?
You can grow chicken of the woods mushrooms at home, both indoors on sawdust blocks and outdoors on logs.
They’re one of the more challenging species to grow indoors, as colonization takes a very long time.
Because of this, indoor cultivation is usually only recommended for experienced growers who’ll enjoy the challenge.
But, if you have a shady spot in your garden, it’s easy to grow them outdoors on large-diameter logs and stumps. They prefer oak but will grow on most hardwood logs.
To inoculate the logs or stumps, you’ll need to drill holes in them, insert plug spawn or sawdust spawn and seal the holes with wax.
It takes six months to a year from when you inoculate your logs for the first flush of mushrooms. But then you should get mushrooms from your logs for another 3 to 5 years.
Our ultimate guide to growing mushrooms on logs takes you through this process step-by-step.
What Does Chicken of the Woods Mushroom Taste Like?
Chicken of the woods mushrooms have a mild flavor with lemony undertones that people describe as similar to chicken, lobster or crab.
But it’s their sinewy texture, so similar to succulent cooked chicken meat, that gives them their name and makes them a great meat replacement in vegetarian and vegan dishes.
Like other mushrooms, chicken of the woods absorbs liquids well and will take on the flavors of other ingredients in dishes.
Can You Eat Chicken of the Woods Mushroom Raw?
You should not eat raw chicken of the woods mushrooms as they may cause stomach problems.
In fact, chefs advise cooking them thoroughly and, if necessary, boiling them before sauteing them to ensure they’re cooked through.
Some people are allergic to chicken of the woods mushrooms even when well cooked.
As with any mushroom you’re eating for the first time, it’s best to try a small portion first to see if you have any allergic reactions.
How to Clean Chicken of the Woods Mushrooms
If you’ve harvested an entire cluster of chicken of the woods, the first step is to separate the brackets and trim off any woody bits, bruises and insect damage.
Chicken of the woods growing at the base of tree trunks can sometimes get extremely dirty. Foragers recommend brushing them gently with a soft-bristle brush or wiping them with a damp cloth to remove any loose dust and debris.
You can also rinse them under cold running water to remove stubborn dirt. Then pat them dry with a clean paper or kitchen towel. Avoid soaking chicken of the woods as they’ll absorb a lot of water and become soggy.
Our article, “How to Clean Mushrooms: A Step-by-Step Guide,” has more information on the best ways to clean mushrooms.
How to Store Chicken of the Woods Mushrooms
Here are three of the easiest ways to store your chicken of the woods mushrooms:
1. In the Refrigerator
You can store fresh chicken of the woods for 7 to 10 days in the refrigerator in a paper bag or breathable fabric bag, but there are a few things to remember to help them last longer:
Store them on a shelf in your fridge, not in the crisper drawer.
Take care not to place them next to strong-smelling foods.
Avoid putting anything on top of them, as young mushrooms bruise easily.
Also, do not wash your chicken of the woods until just before you plan on using them.
2. In the Freezer
Because chicken of the woods often grows in large groups of several clusters, you’ll often end up with more than you can fit in your fridge or eat in a week.
In cases like this, you need long-term storage solutions, and freezing and drying are the best options for chicken of the woods.
Unlike most other mushrooms that need cooking before freezing, raw chicken of the woods freezes well and retains its meaty texture when defrosted.
To store chicken of the woods in the freezer, first trim and clean them and pat them dry or place them on a kitchen towel to dry.
Ensure they’re dry before freezing them because if you freeze them wet, they won’t retain their texture, and you’ll end up with soft mushy mushrooms.
Place the clean, dry chicken of the woods into ziplock bags or vacuum pack them and then freeze them. They’ll last for up to a year in the freezer.
3. Drying
If you plan on using your chicken of the woods in soups and stews, then drying them is also an excellent way to preserve them long term.
Trim, wash and dry your mushrooms, then slice them into half-inch (1.3 cm) pieces and dry them in a food dehydrator. Once dry, you can store them in an airtight jar or ziplock bag. They’ll last a year or more when kept in a cool and dry location.
You can also blend or grind your dried mushrooms to make chicken of the woods mushrooms powder for seasoning dishes. This is the best way to use older mushrooms that are too tough to eat but still have lots of flavor.
Learn how to preserve your chicken of the woods mushrooms.
How to Cook Chicken of the Woods Mushrooms
Like other mushrooms, chicken of the woods is very versatile with many culinary applications.
You can fry, saute, blanch, roast or bake chicken of the woods and use them as you would other mushrooms or as a substitute for chicken or tofu in recipes.
What is Chicken of the Woods Mushroom Good For?
One of the easiest ways to enjoy the flavor and texture of these mushrooms is to sauté them in olive oil with garlic, shallots, white wine and fresh herbs.
But they also work well in pasta dishes, curries, casseroles, risottos and egg-based dishes like quiches, omelets and frittatas.
Below is a chicken of the woods mushroom recipe that really makes the most of their similarity to chicken meat.
And to provide more inspiration, we have put together 30 of our favorite mushroom recipes as well as 25 delicious vegan mushroom recipes.
Crispy Fried Chicken of the Woods Recipe
Image from Forager Chef
This recipe, adapted from the Forager Chef, uses the traditional chicken fried steak recipe to create tender, juicy mushroom steaks with a crispy outer coating.
You can serve these delicious steaks with any sauce and your choice of vegetables, creating endless possibilities.
Ingredients
4 pieces of young chicken of the woods, around 2 oz (57 grams) or the size of a smallish fist
1 cup all-purpose flour or as needed for breading.
Salt and freshly ground black pepper to taste
1 pinch of sweet paprika
1 small pinch of cayenne pepper
3 eggs beaten
4 tablespoons of cooking oil
2 tablespoons unsalted butter
A few sprigs of fresh thyme (optional)
1 small clove of garlic, crushed (optional)
Lemon wedges for serving
Instructions
Trim off the tough parts of your chicken of the woods mushrooms, rinse and dry them well, as this helps the seasonings adhere.
In a bowl, combine the flour with salt, pepper, paprika and cayenne to taste, and place the beaten eggs in another bowl.
Toss the mushrooms first in flour, then in egg, then in flour again.
Heat a pan and add the cooking oil and butter. When the butter has melted, add your breaded chicken of the woods, the crushed clove of garlic, and the thyme.
Sauté the chicken of the woods until they are golden brown on each side, about 4-5 minutes, adding extra oil or butter if the pan gets dry.
When ready, remove the mushrooms from the pan, quickly blot them on a paper towel to remove excess oil, sprinkle with salt and serve immediately.
Health and Nutritional Benefits of Chicken of the Woods
Like many other mushrooms, chicken of the woods is high in protein and digestive fiber and low in fat, making it a healthy meat replacement.
It’s also a good source of potassium, vitamin C and vitamin A.
The nutritional value of chicken of the woods varies depending on the environment and growing conditions.
But studies on the nutritional value and chemical composition of chicken of the woods show that, on average, a 100g serving contains:
6 g of dietary fiber
21g of Protein
2g of fat
150mg of potassium
Chicken of the woods also contains numerous bioactive compounds with antioxidant, antibacterial, anti-inflammatory and anti-tumor properties.
Final Thoughts
Chicken of the woods are delicious, edible mushrooms that are more often foraged than cultivated.
If you’re fortunate enough to live somewhere they grow, you could find fresh chicken of the woods in the wild, at your local farmers market or even grow them outdoors on logs.
Because they often grow in large clumps, you’ll have enough mushrooms to last a while and can store them in the freezer for a year-round supply of tender, meaty mushroom steaks.
To learn more about mushrooms and how they grow, visit our Mushroom Education Hub.
And if you’re hoping to grow mushrooms at home, our Mushroom Growing Hub has loads of valuable resources to help you get started.
Expect the price of ammunition to rise substantially in 2024 as manufacturers dedicate materials to supply the war in Ukraine.
The first hint appeared Monday when Vista Outdoor announced the sale of its outdoor sporting products division to Czechoslovak Group for $1.91 billion. Vista Outdoor brands include Federal, CCI, Speer, Heavy Metal, Bushnell, Butler Creek, Hoppes, and Remington, which owns a large ammunition plant at Lonoke.
A source in the retail side of the Vista universe said that Czechoslovak Group wants the ammunition making capacity for the war in Ukraine. A Reuters article on Monday reinforced that opinion. It said, “Czech-based CSG has seen its revenue and profits rise since Russia’s invasion of Ukraine as demand for heavy military equipment and ammunition to ship to Ukraine soared.”
In December 2022, Czechoslovak Group also acquired 70% of Fiocchi Munizioni, which in November 2022 announced plans to build a firearms primer manufacturing facility in Little Rock. It is one of only six primer manufacturing facilities in the United States and is also the world’s only source for lead-free primers.
When interruptions occur in the firearms industry supply chain, the retail ammunition and ammunition reloading markets get pinched the hardest. Shortages are most noticeable for 9mm Luger, 40 S&W and 45 ACP, all common law enforcement and military cartridges. Accelerated production of ammo for military and law enforcement also causes shortages in the civilian market. This reduces availability of 380 Rem., and 22 LR, which manufacturers de-emphasize when producing high-demand military and police cartridges.
Robin Sharpless, executive vice-president of Redding Reloading Equipment, said that ammunition and reloading component shortages always accompany periods of political and social unrest.
When shortages are most acute, scarcity of factory loaded ammunition is equally acute. Scarcity triggers binge buying among some customers. Big box retailers sell an entire pallet of ammo to a few customers as soon as it leaves the truck. Moving inventory quickly is an objective in the retail paradigm. It doesn’t matter if it moves through three customers or thirty.
Sharpless said that during the coronavirus pandemic, he noticed the same behavior in the reloading components market.
“If you were watching Facebook forums, you’d see posts that would say, ‘Cabelas got so many primers, and I got them ALL!'” Sharpless said. “I talked to one of those guys. He loads a box of ammunition a year. He shoots a couple of deer a year, so that’s, what, half a box at most? But he’s got 3,000 years worth of primers. It’s an ‘I’ve got them and you don’t,’ thing. Those behaviors do hurt the market.
David Stone, president of Dong’s Sporting and Reloading Goods in Tulsa, noticed the same thing in the ammunition market.
“During the pandemic in 2020, there was no rimfire and no 9mm,” Stone said. “One guy told me he had a 50-gallon drum full of 22 rimfire shells. Never in your entire lifetime are you going to shoot all those. There are thousands of hoarders like that.”
Some retailers, like Fort Thompson’s Sporting Goods in Sherwood, flatten the supply and demand curve locally to a small extent by limiting the amount of ammo and components that individuals can buy at one time. Rationing ammo and components ensures that products are available to the maximum number of customers.
Rationing ammo is important during buying spree periods because it engenders trust, Stone said. Nothing frustrates a customer more than an unavailable product.
“I’m here every day and I watch my inventory level,” Stone said. “Big chains have got corporate people that watch stuff. They’ll ship a hundred boxes to a store. One person can walk in off the street and buy it all. I don’t do that.”
Even when ammo is available, reloading supplies often remain scarce for a long time. An associate at Fort Thompson Sporting Goods said it’s because ammo manufacturers consume the bulk of powder, primers, brass and bullets.
“A lot of the primers are staying with the manufacturers because they’re producing cartridges,” the associate said. “If they can’t get primers, they can’t produce cartridges either. Vista owns CCI and Federal, and Vista owns Remington. Hodgdon owns most of the powder brands, so they’ve all got the same issue. Powder is going to the manufacturers to produce the bullets. It’s all a chain deal. Reloaders get the leftovers.”
Sometimes, Stone said, it pays to play a hunch.
“I’m kind of a gambler,” Stone said. “When I saw a primer shortage coming, I gave somebody I’ve never done business with $150,000 up front for primers. When those came in, I gave them another $150,000. That’s a gamble that paid off.”
Even when demand stabilizes, non-endemic factors, like a trucker strike or dock worker strike, can cause a spike in demand and a dip in supply, Stone said.
“Let’s say there’s a trucker strike. There’s no freight coming in. That kind of kills everybody’s plan,” Stone said.
The solution, Stone said, is equivalent to retailer hoarding. He said he buys enough to get him through the lean times. When the supply reflows, he overstocks again.
“The last big shortage was 2013,” Stone said. “I hated it that I ran out, so I over bought. I’ve had primers since 2013. I bought too many then, and I’m glad I did. It’s already paid for.”
With a major supplier intending to devote production for the foreseeable future to a war that has no foreseeable end, the supply of hunting ammo could be tight for years. Stocking up now while supplies and prices are favorable might help see hunters through some upcoming lean times.
An air rifle's effective shooting range depends on various factors, including the type of rifle, the caliber, and the power source. Generally speaking, most...
")
")
")
")
")