Coming from the eastern whitetail woods and objectively entered my first broken country western elk hunt I looked at glassing as a simplistic way to locate animals. Find a vantage point, setup, and scan the mountain sides. I focused having the best gear I could afford when it came to glassing but overlooked the actual art. I very quickly learned that there’s more to being successful behind glass than just spending time looking through a spotter or binoculars. While I continue to hone my western skill set I’ve come a long ways over the last 4 years.
Being a successful western hunter, at some point will entail working glass as long as the habitat allows for the opportunity. Glassing is an planned and learned skill. In this article I’ll cover all the mistakes I’ve made and lessons I’ve learned glassing out west.
Have a Plan

As I mentioned in the opening paragraph, spending hours behind glass does not guarantee anything but time spent. With most western hunts being plan around a 5-7 day hunt, eastern guys heading west need to be efficient with time. It’s difficult to find animals in new vast territory and locating animals to hunt is often where hunters will spending the most of their time. However, it’s also where the least amount of planning is spent for most new hunter.
When it comes to glassing, there’s more to planning than just marking vantage points on onX. You need to identify glassing points based on where elk will be, sun position, access, and vantage points. Morning, afternoon, and evening glass spots will likely all be different. Once you have boots on the ground be sure you use your tracking tool on onX to find your way out in the dark….Yes, I’ve made that mistake and found myself “cliffed” out resulting in a longer hike out and little sleep.
Morning Glassing Spots – Focus on areas that elk will be moving back from feeding areas. From my experiences of hunting elk with a bow in September, it takes time for elk to transition from major destination food sources back to bed. Sometimes hours! Find destination food sources and transition routes back to bed that have broken ground. Mark these areas on onX with a specific color. Next find vantage points that are in a workable distance with the glass you have. Lastly, you need to think about where the sun will be. I’ve made the mistake of doing the first two steps to only be blinded by staring into the sun. Keep the sun to your back.
Afternoon Glassing Spots – Focus on bedding areas. At times this can be difficult as from my experience, elk enjoy dark timber as the September sun is high in sky. Also, keep in mind, as hunting pressure increases elk will shift accordingly. In my opinion, while elk are not as cagey as a whitetail they will shift when pressured. Attempt to identify bedding areas with broken timber or pockets of timber and focus your efforts on the edges. Considering you’re probably not an elk expert if you’re reading this, picking a bedding area off a map is highly unlikely. I’ve found good success locating bugling elk in the mornings and simply following them back to bed while maintaining some distance. Location bugles are your best friend here. Keep in mind, the distance between food and bed will vary. I’ve witnessed elk moving less than .5 mile up into a drainage off an alfa field and I’ve also seen where elk move 5 miles back to a bedding area. Anyway you can locate a bedding area, mark it on your map and plan to spend the afternoons, which are typically slow, glassing to gain intel for an evening hunt or even a hunt the follow morning. Again, find your vantage point and maintain a safe distance based on the wind.
Evening Glassing Spots – Much like morning spots you’ll be focusing on the bed to food pattern. If you’ve been glassing bedding areas during the afternoon, it may make sense to stay put if your vantage point still works. If you’re taking a blind stab and it’s your first setup glassing, focus on transition areas and pick a vantage point that offers the most coverable ground while keeping the setting sun at your back. Points, saddles, and openings not far from bedding have all worked for me in the past. Use your tracker on the way in to have a clear cut access plan for the way out under the stars.
Before you go into the hunt, it does pay to have vantage points marked on your map with areas of focus for each part of the day. It will likely change once you lay your eyes on the first herd of animals but that’s the game. Without a plan you’ll start to feel the pressure of filling your tag and end up doing more work than needed during your time in the field. Creating a glassing plan is a necessity for western rookies, I’ve went into hunts with plans and without plans. Each hunt is different but it seems the more prep and work committed to the hunt the better and more enjoyable the trips turn out.
Sun Direction
I’ve discreetly mention sun direction in with your glassing plan but it very well deserves it’s own place in this article. It’s not rocket science but it does need to be top of mind. I’ve learned this lesson the hard way, spending entire afternoons climbing to a marked vantage point only to find it totally useless because I was blinded by the sun. The real issue here is simply wasted time. When you’re in vast territory spending countless calories and time climbing you can’t just jump over one ridge and make it work….at least not in my experience. You don’t always need the sun to your back but you DEFINITELY do not want it directly at your face. If you take one thing from this article, this is it!
Comfort and Steady Base

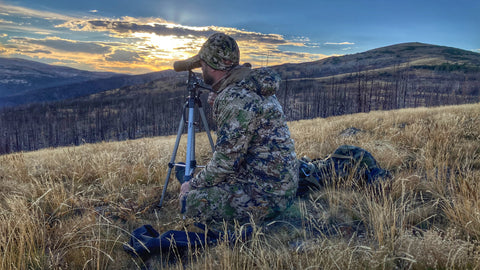
The entire point of glassing is to breakdown an area by spending TIME observing from a distance. Glassing is a skill and it’s not something you learn without doing. The majority of the time when you do spot an animal you will only be catching glimpses of movement if you lucky. More often than not, you’re trying to locate something out of place, an antler, leg, etc. To pull that off you need to go slow and create a systematic approach to cover an area. I personally like to break areas down into a grid and cover it horizontally first before moving back down or up. For example, I’ll start at A1 move to F1 and then return back to A1 before moving vertically and repeat the process over and over and over.
The point here is that to be successful you’ll need to go slow, which takes time. So you need to get comfortably. When you first get setup, take the time to dig out a spot to sit and get a decent backrest, even if you have to carry a few rocks or logs to create it. In effort to save weight in my pack, I usually do not carry a glassing pad because I typically have layers of clothing with me. I’ll use those layers to sit on.
Having a solid tripod is one of the things I personally overlooked on my first couple elk hunts. You cannot be effective behind glass without a solid base. It’s really that simple. Beyond having quality gear, you need to learn how to get it setup solid. Once you begin to glass you WILL inevitably bump your tripod leaving you wondering where you were looking. Diggin in your tripod legs or setting something of weight (rocks, sticks, pack, etc) on each leg will save you some frustrations. In addition to having a solid base, get familiar with your fluid head and it’s adjustments. You don’t want to have them too loose but you also don’t want them cranked too tight. The perfect medium is where you can loosen your pan or tilt with one head without torque on the tripod so much that you’re moving it.
Binos or Spotter or Both?
As I continue to grow as an elk hunter I reflect back to earlier hunts. Things I did wrong, things I did right, lessons I’ve learned and often wondered about how each hunt would play out if I executed things differently. One of the biggest mistakes I make during glassing is going to fast and taking my eyes away from my spotter. For someone who has never spent hours in one place behind glass, it may seem easy. It’s not! It’s mentally exhausting and your eyes will be strained. Something I picked up from Cliff Gray, a lifetime guide and elk hunter, is to use both binoculars and a spotter. Utilize your binoculars to scan and then use your spotter to get a better look at whatever you see. This one thing has drastically increased my glassing success.
While the thoughts of glassing up a giant muley or elk may seem like easy work for those who have never done it, those who have know better. Just like the digital scouting we do for whitetails, creating a plan and considering these tips to glass will pay dividends in aiding to a successful western hunt. I can almost guarantee you won’t be good at it the first go round but with conscious efforts through preparation and execution you can find success and become better with each western experience. You may even find yourself implementing glassing more and more in the whitetail woods!
Author: Chad Sylvester, Exodus Co-Founder/Owner


