In the field, most windows of opportunity are narrow.
So acting swiftly must be your default position as a hunter.
That goes for shot placement as well.

You’ll learn that through a review of:
- 11 scenarios
- 18 diagrams
- 9 rules
Mastery and success rely on understanding several other concepts and topics.
Like optimal bullet choice, advanced shot types, shot placement anatomy, reaction to shot, and more.
I will cover these topics in related articles.

And link to them as we go along or at the end.
Before we get to the details, let me first explain what successful shot placement has in common with Boot Camp.
Where I’m from, we have national service.
I have fond memories of when I first got a chance to shoot my G3.
It’s not an elegant battle rifle by today’s standards. But I loved it. It was rugged, reliable, and relatively accurate. And a ton of fun at night with a Pilkington on top.
Anyway, I digress.
Your success as a hunter depends on two principles – Thinking faster than the animal and Acting faster than the animal.
There were aspects of Boot Camp I was less excited about.
Aircraft recognition training.
We had to be able to make a quick friend or foe identifications. When spotting aircraft.
And we practiced with aircraft flashcards.
This was not exactly my favorite or strong side. But it provides an important lesson when it comes to shot placement.
Success in the field depends on your ability to shoot fast and accurately.
More often than not, animals don’t hang around for long.
If you’re hunting in woodland or bush, the vegetation will further limit your opportunities to shoot.
So you must be able to quickly acquire the correct sight picture.
The flashcard concept is a fantastic way to develop that skill.
Why.
Your working memory can only manage about four concepts at once.
More, and you start dropping the ball.
Of all the things you can process in your working memory when hunting, deciding where to aim is not a good candidate. That has to be intuitive.
Enter the flashcards.
If you’re anything like me, you want to harvest venison for your freezer. Put a trophy on your wall. And live up to your role as a hunter and steward of nature.
Correct and swift shot placement is key to ticking those boxes.

You’ll learn fast target acquisition in two sections.
- What type of shot should you use?
- Where should you aim in different scenarios?
If you’re in a hurry, you can skip to the end for a summary of the rules.
Or to one of the specific scenarios:
- The broadside shot
- The front quartering shot
- The rear quartering shot
- The front shot
- The shot from behind
- Uphill/downhill
- Downhill broadside
- Uphill broadside
- Combined angles
- Front quartering downhill
- Front quartering uphill
- Rear quartering downhill
- Rear quartering uphill
There are several ways to kill a deer or other hoofed animal. One of them stands out as being fast and reliable.

The double lung shot has the biggest margin of error.
And it produces reliable killing.
A heart shot may sound alluring, but it’s not ideal.
It sits low in the body, and shooting under the heart means trouble.
Surprisingly, a bullet through the heart alone can take a long time to take effect.
Other advanced shots present additional challenges. So we’ll leave them for now.
Putting a bullet through both lungs will do one of two things, or both:
- Create severe blood loss that causes fatal shock
- Collapse the lungs and cut off oxygen to the brain and other cells in the body
And this is a surefire way to kill a deer.
This leads us to rule number one.
Shot placement rule #1: Use the double lung shot for fast and reliable killing.

As per the diagram, you’ll see the lungs reach back into the chest cavity of the animal.
But ignore that when it comes to developing fast target acquisition practices.
Instead, consider the vital triangle.
Kevin Robertson introduces it in his book, “The Perfect Shot – Shot Placement for African Big Game” (highly recommended).
It is also good reference for deer and other hoofed animals.
And the center of the triangle corresponds with the center of the lungs.
As well as the top of the heart where you find the arteries and veins meet.
Determine the triangle with these three references:
- The bottom edge of the shoulder blade
- The shoulder joint
- The tip of the elbow

Sometimes you can see the contour of the bones.
But it’s best to have a more reliable way to aim.
I’ll show you how when we analyze the broadside shot.
Table of Contents
The broadside shot
The broadside shot is the shortest and most forgiving path through the lungs.
In the ideal scenario we’ll review here, you are at a 90-degree angle to the animal.
And at the same level.
We’ve established that the center of the vital triangle is the best aiming point for speed and effectiveness. But where exactly should you put your crosshairs?
To determine how far you should come up, follow rule two.
Shot placement rule #2 – For horizontal shots, place your horizontal post between ⅓ and ½ up the deer’s body.
As you can see, that corresponds with the center of the triangle.

Where should you put your vertical post then? Easy, follow rule three
Shot placement rule #3 – For broadside shots, place your vertical post on the center of the front leg.

As you can see from the image, by the center, I mean the center of the top part of the leg.
Because the lower part of the leg may reach further forward on a deer, depending on how it stands.
So, your sight picture should look like this for a full broadside shot.

This is the foundational way to shoot an animal.
I won’t go into advanced shots in this article, but it’s worth mentioning one other popular shot.
With the high-heart/center-lung shot, you hit good shoulder meat that will potentially be bloodshot and wasted.
To avoid that, you can move your sight picture to the right. So your vertical post rests on the elbow point, just in the crease between the leg and the belly.

This shot will destroy the lungs, but you must be careful not to come too far back.
A rear lung shot may also be worth considering if you’re shooting a large animal at long range, using a high BC bullet that is fast expanding. With this shot you won’t there is further to the shoulder bones and you will shoot through less muscle.
Generally speaking, the broadside shot is easy on your bullet.
Once we move to the quartering shots, you need to consider if your bullet is fit for purpose.
Let’s see why.
The front quartering shot
Remember the bone structure triangle from the broadside shot?
It was our friend then, creating a relatively free passage for a double lung shot.
If you take a shot at a quartering animal, you need to think about the bullet’s path as it travels through the animal.
I once shot a female red deer with my 7 by 64 (similar to a 280 Remington).
I used a tipped bullet designed for deer.
I thought I was home free as the deer went down from the shot.
As the guide congratulated me on a job well done, the deer started moving and got up on all four.
Fortunately, I’d reloaded immediately after the shot, so I was ready to shoot again.
And I anchored the deer for good.
When butchering the deer, we found the first bullet perfectly lodged in the shoulder knuckle. It wasn’t a big deer. I used a bullet made for that size of animal. And it left the barrel of my rifle at a reasonable velocity.
This is just one data point, but it emphasizes that a front quartering shot means you must carefully consider your bullet choice.
And it’s not just bone structure you need to consider.
At this angle, you’ll shoot through a fair bit of muscle. Especially on a larger animal.
Please ensure the bullet you use can penetrate all the way to and through the vitals if you decide to take a front quartering shot. Regardless of what distance you choose to shoot.
Enough said.
When you do decide to take a shot, where should you aim?
You want to put your bullet through both lungs.
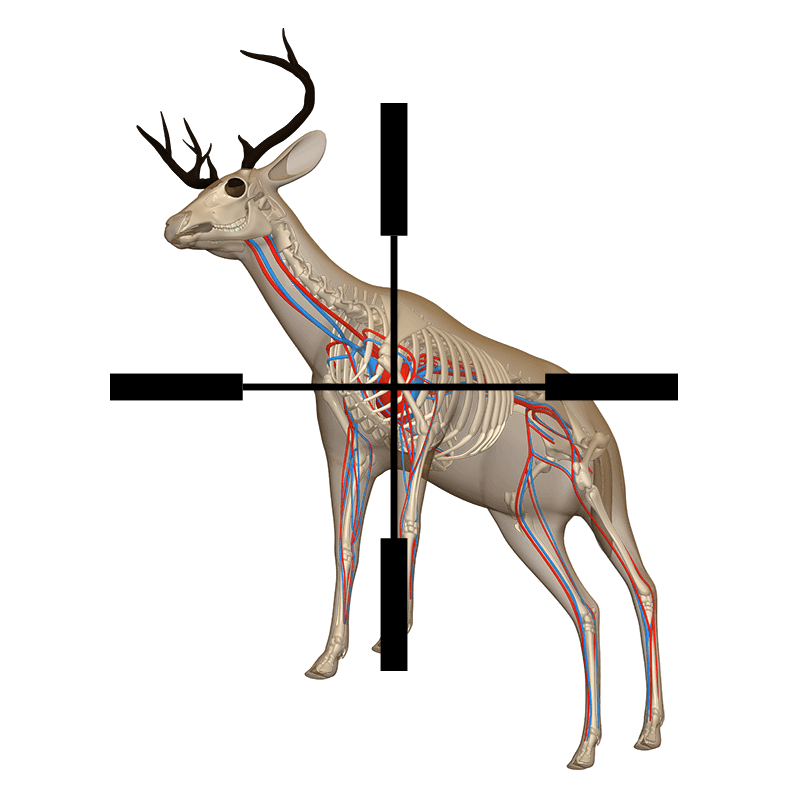
For a 45-degree broadside shot, that path looks like this.

We’ve established you should come up somewhere between 1/3 and 1/2 way up from the animal’s chest.
The exact aiming point depends on how much the animal is quartering.
Here’s a key point to consider.
The heart is offset slightly from the very front of the animal you aim at. So you don’t want to put your vertical post midway between the legs.
Instead, use rule number four.
Shot placement rule #4 – For a 45° front quartering shot, place your vertical post inside the near leg.

That’s your flash card image.
Memorize it. Be ready for action 🙂
Quick question.
Inside the upper leg or lower leg?
Generally speaking, inside the upper part, but it depends on the angle.
And speaking of angles, you must also follow rule number five.
Shot placement rule #5 – Don’t take shots more than 45 degrees off a square broadside.
I’ll explain why when discussing the front and rear quartering shots.
This brings us to the next shot scenario.
The rear quartering shot
With the rear quartering shot, you don’t have the shoulder bone to worry about.
But depending on the angle, you might penetrate the rumen.
I’ll create a separate article with more detail about key organs and shot placement.
All I’ll say here is that the rumen is full of undigested grass.
And it’s a tall order to shoot through.
Shooting through it will also introduce stomach content and bacteria in the body cavity.
That’s something you should try to avoid.
Here’s a diagram showing a 45-degree angle.

It looks like you’re home free.
But in the field, the stomach will most likely be fuller.
And it sits flush with the sides of the animal.
The liver takes up space between the stomach and lungs on the right-hand side, so you might hit it.
On the left-hand side, the stomach takes up all the space. So you’re more likely to hit it when taking on that side.
Combine that with a steeper angle, and you see it’s easy to get in trouble. Just follow rule number five. No shots beyond 45 degrees from a perfect broadside.
I want you to recognize this situation as a potential issue.
Some of the highly frangible bullets that are fantastic for broadside shots at extended ranges will give you trouble if you have to shoot through the rumen.
Bear that in mind.
There is no perfect choice of cartridge and bullet for long and short-range shooting.
Make a choice and be clear on the limitations you have to work with.
With that covered, where should you aim?
Height-wise, you should still refer to rule number two.
Where should you put your vertical post?
Consider rule number six.
Shot placement rule #6 – For a 45° rear quartering shot, place your vertical post inside the far leg.
As discussed, the heart is offset from the front.
So you do the opposite than for a front quartering shot.

That’s your rear quarter flash card.
Look at it before you go to bed at night.
Be ready… 🙂
The front shot
So if there are challenges with the quartering shots, the front shot, straight on, should be easy, right?
I wish.
Your margin of error for significant tissue destruction becomes a lot smaller.
Consider the broadside shot.
You still penetrate both lungs even if you’re a little off your target.
And “both” is the keyword here.
Even if you’re a fair bit off your aiming point.
With a front shot, the further your impact moves from the center of the heart, the less tissue you will destroy.
And veering off, you will only be able to destroy one lung.
Which makes a big difference.
I once tracked an Oryx in South Africa.

Because of a high lung shot that hadn’t done enough damage.
It went down from the shock and then took off.
It took us seven hours to catch up and put it out of it’s misery. More about shock in another article by the way.
Animals can run far if the damage to their lungs isn’t substantial.
There’s no need for you to engineer that kind of situation for yourself.
Here’s an illustration showing how little you have to work with.
It’s the reason the 45-degree rule applies to front quartering shots.
If you go beyond 45 degrees, you start to approach a front shot.
And I recommend that you don’t take this shot unless you have wounded the animal.

By the way, you will notice that it won’t take much head movement before you have a show-stopping object in the bullet path.
And a wounded animal to deal with.
A shot from behind
What about the opposite end?
Shooting the animal up the rear, what some folks refer to as a Texas heart shot.
By the way, I don’t think that’s fair to the good folks and serious hunters in Texas.
But let’s leave that discussion for now.
Here’s the problem with this shot.
You combine the challenges of the rear quartering shot and the front shot.
A limited target area and a great deal of show-stopping plant material.
In my book, you should only use this shot in an emergency.
If you have already wounded an animal. And you need deep penetrating bullets to have any chance of success.
Let me just pause and add one thing.
It may sound like I’ve been preaching stout bullets.
But I haven’t.
What I’m preaching is the right tool for the job.
I will write an article with more detail on cartridge choice and bullet construction.
For now, I will add that in some cases, you want a bullet that expands fast.
You don’t have much distance to work with when you shoot small deer species. So you want a bullet that opens up fast enough to destroy lung and heart tissue before it exits the animal.
And you need the same if you shoot at long ranges.
Shooting uphill and downhill
Maybe you’re hunting from a tree stand.
Or perhaps you’re fortunate enough to hunt in a mountainous or hilly area. Which, by the way, is my favorite environment to hunt.
In that case, you must consider the changes to the aiming point uphill and downhill shooting presents.
Whether you’re shooting up or down, you must consider this.
You are not aiming where you want to hit.
Your goal is to put a bullet straight through the middle of the lungs, as we discussed.
However, your aiming point is some distance from your target, so you must adjust it to ensure the correct bullet path.
It’s worth noting that this is relevant as the shot angle becomes steeper.

Enter rule number seven.
Shot placement rule #7 – Adjust for uphill or downhill shots when the angle exceeds 20 degrees.
So how should you adjust?
Follow rules number eight and nine.
Shot placement rule #8 – If you’re shooting downhill, your aiming point must come up.
Shot placement rule #9 – If you’re shooting uphill, your aiming point must come down.
A little like adjusting open sights back in the day.
Ballistic side note: When shooting uphill or downhill at longer ranges, gravity will have less impact on your bullet. You must combine this effect with the changes to your aiming point.
Downhill broadside
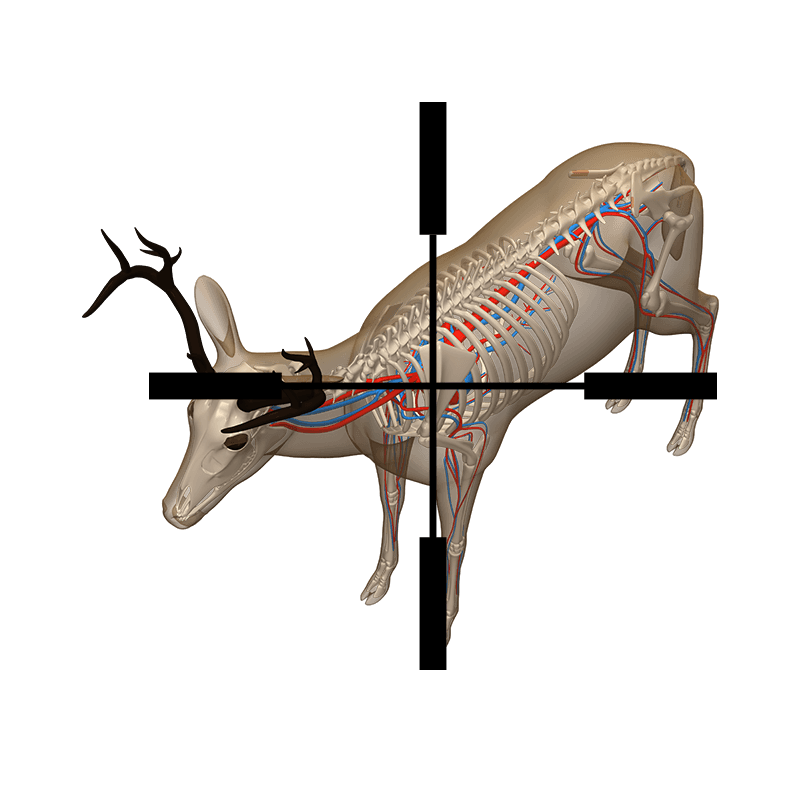
Using the center of the vital triangle, inside the body, as our target, you can see from the diagram that your aiming point changes drastically for steeper angles.
Here’s your flashcard.

Shooting from above, you’ll get much closer to the shoulder blade.
With a bow or light for animal cartridge with a fast expanding bullet, you have to be careful about what you do.
Because your margin of error is getting smaller at that angle.
Uphill broadside
Shooting uphill, you can see how you have to aim further down the body than a regular broadside shot.

This is a relatively acute angle for shooting uphill, and I’ve chosen it to exaggerate and show you the difference.
Consider the 20 degrees as the point when you need to adjust.
And use this diagram as your flash card.
Combined angles
Let’s have some fun.
Let’s combine the quartering shots with the up and downhill shots.
No new rules.
The current ones still apply.
Front quartering downhill
For the front quartering and above version, you will still have to consider the bone structure.

More the shoulder blade than the shoulder knuckle.
Depending on the deer’s size, the quartering shot warnings still apply.
And if you’re a bowhunter, you need to consider if the shoulder bone or blade can deflect or stop your arrow.
Front quartering uphill
As with regular up and downhill shots, visualize the center of the vital triangle inside the body. Offset a bit between the front legs.
Here’s your flashcard.

Rear quartering downhill
This is a typical tree stand shot.
The animal is walking away from you and is less likely to spot any movements.
Rule number five still applies.
More than 45 degrees, and you get in trouble.
By the way, notice how your crosshairs are much closer to the spine. But if you should shoot close to it, you’ll still penetrate both lungs.
Hunting lots from treestands?
Then tattoo this flashcard on the inside of your left eyelid…

Rear quartering uphill
Granted, this is an unusual shot unless you encounter an animal on a ledge on a hill above you.
I once stalked a group of red deer along the base of a ridge line.
They’d moved up the ridge as I turned a corner, and I had a safe and clear uphill shot like this.
I was on flat ground, and the deer left before I could get to a knoll to take an uphill shot.

Now you know where to aim.
Don’t come back with silly excuses like mine.
Bring back a monster rack!
Wow.
Did you ever imagine you could have so much fun with deer shot placement diagrams?
Well, now you know.
Here’s a serious note.
Remember the duty we have as hunters to be effective.
We owe it to those magnificent deer we admire, hunt, harvest, and care for.
Practice your craft as a hunter.
Invest in understanding the behaviors and anatomy of the deer.
And know the capability and limitations of yourself and your equipment.
Memorize the scenarios and shot placement diagrams.
And use the nine rules to help you along the way.
As a reminder, here are the rules.
- Use the double lung shot for fast and reliable killing.
- For horizontal shots, place your horizontal post between ⅓ and ½ up the deer’s body.
- For broadside shots, place your vertical post on the center of the front leg.
- For a 45° front quartering shot, place your vertical post inside the near leg.
- Don’t take shots more than 45 degrees off a square broadside.
- For a 45° rear quartering shot, place your vertical post inside the far leg.
- Adjust for uphill or downhill shots when the angle exceeds 20 degrees.
- If you’re shooting downhill, your aiming point must come up.
- If you’re shooting uphill, your aiming point must come down.
By the way, I have a bonus for you. We’ve added the diagrams to the Efficient Hunting e-book.
Click here to go to the download page.


